
1. Įvadas ir pabaigaview
This manual provides essential information for the safe and efficient operation, maintenance, and troubleshooting of your JET JSG-6DC Benchtop Belt and Disc Sander. Please read and understand all instructions before operating the machine.

Figure 1: JET JSG-6DC Benchtop Belt and Disc Sander
The image displays the complete JET JSG-6DC Benchtop Belt and Disc Sander, showcasing its primary components including the belt sanding arm on the left, the disc sanding plate on the right, and the motor housing in the center with the power switch.
Pagrindinės funkcijos:
- Galingas variklis: Equipped with a 1-1/2 HP motor for demanding sanding tasks.
- Dual Sanding Surfaces: Features a 6" x 48" belt and a 12" disc for versatile applications.
- Reguliuojamas diržo rankenos dydis: The belt can be used horizontally, vertically, or at any angle in between.
- Precision Tables: Cast iron tables with miter gauge slots and positive stops at 90 and 45 degrees.
- Efektyvus dulkių surinkimas: Single 4" dust port for effective dust extraction from both sanding surfaces.
- Graphite Platen: Graphite-covered steel platen for cooler operation and extended belt life.
- Lengvas reguliavimas: Dual thumbscrew belt tracking adjustment and quick-release belt tension lever.
2. Saugos instrukcijos
Visada laikykitės pagrindinių saugos priemonių, kad sumažintumėte gaisro, elektros smūgio ir sužalojimo riziką naudodami elektrinius įrankius. Išsaugokite šį vadovą ateičiai.
Bendrosios saugos taisyklės:
- Darbo sritis: Laikykite darbo vietą švarią ir gerai apšviestą. Netvarkingos arba tamsios vietos sukelia nelaimingus atsitikimus.
- Elektros sauga: Do not expose power tools to rain or wet conditions. Avoid body contact with grounded surfaces.
- Asmeninis saugumas: Always wear eye protection. Use hearing protection when operating the sander. Wear appropriate clothing; avoid loose clothing, jewelry, and long hair that can get caught in moving parts.
- Mašinos veikimas: Do not force the tool. Use the correct tool for your application. Ensure the power switch is in the OFF position before connecting to power.
- Priežiūra: Prieš atlikdami bet kokius reguliavimus, keisdami priedus arba laikydami įrankį, atjunkite kištuką nuo maitinimo šaltinio.
- Dulkių surinkimas: Always connect the sander to a dust collection system to minimize airborne dust and maintain a clear workspace.
3. Komponentai ir valdikliai
Familiarize yourself with the various parts of the sander before operation.
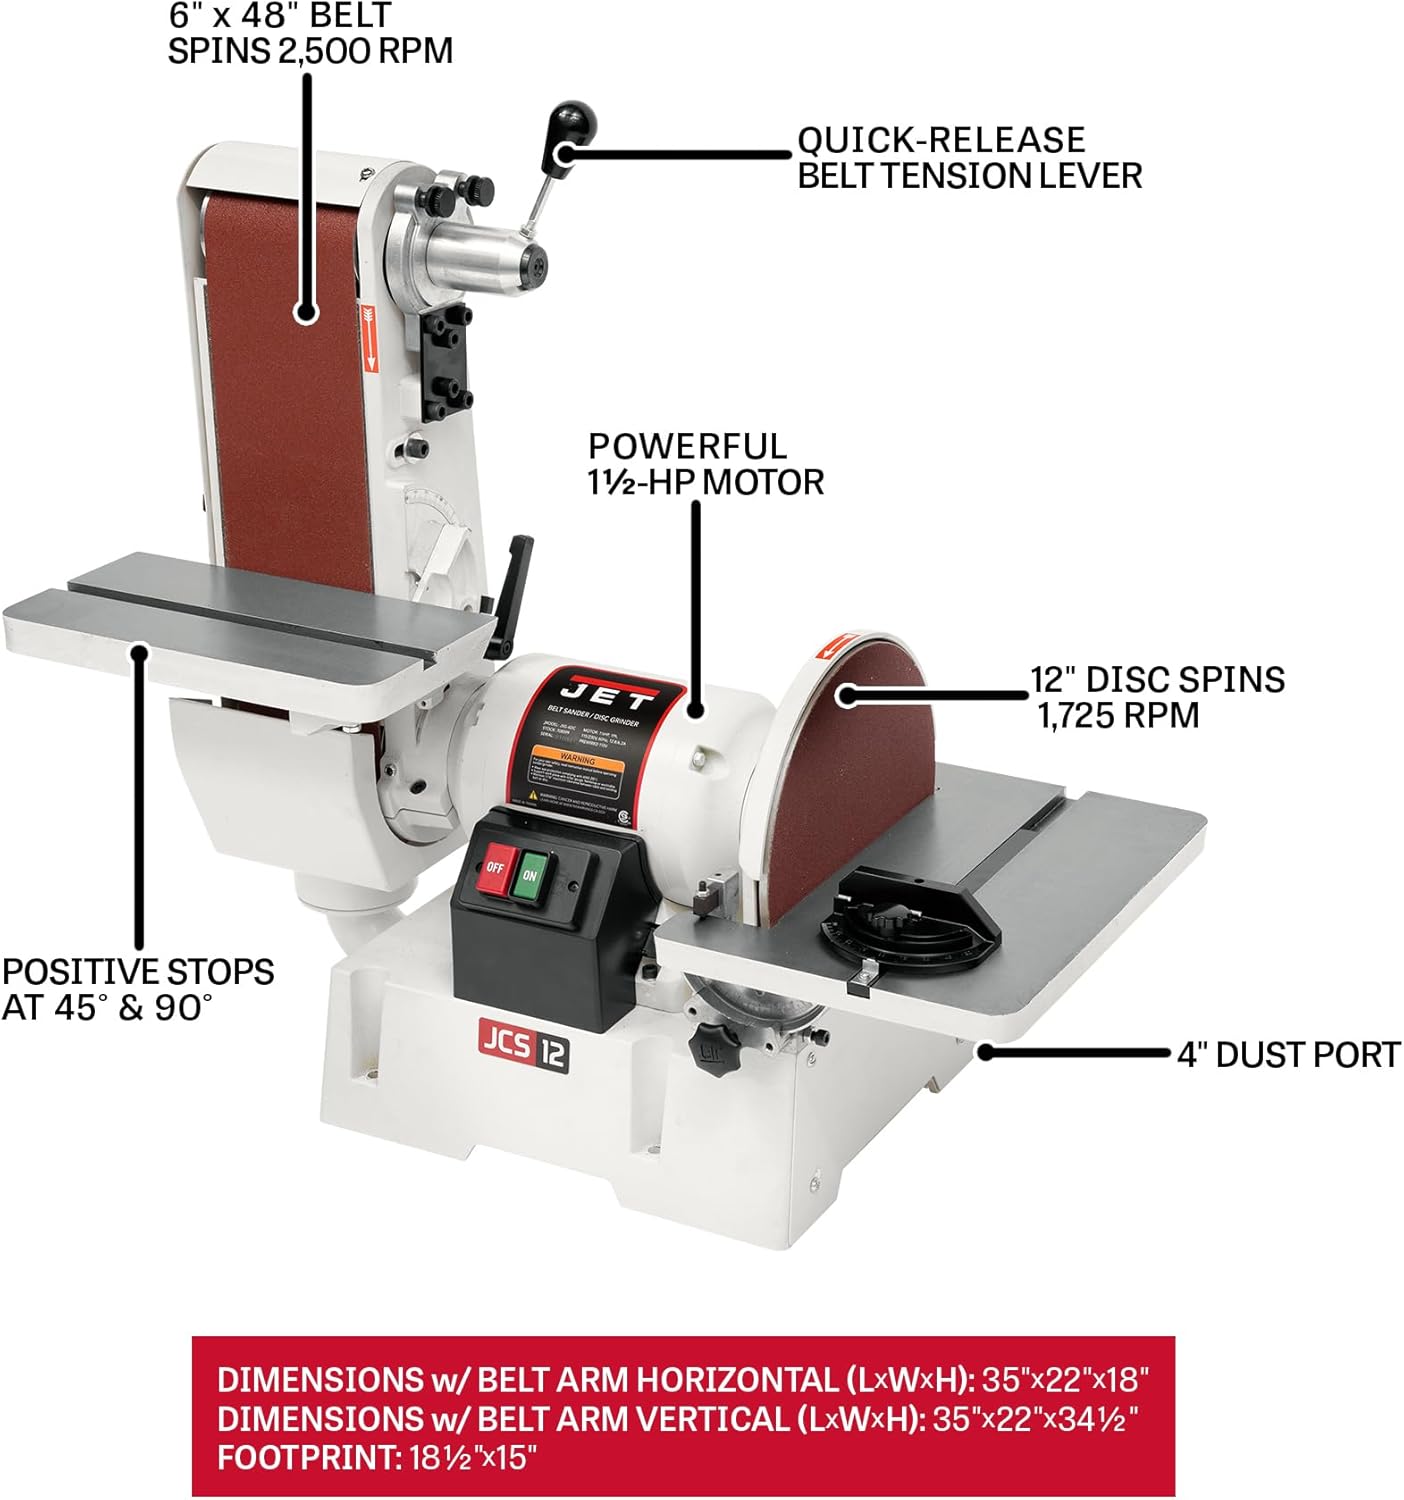
Figure 2: Key Components of the JSG-6DC Sander
This diagram illustrates the main components of the sander, including the 6" x 48" belt, 12" disc, 1-1/2 HP motor, quick-release belt tension lever, dual thumbscrew belt tracking adjustment, positive stops at 45° & 90°, and the 4" dust port.
- Diržo šlifavimo rankena: Holds the 6" x 48" abrasive belt. Can be adjusted for horizontal, vertical, or angled sanding.
- Disc Sanding Plate: The 12" diameter disc for flat sanding operations.
- Work Tables: Two precision-ground cast iron tables, one for the belt and one for the disc, with miter gauge slots.
- Skersinis matuoklis: Used with the work tables for accurate angle sanding.
- Maitinimo jungiklis: ON/OFF switch located on the motor housing.
- Dulkių prievadas: 4-inch diameter port for connecting to a dust collection system.
- Diržo sekimo reguliavimas: Dual thumbscrews for precise alignment of the sanding belt.
- Diržo įtempimo svirtis: Quick-release lever for easy belt changes.
4. Sąranka ir surinkimas
Išpakavimas ir patikrinimas:
Carefully remove the sander and all components from the packaging. Inspect for any shipping damage. Report any damage immediately to your dealer.
Vieta:
Place the sander on a sturdy, level workbench or an optional stand. Ensure adequate space around the machine for safe operation and material handling.
Elektros jungtis:
- The JSG-6DC is prewired for 115V operation. It can be rewired for 230V by a qualified electrician if needed.
- Įsitikinkite, kad maitinimo šaltinis atitinka tūrįtage requirements of the sander.
- Connect the sander to a grounded outlet.
Dust Collection System Connection:
Connect a 4-inch dust collection hose to the dust port located at the rear of the sander base. Proper dust collection is crucial for safety and machine longevity.

Figure 3: 4-Inch Dust Port
Iš arti view of the 4-inch dust port, designed for connecting to an external dust collection system to manage sanding debris.
5. Operacija
Paleidimas ir sustojimas:
- To start the sander, press the green "ON" button.
- To stop the sander, press the red "OFF" button.
Using the Belt Sander:
- Diržo rankenos reguliavimas: The belt arm can be positioned from horizontal to vertical. Loosen the locking knob, adjust the arm to the desired angle, and tighten the knob securely.
- Diržo sekimas: Use the dual thumbscrew belt tracking adjustment to ensure the belt runs centrally on the rollers. Adjust while the sander is running (briefly) until the belt tracks correctly.
- Ruošinio atrama: Utilize the belt work table for supporting your workpiece. The table can be adjusted for angle sanding.
- Šlifavimo technika: Apply light, even pressure. Move the workpiece smoothly across the belt to prevent uneven sanding and overheating.
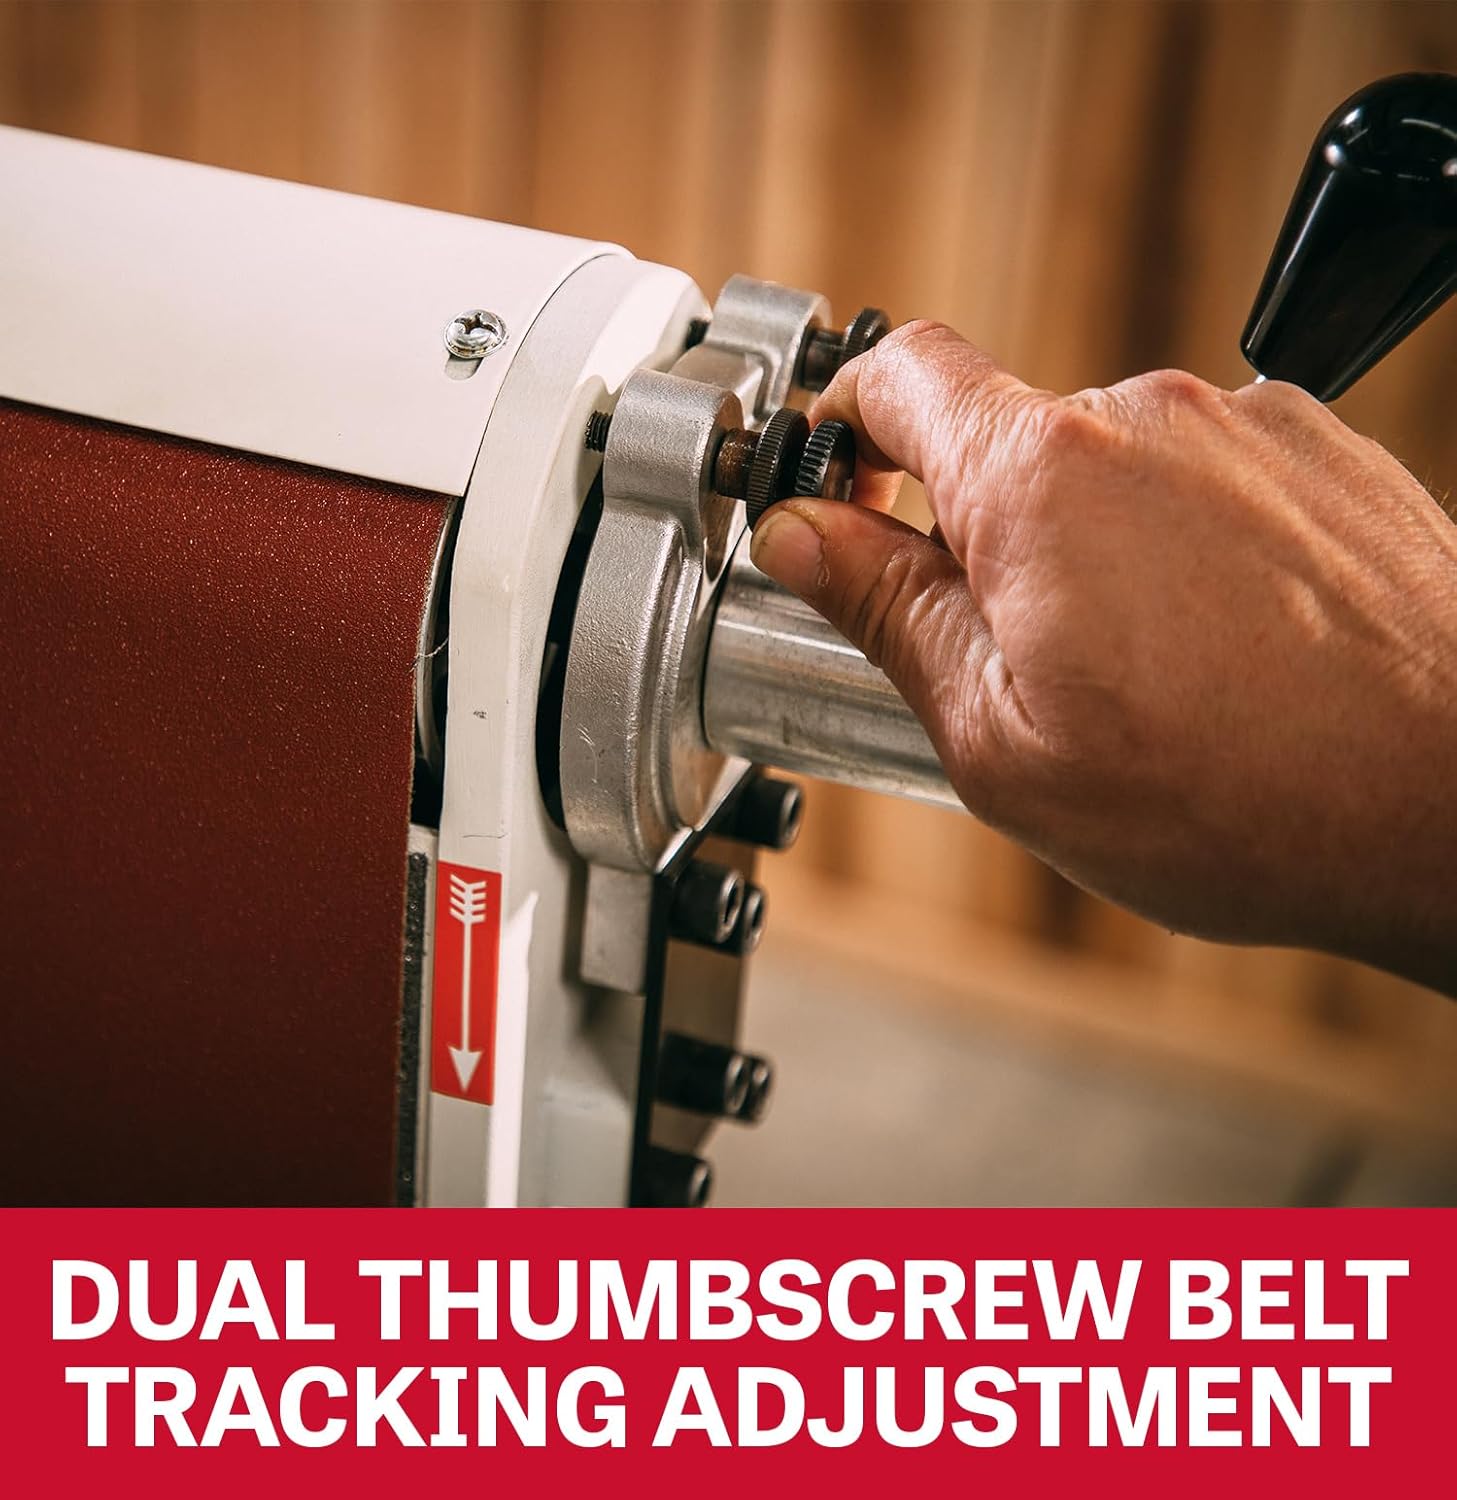
Figure 4: Dual Thumbscrew Belt Tracking Adjustment
A close-up of the dual thumbscrews used for precise adjustment of the sanding belt's tracking, ensuring it stays centered during operation.

Figure 5: Preset Stops for Work Tables
This image shows the mechanism for setting the work tables with positive stops at 90 and 45 degrees, facilitating accurate angle sanding.
Using the Disc Sander:
- Work Table Adjustment: The disc work table can be tilted and locked at various angles, with positive stops at 90 and 45 degrees.
- Skersinis matuoklis: Insert the miter gauge into the table slot for precise angle sanding on the disc.
- Šlifavimo technika: Always sand on the downward-rotating side of the disc (left side when facing the disc) to prevent the workpiece from being thrown.

Figure 6: Precision-Ground Cast Iron Tables
A view of the robust cast iron work tables, highlighting their precision-ground surface for stable and accurate workpiece support during sanding.
6. Priežiūra
Reguliarus techninis aptarnavimas užtikrina optimalų našumą ir pailgina šlifuoklio tarnavimo laiką. Prieš atlikdami bet kokią techninę priežiūrą, visada atjunkite maitinimą.
Valymas:
- After each use, clean dust and debris from the machine, especially around the motor vents, belt, and disc areas.
- Use compressed air or a brush. Do not use solvents that may damage plastic parts.
Diržo keitimas:
- Atjunkite maitinimą.
- Release the quick-release belt tension lever.
- Remove the old belt and install the new 6" x 48" belt, ensuring the directional arrow on the belt matches the arrow on the machine.
- Re-engage the tension lever and adjust belt tracking.
Disko keitimas:
- Atjunkite maitinimą.
- Remove the quick-lock dust cover for access to the disc.
- Peel off the old adhesive-backed 12" sanding disc.
- Clean the disc plate thoroughly before applying a new disc.
- Align and firmly press the new disc onto the plate.

Figure 7: Graphite-Covered Steel Platen
Iš arti view of the graphite-covered steel platen, which helps reduce friction and heat buildup, extending the life of the sanding belt.
7. Problemų sprendimas
Šiame skyriuje aptariamos dažniausiai pasitaikančios problemos, su kuriomis galite susidurti naudodami šlifuoklį.
| Problema | Galima priežastis | Sprendimas |
|---|---|---|
| Sanderis neužsiveda | Nėra elektros, sugedęs jungiklis, suveikė grandinės pertraukiklis. | Check power connection, wall outlet, circuit breaker. Inspect switch for damage. |
| Belt tracks unevenly | Incorrect belt tracking adjustment, worn belt. | Adjust belt tracking using thumbscrews. Replace worn belt. |
| Per didelė vibracija | Loose components, unbalanced disc, worn bearings. | Check all fasteners. Ensure disc is properly seated. Contact service if bearings are suspected. |
| Prastas dulkių surinkimas | Clogged dust port/hose, inadequate dust collector. | Clear obstructions from dust port and hose. Ensure dust collector is operating efficiently. |
| Sander bogs down under load | Overloading, dull abrasive, incorrect voltage. | Reduce pressure on workpiece. Replace abrasive belt/disc. Verify correct voltage tiekimas. |
8. Specifikacijos
| Specifikacija | Detalė |
|---|---|
| Modelio numeris | JSG-6DC |
| Dalies numeris | 708599 |
| Variklis | 1-1/2 HP, 115/230V, 1Ph (prewired 115V) |
| Ampįtampa (115 V) | 12.8 Amps |
| Diržo dydis | 6" x 48" |
| Juostos greitis | 2,500 SFPM (Surface Feet Per Minute) |
| Disko skersmuo | 12 colių |
| Disko greitis | 1,725 aps./min |
| Bendri matmenys (I x P x A) | 35" x 22" x 34.5" (with belt arm vertical) |
| Svoris | 215 svaro |
| Medžiaga | Ketaus, Plieno |
| Included Abrasives | 60 Grit Belt, 60 Grit Disc |

Figure 8: Belt and Disc Speeds
This image highlights the operational speeds of the sander: the belt spins at 2,500 SFPM and the disc spins at 1,725 RPM.
9. Garantija ir palaikymas
Informacija apie garantiją:
The JET JSG-6DC Benchtop Belt and Disc Sander is covered by a 5 metų garantijaŠi garantija taikoma medžiagų ir gamybos defektams, atsiradusiems įprasto naudojimo ir priežiūros sąlygomis.

Figure 9: JET 5-Year Warranty
The image displays the official JET 5-Year Warranty logo, indicating the product's coverage period.
For full warranty details, terms, and conditions, please refer to the official JET websvetainėje arba susisiekite su klientų aptarnavimo tarnyba.
Klientų aptarnavimas:
For technical assistance, parts, or service inquiries, please contact JET customer support. Have your model number (JSG-6DC) and serial number ready when contacting support.
Aplankykite pareigūną JET Store on Amazon daugiau informacijos ir produktų priedų.