
ECS Elitegroup P4M800-M7
ECS P4M800-M7 Motherboard User Manual
Model: P4M800-M7
Įvadas
This manual provides detailed instructions for the installation, operation, and maintenance of the ECS P4M800-M7 motherboard. The P4M800-M7 is designed to support Socket LGA775 Intel Pentium 4 / Pentium D / Celeron D Processors with FSB 800/533 MHz and Hyper-Threading Technology.
Key features include 64-bit support, FSB 800MHz, RAID0, RAID1, and Serial ATA capabilities.
Produktas baigtasview

Figure 1: ECS P4M800-M7 Motherboard Layout. This image displays the main components of the motherboard, including the CPU socket (LGA 775), two DDR RAM slots, PCI and AGP expansion slots, and various I/O ports.
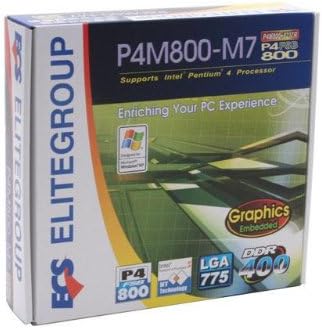
Figure 2: ECS P4M800-M7 Retail Box. The product packaging indicates support for Intel Pentium 4 processors, embedded graphics, and DDR400 memory, along with the LGA 775 socket type.
Sąranka ir diegimas
Follow these steps for proper installation of the ECS P4M800-M7 motherboard into your computer system.
1. Paruoškite savo sistemą
- Įsitikinkite, kad jūsų maitinimo šaltinis yra atjungtas nuo sieninio lizdo.
- Iškraukite statinę elektrą paliesdami įžemintą metalinį objektą.
2. Įdiekite procesorių
- Atidarykite procesoriaus lizdo svirtį.
- Carefully align the CPU (Intel Pentium 4 / Pentium D / Celeron D) with the socket, ensuring the notches match.
- Švelniai įkiškite procesorių į lizdą. Nespauskite jėgos.
- Uždarykite lizdo svirtį, kad pritvirtintumėte procesorių.
- Apply a thin layer of thermal paste to the CPU surface.
- Įdiekite procesoriaus aušintuvą pagal gamintojo instrukcijas.
3. Install Memory Modules
The motherboard supports DDR memory. Insert DDR modules into the available memory slots (2 slots).
- Atidarykite spaustukus abiejuose DIMM lizdo galuose.
- Sulygiuokite atminties modulį su lizdu, užtikrindami, kad modulio įpjova sutaptų su lizdo rakteliu.
- Tvirtai spauskite abu modulio galus, kol spaustukai užsifiksuos vietoje.
4. Sumontuokite pagrindinę plokštę
- Install standoffs in your PC case that align with the motherboard's mounting holes.
- Carefully place the motherboard onto the standoffs, aligning the I/O shield with the case opening.
- Pritvirtinkite pagrindinę plokštę varžtais.
5. Prijunkite maitinimą ir periferinius įrenginius
Connect the 20-pin ATX main power connector and the 4-pin ATX 12V power connector from your power supply to the motherboard. Connect SATA and IDE devices, front panel connectors, and expansion cards as needed.
Naudojimo instrukcijos
Once the motherboard is installed and all components are connected, you can proceed with system operation.
1. Pradinis paleidimas
After connecting the power supply and monitor, power on your system. The system should display the BIOS POST screen. Press the designated key (usually DEL or F2) to enter the BIOS setup utility.
2. BIOS konfigūracija
In the BIOS, you can configure various system settings, including boot order, date/time, and hardware parameters. Refer to the BIOS section of the full manual for detailed settings. Save changes and exit the BIOS to continue.
3. Operacinės sistemos diegimas
Insert your operating system installation media (e.g., Windows CD/DVD) and follow the on-screen prompts to install the OS. Ensure all necessary drivers (chipset, audio, network, graphics) are installed after the OS installation for optimal performance. Drivers are typically provided on a CD with the motherboard or can be downloaded from the ECS Elitegroup websvetainę.
Priežiūra
Tinkama priežiūra užtikrina jūsų pagrindinės plokštės ilgaamžiškumą ir stabilų veikimą.
- Dulkių šalinimas: Reguliariai valykite dulkes iš kompiuterio korpuso vidaus, ypač nuo radiatorių ir ventiliatorių, naudodami suslėgtą orą. Prieš valydami įsitikinkite, kad sistema išjungta ir atjungta nuo elektros tinklo.
- Kabelių valdymas: Ensure internal cables are neatly routed to allow for proper airflow.
- BIOS atnaujinimai: Periodically check the ECS Elitegroup website for BIOS updates. Only update the BIOS if necessary and follow the instructions precisely to avoid system instability.
- Tvarkyklės atnaujinimai: Keep your device drivers updated to ensure compatibility and performance.
Trikčių šalinimas
This section addresses common issues you might encounter with the ECS P4M800-M7 motherboard.
| Problema | Galima priežastis | Sprendimas |
|---|---|---|
| Sistema neįsijungia. | Power cables not connected, faulty power supply, or short circuit. | Check all power connections (20-pin ATX, 4-pin 12V). Test power supply. Ensure no metal objects are touching the motherboard. |
| Monitoriuje nėra vaizdo. | Monitor cable loose, faulty graphics card (if external), or RAM not seated correctly. | Verify monitor cable connection. Reseat RAM modules. If using an external graphics card, ensure it is properly seated and powered. |
| System freezes or crashes. | Overheating, unstable drivers, or faulty RAM. | Check CPU and chipset temperatures. Update drivers. Test RAM modules individually. |
| Operacinė sistema nerasta. | Incorrect boot order in BIOS, or hard drive not detected. | Enter BIOS and set the correct boot order. Check SATA/IDE cable connections to the hard drive. |
Specifikacijos
| Funkcija | Detalė |
|---|---|
| Gamintojas | ECS |
| Modelio numeris | P4M800-M7 |
| CPU lizdas | LGA 775 |
| Suderinami procesoriai | Intel Celeron D, Intel Pentium 4, Intel Pentium |
| Lustų rinkinio tipas | Intel |
| Galimi atminties lizdai | 2 |
| Palaikomas sistemos magistralės standartas | SATA 3 |
| FSB Support | 800/533 MHz |
| „Hyper-Threading“ technologija | Palaikoma |
| RAID palaikymas | RAID0, RAID1 |
| UPC | 881038001678 |
| Pasiekiama pirmoji data | 5 m. balandžio 2006 d |
Garantija ir palaikymas
For warranty information and technical support, please refer to the documentation included with your purchase or visit the official ECS Elitegroup websvetainėje. Garantijos sąlygos gali skirtis priklausomai nuo regiono ir mažmenininko.
Official ECS Elitegroup Websvetainė: ECS Elitegroup Store on Amazon (Note: This link directs to the brand's store page on Amazon, where further support information might be available.)
Ask a question about this manual
Ask about setup, troubleshooting, compatibility, parts, safety, or missing instructions. Manuals+ will review the question and use this page’s manual context to help answer it.