
1. Įvadas
This manual provides instructions for the installation, operation, and maintenance of your StarTech.com SLIMDVDRW8U2 External Slim USB 2.0 DVD+/-RW Dual Layer Drive. This device allows you to read and write data to DVD and CD media using a standard USB 2.0 connection, offering portability and convenience for laptops and desktop PCs without an internal optical drive.
2. Pakuotės turinys
Patikrinkite, ar jūsų pakuotėje yra šie elementai:
- 1x StarTech.com SLIMDVDRW8U2 External Slim USB 2.0 DVD+/-RW Drive
- 1x USB 2.0 A to B Cable
- 1x naudojimo instrukcija
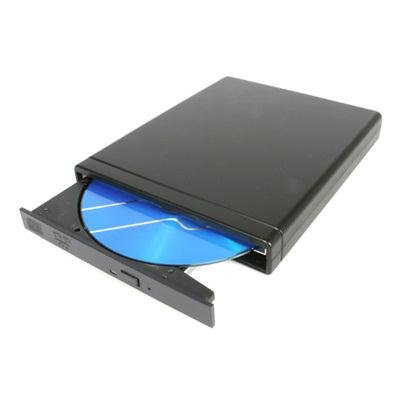
Image: The StarTech.com SLIMDVDRW8U2 external slim DVD+/-RW drive, shown with its sleek black casing and USB port.
3. Sistemos reikalavimai
Before installing the drive, ensure your system meets the following requirements:
- Available USB 2.0 port (or higher, compatible with USB 2.0)
- Operating System: Windows XP/Vista/7/8/10/11, macOS, or Linux (with USB mass storage device support)
- For DVD/CD burning, compatible burning software may be required (not included).
4. Sąranka
Follow these steps to connect and prepare your external DVD drive for use:
- Prijunkite USB kabelį: Plug the USB Type-B connector of the provided USB cable into the corresponding port on the external DVD drive.
- Prisijunkite prie kompiuterio: Plug the USB Type-A connector of the cable into an available USB 2.0 port on your computer (laptop or desktop PC).
- Tvarkyklės diegimas: The drive is plug-and-play. Your operating system should automatically detect and install the necessary drivers. This process may take a few moments.
- Patvirtinimas: Once drivers are installed, the drive will appear as an optical drive in "My Computer" (Windows) or "Finder" (macOS).
5. Naudojimo instrukcijos
This section details how to use your external DVD drive for reading and writing optical media.
5.1. Disko įdėjimas
- Ensure the drive is connected to your computer and powered on (indicated by an LED, if present).
- Press the eject button on the front of the drive. The disc tray will open.
- Carefully place a CD or DVD onto the tray, ensuring it is centered with the label side facing up.
- Gently push the tray back into the drive until it clicks shut. The drive will begin to read the disc.
5.2. Ejecting a Disc
- Software Eject (Recommended): Right-click on the optical drive icon in "My Computer" (Windows) or drag the disc icon to the Trash (macOS) and select "Eject".
- Hardware Eject: Press the eject button on the front of the drive. If the disc is in use, the tray may not open. Ensure no applications are accessing the disc before using the hardware eject button.
5.3. Reading Data from a Disc
Once a disc is inserted and recognized by your operating system, you can access its contents. Double-click the drive icon to browse files, or use media player software to play audio CDs or video DVDs.
5.4. Writing Data to a Disc (Burning)
To write data to a blank CD-R/RW or DVD-R/RW disc, you will need compatible burning software. Many operating systems include basic burning capabilities, or you can use third-party software. Follow the instructions provided with your chosen burning software.
- Insert a blank, recordable disc (CD-R/RW, DVD-R/RW, DVD+R/RW, DVD+R DL).
- Open your burning software and select the type of project (data disc, audio CD, video DVD, etc.).
- Pridėkite files or media you wish to burn to the disc.
- Initiate the burning process. Do not disconnect the drive or interrupt the process until completion.
6. Priežiūra
Proper care ensures the longevity and optimal performance of your drive.
- Išorės valymas: Use a soft, dry, lint-free cloth to wipe the exterior of the drive. Avoid abrasive cleaners or solvents.
- Objektyvo valymas: Do not attempt to clean the internal optical lens manually. Use a specialized CD/DVD lens cleaning disc if necessary.
- Disko tvarkymas: Visada imkite diskus už kraštų. Nelieskite duomenų paviršiaus. Kai nenaudojate, laikykite diskus apsauginiuose dėkluose.
- Saugykla: Laikykite diską vėsioje, sausoje vietoje, apsaugotoje nuo tiesioginių saulės spindulių ir ekstremalių temperatūrų.
- Venkite dulkių: Keep the drive in a clean environment to prevent dust accumulation, which can affect performance.
7. Problemų sprendimas
If you encounter issues with your external DVD drive, refer to the following common problems and solutions:
7.1. Drive Not Recognized by Computer
- Patikrinkite jungtis: Ensure the USB cable is securely connected to both the drive and your computer's USB port.
- Išbandykite kitą USB prievadą: Connect the drive to a different USB port on your computer.
- Iš naujo paleiskite kompiuterį: Kartais paprastas paleidimas iš naujo gali išspręsti aptikimo problemas.
- Patikrinkite įrenginių tvarkytuvę („Windows“): Open Device Manager and look for "DVD/CD-ROM drives." If there's an exclamation mark, try updating or reinstalling the driver.
- Check System Information (macOS): Go to Apple Menu > About This Mac > System Report > USB. Check if the drive is listed.
7.2. Disc Read Errors or Slow Performance
- Clean Disc: Inspect the disc for scratches, smudges, or dirt. Gently clean it with a soft, lint-free cloth from the center outwards.
- Išbandykite kitą diską: Test with a different, known-good disc to determine if the issue is with the drive or the disc itself.
- Objektyvo valymas: Use a specialized CD/DVD lens cleaning disc.
- Resource Usage: Uždarykite kitas daug išteklių reikalaujančias programas, kurios gali eikvoti sistemos išteklius.
7.3. Disc Tray Does Not Open/Close
- Galios patikrinimas: Ensure the drive is properly connected and receiving power.
- Programinės įrangos išstūmimas: Attempt to eject the disc through your operating system's software interface first.
- Rankinis išstūmimas: If the tray is stuck, locate the small emergency eject hole (often near the eject button). Insert a straightened paperclip into the hole and push gently to manually open the tray.
8. Specifikacijos
| Funkcija | Specifikacija |
|---|---|
| Modelio numeris | SLIMDVDRW8U2 |
| Techninės įrangos sąsaja | USB 2.0 |
| Optinės atminties įrašymo greitis | 8 kartus (DVD), 24 kartus (CD) |
| Optinės atminties skaitymo greitis | 8 kartus (DVD), 24 kartus (CD) |
| Aparatinės įrangos platforma | Nešiojamasis kompiuteris, kompiuteris |
| Suderinami įrenginiai | Most personal computers and laptops with a USB 2.0 port |
| Ryšio technologija | USB |
| Formos faktorius | Slim External |
| Prekės svoris | 1.92 svaro (apie 0.87 kg) |
| Maitinimo šaltinis | USB veikia |
9. Garantija ir techninė pagalba
StarTech.com provides a comprehensive warranty for its products. For specific warranty details, please refer to the warranty information included with your product or visit the official StarTech.com websvetainę.
For technical support, troubleshooting assistance, or to download the latest drivers and manuals, please visit the StarTech.com support websvetainėje arba susisiekite su jų klientų aptarnavimo skyriumi. Kontaktinę informaciją paprastai galite rasti ant produkto pakuotės arba oficialioje websvetainę.
Websvetainė: www.startech.com/support