
1. Įvadas
The Velleman MK134 is a mini electronics kit designed to generate the authentic sound of a vintage steam engine, complete with an adjustable steam whistle. This kit allows enthusiasts to build their own sound module, perfect for model railroads, radio plays, stage props, or as a unique gadget. It features adjustable speed and volume controls, and includes an 8 ohm/0.5W miniature speaker for immediate use upon assembly.
This manual provides detailed instructions for the assembly, setup, operation, and maintenance of your MK134 kit. Please read all instructions carefully before beginning assembly.
2. Saugos informacija
This kit involves soldering and working with small electronic components. Please observe the following safety precautions:
- Always work in a well-ventilated area when soldering.
- Use appropriate safety gear, such as safety glasses, to protect your eyes from solder splashes.
- Ensure your soldering iron is on a heat-resistant stand and unplugged when not in use.
- Avoid touching the hot tip of the soldering iron or freshly soldered components.
- Visus komponentus ir įrankius laikykite vaikams ir naminiams gyvūnams nepasiekiamoje vietoje.
- Only use the specified power supply (9V battery). Using an incorrect power source can damage the circuit and pose a safety risk.
- If you are new to soldering, consider practicing on scrap components before assembling the kit.
3. Rinkinio turinys
Before starting assembly, verify that all components are present in your kit. The Velleman MK134 kit typically includes:
- Spausdintinė plokštė (PCB)
- Various electronic components (resistors, capacitors, diodes, transistors, integrated circuits, etc.)
- Miniature speaker (8 ohm/0.5W)
- Steam whistle push button
- Potentiometers for speed and volume adjustment
- Battery clip for 9V battery
- Small wires and connectors
Note: A 9V battery is required for operation and is typically not included in the kit.
4. Surinkimo instrukcijos
Assembly of the Velleman MK134 requires basic soldering skills. Follow the steps below carefully. Refer to the component overlay on the PCB and the component list for correct placement.
4.1 Reikalingi įrankiai
- Soldering iron (25-40W recommended)
- Thin electronic solder (rosin core)
- Small diagonal cutters or flush cutters
- Adatinės replės
- Multimetras (nebūtina, bandymui)
- Apsauginiai akiniai
4.2 General Soldering Tips
- Heat both the component lead and the PCB pad simultaneously.
- Apply a small amount of solder to the heated joint, allowing it to flow evenly.
- Remove the solder, then the iron. The joint should be shiny and cone-shaped.
- Avoid cold solder joints (dull, lumpy) or solder bridges (solder connecting two adjacent pads).
- Trim excess component leads after soldering.
4.3 Assembly Steps (General Order)
- Nurodykite komponentus: Sort and identify all resistors, capacitors, diodes, and integrated circuits. Pay close attention to resistor color codes and capacitor values.
- Solder Smallest Components First: Begin with resistors and diodes, as they are typically the lowest profile. Ensure diodes are oriented correctly (band matches PCB marking).
- Solder Capacitors and Transistors: Proceed with capacitors (electrolytic capacitors have polarity, ensure correct orientation) and transistors.
- Solder Integrated Circuit (IC) Sockets (if provided): If your kit includes an IC socket, solder it first, then carefully insert the IC into the socket, ensuring correct orientation (notch on IC matches notch on socket/PCB).
- Solder Potentiometers and Push Button: Mount and solder the potentiometers (for speed and volume) and the steam whistle push button.
- Connect Speaker: Solder the miniature speaker to the designated pads on the PCB. Observe polarity if indicated.
- Connect Battery Clip: Solder the red wire of the 9V battery clip to the positive (+) terminal and the black wire to the negative (-) terminal on the PCB.
- Vizuali apžiūra: After all components are soldered, carefully inspect the PCB for any cold solder joints, solder bridges, or incorrectly oriented components.
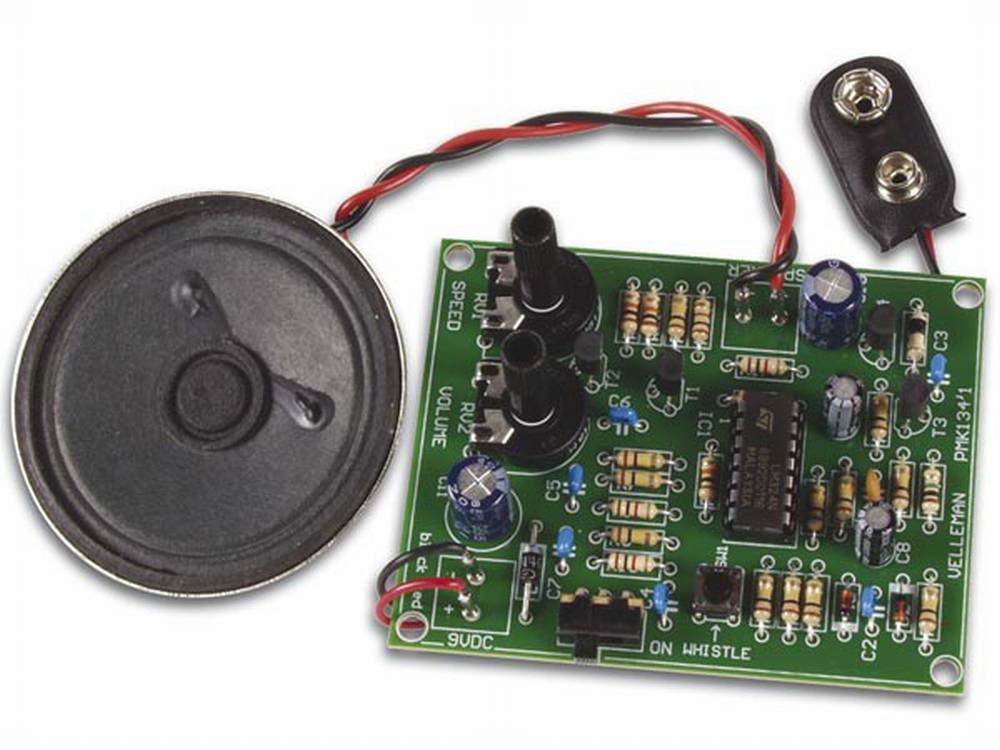
1 pav.: pvz.ample of the Velleman MK134 Steam Engine Sound Generator Mini Kit, showing the circuit board with various electronic components, potentiometers, a push button, and a speaker. This image illustrates the components that need to be assembled and soldered onto the PCB.
5. Sąranka
Once assembly is complete and verified, follow these steps to set up your MK134:
- Įdėkite bateriją: Connect a fresh 9V battery to the battery clip. Ensure a secure connection.
- Pradinis bandymas: With the battery connected, the unit should power on. You may hear a faint sound or a click.
- Reguliuoti garsumą: Turn the volume potentiometer to a mid-range setting.
- Sureguliuokite greitį: Turn the speed potentiometer to a mid-range setting.
6. Naudojimo instrukcijos
Operating the Velleman MK134 is straightforward:
- Steam Engine Sound: Upon power-up, the module will begin generating the characteristic "chuffing" sound of a steam engine.
- Greičio reguliavimas: Rotate the potentiometer labeled "SPEED" (or similar) to increase or decrease the rate of the steam engine sound.
- Garso reguliavimas: Rotate the potentiometer labeled "VOLUME" (or similar) to control the output loudness of the sound.
- Steam Whistle: Press and hold the designated push button to activate the steam whistle sound. Release the button to stop the whistle.
7. Priežiūra
The Velleman MK134 is a low-maintenance device. To ensure its longevity:
- Laikyti švarų: Periodically wipe the circuit board and components with a soft, dry cloth to remove dust.
- Venkite drėgmės: Do not expose the kit to water or high humidity, as this can damage electronic components.
- Akumuliatoriaus priežiūra: Remove the 9V battery if the kit will not be used for an extended period to prevent leakage.
- Elkitės švelniai: Avoid dropping or subjecting the assembled kit to strong impacts.
8. Problemų sprendimas
If you encounter issues with your MK134, try the following troubleshooting steps:
- Nėra garso:
- Check the 9V battery: Ensure it is fresh and correctly connected.
- Verify all solder joints: Look for cold joints or solder bridges, especially around the IC, speaker, and power connections.
- Check component orientation: Ensure diodes, electrolytic capacitors, and ICs are installed with correct polarity/orientation.
- Inspect speaker connections: Ensure the speaker wires are securely soldered.
- Adjust volume potentiometer: Ensure it is not turned all the way down.
- Iškraipytas arba silpnas garsas:
- Patikrinkite akumuliatoriaus tūrįtage: A weak battery can cause distorted sound.
- Inspect speaker: Ensure the speaker cone is not damaged.
- Review solder joints: Poor connections can lead to signal degradation.
- Whistle Not Working:
- Check the push button: Ensure it is correctly soldered and functioning.
- Inspect associated circuit components: Verify soldering and orientation of components near the whistle circuit.
If problems persist after troubleshooting, carefully re-examine your assembly against the kit's schematic (if provided) or contact Velleman support.
9. Specifikacijos
| Funkcija | Specifikacija |
|---|---|
| Modelio numeris | MK134 |
| Maitinimo šaltinis | 9V DC (battery not included) |
| Garsiakalbio išvestis | 8 ohm / 0.5W miniature speaker |
| Garso generavimas | Vintage steam engine sound with whistle |
| Valdikliai | Adjustable speed, adjustable volume, push button for whistle |
| Gaminio matmenys | 2.5 x 12.1 x 20 cm (pakuotės matmenys) |
| Svoris | 4.54 g (kit components) |
| Gamintojas | Velmanas |
10. Garantija ir palaikymas
Velleman kits are designed for educational and hobby purposes. Due to the nature of DIY assembly, specific warranties on assembled kits may vary. Please refer to the packaging or Velleman's official websvetainėje rasite išsamią informaciją apie jūsų regione galiojančią garantiją.
For technical support, assembly questions, or to report missing components, please visit the official Velleman website or contact their customer service department. Have your kit model number (MK134) ready when contacting support.
Velleman Official Websvetainė: www.velleman.eu