
1. Įvadas
Thank you for choosing the Voltcraft VC-11 Digital Multimeter. This portable, Category III, 250V multimeter with a 2000-count display is designed for accurate electrical measurements in various applications. This manual provides essential information for safe operation, proper use, and maintenance of your device. Please read it thoroughly before use and keep it for future reference.
2. Saugos informacija
WARNING: Electrical shock hazard. Improper use of this meter can cause damage, shock, injury, or death. Read and understand this manual before operating the meter.
- Always ensure the meter is in good working condition and the test leads are not damaged.
- Netepkite daugiau nei vardinis tūristage, kaip pažymėta ant skaitiklio, tarp gnybtų arba tarp bet kurio gnybto ir įžeminimo.
- Būkite ypač atsargūs dirbdami su voltages above 25V AC RMS or 35V DC. These voltagtai kelia šoko pavojų.
- Prieš keisdami funkcijas ar diapazonus, visada atjunkite bandymo laidus nuo grandinės.
- Do not operate the meter with the battery cover removed or loosened.
- Adhere to local and national safety codes. Use personal protective equipment (PPE) such as approved safety glasses and electrically insulated gloves.
3. Produktas baigtasview
The Voltcraft VC-11 is a compact digital multimeter featuring a clear LCD display, a rotary function switch, and input jacks for test leads. It is designed for measuring DC/AC voltage, DC current, resistance, and includes diode and continuity test functions.
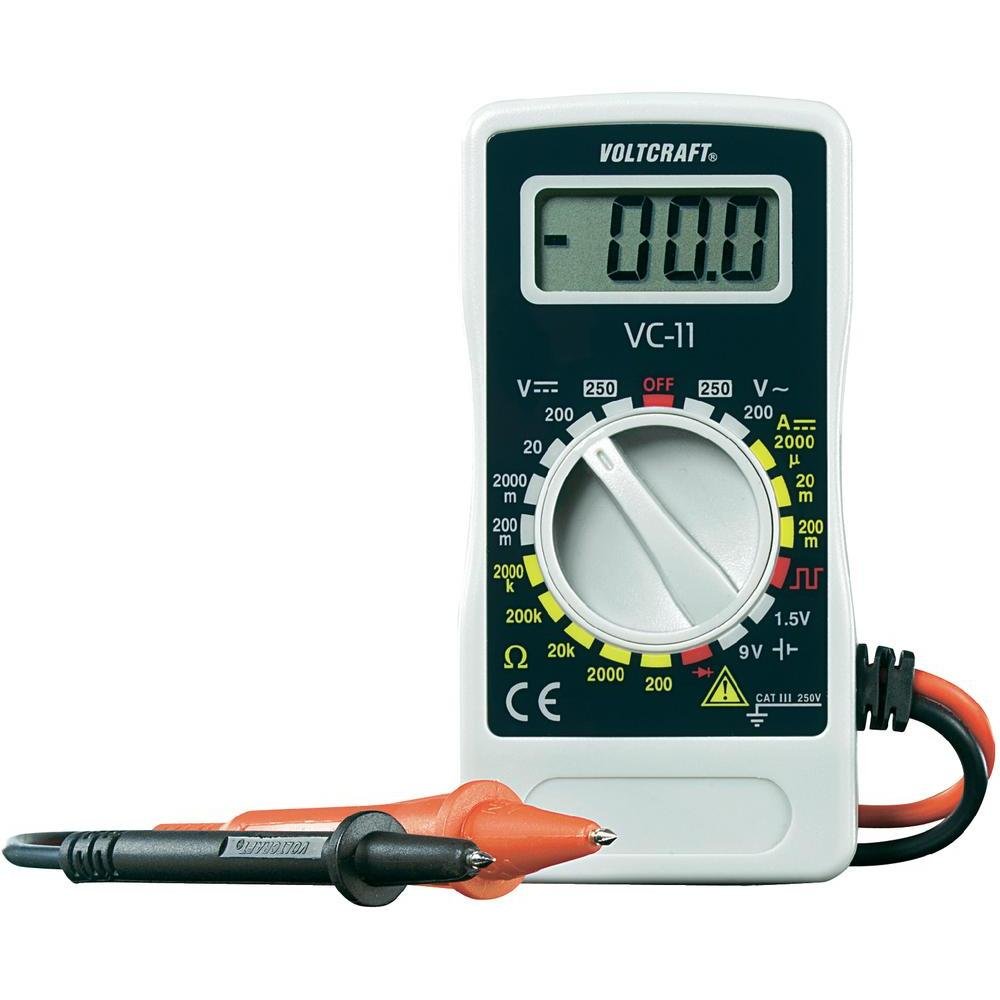
1 pav.: priekis view of the Voltcraft VC-11 Digital Multimeter with test leads connected. This image shows the LCD display, rotary switch, and input terminals.

2 pav.: Kampinis view of the Voltcraft VC-11 Digital Multimeter, highlighting the compact design and the CE marking.

Figure 3: The Voltcraft VC-11 Digital Multimeter shown with its test leads detached, illustrating the input ports.
3.1 Komponentai
- LCD ekranas: Rodo matavimo rodmenis, vienetus ir funkcijų indikatorius.
- Sukamasis jungiklis: Naudojamas matavimo funkcijoms ir diapazonams pasirinkti.
- Įvesties lizdai: Ports for connecting the test leads (COM, VΩmA).
- Bandymo laidai: Red and black leads for connecting to the circuit under test.
4. Sąranka
4.1 Akumuliatoriaus įdėjimas
The Voltcraft VC-11 requires a 9V battery for operation (not included). To install or replace the battery:
- Įsitikinkite, kad multimetras yra IŠJUNGTAS, ir atjunkite visus bandymo laidus.
- Suraskite baterijų skyriaus dangtelį matuoklio gale.
- Atsuktuvu atsukite varžtą, tvirtinantį akumuliatoriaus dangtelį.
- Atsargiai nuimkite dangtelį.
- Prijunkite naują 9 V bateriją prie baterijos spaustuko, stebėdami teisingą poliškumą.
- Įdėkite bateriją į skyrių ir uždėkite dangtelį, pritvirtindami jį varžtu.
4.2 Bandymo laidų prijungimas
Always connect the black test lead to the 'COM' (common) jack. Connect the red test lead to the appropriate input jack based on the desired measurement:
- Dėl ttage (V), Resistance (Ω), Diode, and Continuity measurements, connect the red lead to the 'VΩmA' jack.
- For Current (A) measurements, connect the red lead to the 'VΩmA' jack (for mA range).
5. Naudojimo instrukcijos
Before taking any measurement, ensure the test leads are correctly connected and the rotary switch is set to the desired function and range.
5.1 DC matavimas Voltage (V=)
- Nustatykite sukamąjį jungiklį į norimą nuolatinės srovės įtampątage (V=) range (e.g., 200mV, 2V, 20V, 200V, 250V). If the voltagJei e nežinoma, pradėkite nuo didžiausio diapazono ir mažinkite pagal poreikį.
- Connect the black test lead to the 'COM' jack and the red test lead to the 'VΩmA' jack.
- Prijunkite bandymo zondus lygiagrečiai prie matuojamo komponento arba grandinės.
- Perskaitykite ttage reikšmė LCD ekrane.
5.2 AC matavimas, ttage (V~)
- Nustatykite sukamąjį jungiklį į norimą kintamosios srovės garsumo lygį.tage (V~) diapazonas (pvz., 200 V, 250 V).
- Connect the black test lead to the 'COM' jack and the red test lead to the 'VΩmA' jack.
- Connect the test probes in parallel across the AC source or component.
- Perskaitykite ttage reikšmė LCD ekrane.
5.3 Measuring DC Current (A=)
- Set the rotary switch to the desired DC Current (A=) range (e.g., 2000µA, 20mA, 200mA).
- Connect the black test lead to the 'COM' jack and the red test lead to the 'VΩmA' jack.
- ĮSPĖJIMAS: To measure current, the meter must be connected in series with the circuit. Break the circuit and insert the meter.
- Prijunkite bandymo zondus nuosekliai prie grandinės.
- Skaitykite dabartinę vertę LCD ekrane.
5.4 Varžos (Ω) matavimas
- Prieš matuodami varžą, įsitikinkite, kad grandinė yra atjungta nuo įtampos.
- Set the rotary switch to the desired Resistance (Ω) range (e.g., 200Ω, 2kΩ, 20kΩ, 200kΩ, 2000kΩ).
- Connect the black test lead to the 'COM' jack and the red test lead to the 'VΩmA' jack.
- Prijunkite bandymo zondus prie matuojamo komponento.
- Nuskaitykite varžos vertę LCD ekrane.
5.5 Diodų bandymas
- Įsitikinkite, kad grandinėje nėra įtampos.
- Set the rotary switch to the Diode symbol (usually next to resistance).
- Connect the black test lead to the 'COM' jack and the red test lead to the 'VΩmA' jack.
- Prijunkite raudoną zondą prie diodo anodo, o juodą zondą – prie katodo. Ekrane bus rodomas tiesioginis srovės stipris.tage lašas.
- Reverse the probes. The display should show 'OL' (Overload) for a good diode.
5.6 Tęstinumo testas
- Įsitikinkite, kad grandinėje nėra įtampos.
- Set the rotary switch to the Continuity symbol (usually next to diode/resistance).
- Connect the black test lead to the 'COM' jack and the red test lead to the 'VΩmA' jack.
- Prijunkite bandymo zondus prie grandinės arba komponento.
- If the resistance is below a certain threshold (typically 30-50Ω), the meter will emit an audible beep, indicating continuity.
6. Priežiūra
6.1 Valymas
Nuvalykite skaitiklį reklamaamp šluoste ir švelniu plovikliu. Nenaudokite abrazyvinių medžiagų ar tirpiklių. Prieš naudodami įsitikinkite, kad matuoklis yra visiškai sausas.
6.2 Akumuliatoriaus keitimas
When the battery symbol appears on the LCD display, the 9V battery needs to be replaced. Refer to section 4.1 for battery installation instructions.
7. Problemų sprendimas
| Problema | Galima priežastis | Sprendimas |
|---|---|---|
| Nėra ekrano arba ekranas yra pritemdytas | Išsikrovusi arba išsikrovusi baterija | Pakeiskite 9 V akumuliatorių. |
| Neteisingi rodmenys | Pasirinkta neteisinga funkcija / diapazonas Blogas bandymo laido prijungimas Pažeisti bandymo laidai | Select the correct function and range. Ensure test leads are firmly connected. Inspect and replace damaged test leads. |
| Rodoma „OL“ (perkrova) | Matavimas viršija pasirinktą diapazoną Open circuit (for resistance/current) | Select a higher range. Check for breaks in the circuit. |
8. Specifikacijos
- Prekinis ženklas: VOLTRAFTAS
- Modelio numeris: VC11
- Gamintojas: VOLTRAFTAS
- Produkto svoris: Approximately 9.07 g (without packaging)
- Pakuotės matmenys: 14.8 x 8 x 3.6 cm
- Kategorijos įvertinimas: CAT III 250V
- Ekranas: 2000 Skaičių
- Maitinimo šaltinis: 9 V baterija (nepridedama)
9. Informacija apie garantiją
This product is covered by a standard manufacturer's warranty. Please refer to the warranty card included with your purchase or contact your retailer for specific terms and conditions. The warranty typically covers defects in materials and workmanship under normal use.
10. Pagalba klientams
For technical assistance, troubleshooting, or service inquiries, please contact Voltcraft customer support or your local distributor. Contact information can usually be found on the manufacturer's websvetainėje arba ant produkto pakuotės.