
1. Įvadas
This manual provides instructions for the installation, operation, and maintenance of your Orbit 27954 Pocket Star 4-Station Plus Indoor Sprinkler Controller. This controller is designed to manage residential 24-volt sprinkler systems, offering dual programming capabilities and a rain delay feature.
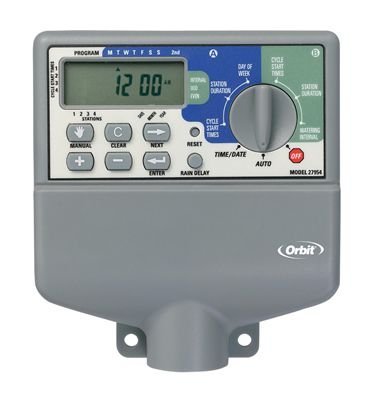
Image 1.1: The Orbit 27954 Pocket Star 4-Station Plus Indoor Sprinkler Controller. This image displays the front panel of the controller, featuring its digital display and control buttons.
2. Saugos informacija
Prieš montuodami ir naudodami, atidžiai perskaitykite visas instrukcijas. Nesilaikant šių instrukcijų, galite sugadinti turtą arba susižaloti.
- This controller is designed for indoor use only. Do not install outdoors or in areas exposed to water.
- Prieš atlikdami bet kokius laidų prijungimo ar techninės priežiūros darbus, įsitikinkite, kad maitinimo šaltinis yra atjungtas.
- All electrical wiring should comply with local codes and regulations. If you are unsure, consult a qualified electrician.
- Nebandykite patys taisyti įrenginio. Visus techninės priežiūros darbus patikėkite kvalifikuotiems specialistams.
3. Sąranka
3.1 Išpakavimas
Carefully remove the controller from its packaging. Verify that all components are present. Retain packaging for future use or disposal.
3.2 Valdiklio montavimas
- Choose a suitable indoor location near a standard 120V AC outlet and away from direct sunlight or extreme temperatures.
- Use the provided mounting template (if applicable) or mark the desired screw locations on the wall.
- Install mounting screws into the wall, leaving the screw heads slightly extended.
- Pakabinkite valdiklį ant varžtų, naudodami rakto skylutes įrenginio gale.
- Pritvirtinkite valdiklį priverždami varžtus.
3.3 Laidai
Svarbu: Prieš prijungdami laidus, atjunkite maitinimą.
- Maitinimo jungtis: Plug the controller's power cord into a standard 120V AC outlet.
- Vožtuvo laidų sujungimas: Connect one wire from each sprinkler valve to a numbered terminal (1, 2, 3, 4) on the controller. Connect the common wire from all valves to the terminal labeled 'C' (Common).
- Jutiklio laidų prijungimas (neprivaloma): If using a rain sensor, connect its wires to the designated sensor terminals. Refer to your sensor's manual for specific wiring instructions.
3.4 Pradinis įjungimas
Once all wiring is complete and secure, connect the power cord to the electrical outlet. The controller display should illuminate, indicating it is powered on.
4. Naudojimo instrukcijos
4.1 Ekrano ir mygtukų supratimas
The controller features a digital display and several buttons for navigation and programming. Familiarize yourself with the 'Program', 'Set', 'Arrow' (up/down), and 'Rain Delay' buttons.
4.2 Dabartinio laiko ir datos nustatymas
- Press the 'Set' button repeatedly until 'Set Time' appears on the display.
- Use the 'Arrow' buttons to adjust the hour, then press 'Set' to move to minutes.
- Repeat for minutes, AM/PM, year, month, and day.
4.3 Laistymo grafikų programavimas
The controller supports dual programs (A and B) for flexible scheduling.
- Pasirinkite programą: Press the 'Program' button to select Program A or B.
- Nustatyti pradžios laikus: Press 'Set' until 'Start Time' appears. Use 'Arrow' buttons to set the desired start time for the first cycle. The controller supports multiple start times per program.
- Nustatyti vykdymo laikus: Press 'Set' until 'Run Time' appears. Use 'Arrow' buttons to set the duration (in minutes) for each station (1-4).
- Nustatykite laistymo dienas: Press 'Set' until 'Watering Days' appears. Use 'Arrow' buttons to select specific days of the week, odd/even days, or interval watering.
4.4 Rankinis valdymas
Norėdami laistyti vieną arba visas zonas rankiniu būdu:
- Press the 'Manual' button (if available, or follow specific manual run instructions in the display menu).
- Select the desired station or 'All Stations'.
- Set the run time using the 'Arrow' buttons.
- The selected station(s) will begin watering immediately.
4.5 Lietaus uždelsimo funkcija
The rain delay feature allows you to pause watering for a set period without losing your programmed schedule.
- Press the 'Rain Delay' button.
- Use the 'Arrow' buttons to select the delay duration (e.g., 24, 48, or 72 hours).
- The controller will pause watering for the selected period and resume the schedule automatically afterward.
5. Priežiūra
5.1 Valymas
Valdymo pulto išorę nuvalykite minkšta,amp šluoste. Nenaudokite abrazyvinių valiklių ar tirpiklių, nes jie gali pažeisti ekraną arbaasing.
5.2 Sezoniniai aspektai
As an indoor controller, the unit is not directly exposed to outdoor elements. However, ensure the indoor environment remains within recommended operating temperatures to prolong its lifespan.
6. Problemų sprendimas
| Problema | Galima priežastis | Sprendimas |
|---|---|---|
| Valdiklio ekranas tuščias. | Nėra galios. | Check power outlet, ensure power cord is securely plugged in. Verify circuit breaker. |
| Purkštuvai neįsijungia. | Incorrect programming, wiring issue, or rain sensor activated. | Verify watering schedule. Check valve wiring connections. Ensure rain sensor is not active or bypassed. |
| Only some sprinklers turn on. | Faulty valve, wiring issue to specific station. | Check wiring for the non-working station. Test the valve manually. |
| Watering occurs at incorrect times. | Incorrect time/date setting or program schedule. | Patikrinkite dabartinį laiką ir datą.view and adjust program start times and watering days. |
7. Specifikacijos
- Modelis: Orbit 27954 Pocket Star 4-Station Plus Indoor Controller
- Prekinis ženklas: Orbita
- Dalies numeris: 27954
- Stočių skaičius: 4
- ttage: 24 voltai (kintamoji srovė)
- Žmogaus sąsajos įvestis: Mygtukai
- Reikalingos baterijos: Nr
- Montavimas: Vidinis
- Savybės: Dual program, Rain delay
- Pakuotės matmenys: 21.84 x 13.46 x 6.6 cm
- Svoris: 226.8 g
8. Garantija ir palaikymas
Dėl garantijos informacijos arba techninės pagalbos kreipkitės į oficialią „Orbit“ svetainę. websvetainėje arba susisiekite su jų klientų aptarnavimo skyriumi. Išsaugokite pirkimo kvitą kaip pirkimo įrodymą.