
1. Įvadas
This manual provides essential instructions for the safe and efficient operation of your Sharp CD-DH950P 240W Mini-Component System. This system features a 5-disc CD changer, a cassette deck, an iPod/iPhone docking station, a USB host for digital audio playback, and an AM/FM tuner. Please read this manual thoroughly before using the system and retain it for future reference.
2. Saugos informacija
- Maitinimo šaltinis: Prijunkite įrenginį tik prie nurodytos įtampos kintamosios srovės lizdotage.
- Vėdinimas: Užtikrinkite tinkamą vėdinimą. Neužblokuokite ventiliacijos angų.
- Vanduo ir drėgmė: Saugokite įrenginį nuo lietaus, drėgmės ar lašančių/taškančių skysčių.
- Šiluma: Laikykite įrenginį atokiau nuo šilumos šaltinių, tokių kaip radiatoriai, šildytuvai, viryklės ar kiti šilumą skleidžiantys prietaisai.
- Valymas: Prieš valydami atjunkite įrenginį nuo elektros lizdo. Naudokite minkštą, sausą šluostę.
- Aptarnavimas: Nemėginkite patys aptarnauti šio gaminio. Visą techninę priežiūrą patikėkite kvalifikuotam aptarnavimo personalui.
3. Pakuotės turinys
Patikrinkite, ar jūsų pakuotėje yra šie elementai:
- Main Unit (CD-DH950P)
- Kairysis garsiakalbis
- Dešinysis garsiakalbis
- Nuotolinio valdymo pultas su baterijomis
- AM kilpos antena
- FM laido antena
- Maitinimo laidas
4. Sąranka
4.1 Garsiakalbių prijungimas
Connect the speaker wires from the main unit to the corresponding terminals on the back of each speaker. Ensure correct polarity (red to red, black to black) for optimal sound quality. The left speaker connects to the left speaker output, and the right speaker to the right speaker output.
4.2 Antenų prijungimas
- FM antena: Connect the supplied FM wire antenna to the FM antenna terminal on the rear of the main unit. Extend the wire for better reception.
- AM antena: Connect the supplied AM loop antenna to the AM antenna terminals on the rear of the main unit. Position the antenna for best reception.
4.3 Maitinimo jungtis
Plug the power cord into the AC IN jack on the rear of the main unit, then plug the other end into a standard AC wall outlet.
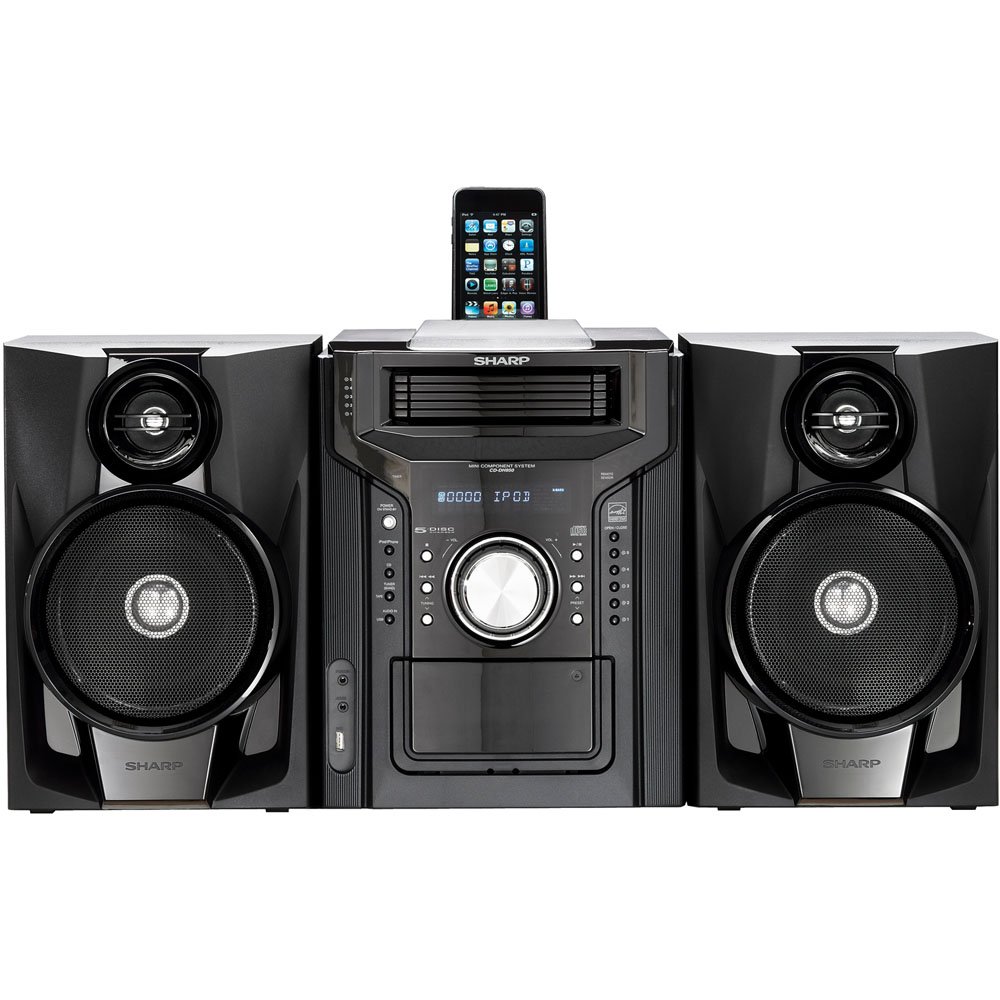
4.3.1 pav. Bendra view of the Sharp CD-DH950P Mini-Component System, showing the main unit flanked by two speakers, with an iPhone docked on top of the main unit.
5. Naudojimo instrukcijos
5.1 Įjungimas / išjungimas ir garsumo valdymas
- Paspauskite GALIA mygtuką priekiniame skydelyje arba nuotolinio valdymo pulte, kad įjungtumėte arba išjungtumėte įrenginį.
- Pasukite TOMAS rankenėlę priekiniame skydelyje arba naudokite VOL +/- mygtukais ant nuotolinio valdymo pulto, kad sureguliuotumėte garso lygį.
5.2 CD atkūrimas
This system features a 5-disc CD changer.
- Paspauskite ATIDARYTI/UŽDARYTI mygtuką, kad atidarytumėte CD dėklą.
- Place up to five CDs on the disc trays, label side up.
- Paspauskite ATIDARYTI/UŽDARYTI dar kartą, kad uždarytumėte dėklą.
- Paspauskite CD mygtuką, kad pasirinktumėte CD funkciją.
- Paspauskite PALEISTI / PAUZĖ mygtuką, norėdami pradėti atkūrimą.
- Naudokite PRALEISTI buttons to navigate between tracks or discs.
5.3 Kasečių grotuvo valdymas
- Paspauskite TAPE OPEN/CLOSE button to open the cassette deck.
- Įdėkite kasetę.
- Paspauskite TAPE mygtuką, kad pasirinktumėte kasetės funkciją.
- Paspauskite ŽAISTI norėdami pradėti atkūrimą.
- To record, ensure the source is selected (e.g., CD, Tuner) and press the ĮRAŠAS button on the cassette deck.
5.4 iPod/iPhone Docking
The system includes a top-mounted docking slot for compatible iPod and iPhone devices (30-pin connector).
- Carefully place your iPod or iPhone into the docking slot.
- The system will automatically switch to iPod/iPhone mode or you may need to press the „iPod“ / „iPhone“ mygtuką.
- Use the system's controls or your device's controls to play music. The device will also charge while docked.
5.5 USB Host Playback
Connect a USB storage device containing MP3 or WMA audio files to the USB port on the front panel.
- Įkiškite USB įrenginį į USB prievadą.
- Paspauskite USB button to select the USB function.
- Use the playback controls to navigate and play files.
5.6 AM/FM imtuvas
- Paspauskite TUNER mygtuką, kad pasirinktumėte AM arba FM radiją.
- Naudokite TUNINGAS +/- mygtukais, kad rankiniu būdu nustatytumėte stotį.
- To auto-scan, press and hold the TUNINGAS +/- mygtukai.
- To store a preset, tune to the desired station, then press ATMINTIS followed by a preset number.
5.7 garso įvestis
Connect an external audio device (e.g., MP3 player, smartphone) to the AUDIO IN jack on the front panel using a 3.5mm stereo cable.
- Connect your device to the AUDIO IN jack.
- Paspauskite GARSO ĮVEDIS mygtuką, kad pasirinktumėte šį šaltinį.
- Valdykite atkūrimą iš prijungto įrenginio.
6. Priežiūra
6.1 Įrenginio valymas
Prietaiso išorę nuvalykite minkšta, sausa šluoste. Nenaudokite abrazyvinių valiklių, vaško ar tirpiklių. Prieš valydami įsitikinkite, kad prietaisas yra atjungtas nuo elektros tinklo.
6.2 CD ir kasečių priežiūra
- Handle CDs by their edges to avoid fingerprints and scratches. Clean discs with a soft, lint-free cloth from the center outwards.
- Store cassette tapes away from strong magnetic fields and direct sunlight.
7. Problemų sprendimas
| Problema | Galima priežastis | Sprendimas |
|---|---|---|
| Nėra galios | Maitinimo laidas neprijungtas; Maitinimo lizdas sugedęs | Įsitikinkite, kad maitinimo laidas yra tvirtai prijungtas; Pabandykite kitą lizdą |
| Nėra garso | Volume too low; Speakers not connected; Incorrect source selected | Padidinkite garsumą; patikrinkite garsiakalbių jungtis; pasirinkite tinkamą įvesties šaltinį |
| CD negroja | Disc inserted incorrectly; Disc is dirty or scratched | Insert disc correctly (label side up); Clean or replace disc |
| Prastas radijo priėmimas | Antenna not positioned correctly; Weak signal | Adjust position of AM/FM antennas; Try auto-tuning or manual fine-tuning |
| iPod/iPhone not charging/playing | Device not properly docked; Device not compatible (e.g., newer connector) | Re-dock the device; Note that this system uses a 30-pin connector, newer devices may require an adapter (not included) |
8. Specifikacijos
- Prekinis ženklas: Aštrus
- Modelis: CD-DH950P
- Bendra išėjimo galia: 240 Watts RMS (85W/ch FTC)
- Garsiakalbio konfigūracija: 2.1 kanalas
- Palaikomi garso formatai: CD, MP3, WMA
- Signalo ir triukšmo santykis: 100 dB
- Suderinami įrenginiai: MP3 Player, Smartphone (via 30-pin dock or USB/Audio In)
- Matmenys (P x P x A): 27.6 x 13.6 x 13.5 colio
- Prekės svoris: 24.4 svaro
- UPC: 074000369863, 074000369290
9. Informacija apie garantiją
This product is covered by a 1-year limited warranty from the date of purchase. Please refer to the warranty card included with your product for full terms and conditions, or contact Sharp customer service for details.
10. Parama
For further assistance, technical support, or service inquiries, please contact Sharp customer service. Contact information can typically be found on the Sharp official websvetainėje arba dokumentuose, pateiktuose kartu su jūsų produktu.