
1. Įvadas ir pabaigaview
The OSD Audio ATM-7 is a sophisticated 7-zone automatic speaker selector designed to distribute amplified audio signals to various zones within a home or commercial space. It allows users to select between two distinct music sources for each designated zone, providing flexible audio management. This passive device is engineered for seamless integration into existing audio systems, offering remote control capabilities for enhanced convenience.
For optimal performance and to prevent potential damage to your amplifier, it is highly recommended to use impedance matching in-wall volume controls in conjunction with the ATM-7, as this unit does not include built-in impedance protection.

Figure 1.1: OSD Audio ATM-7 Speaker Selector and its accompanying remote control, showcasing the front panel and rear connections.
2. Pagrindinės savybės
- 7-Zone Audio Distribution: Platina amplified audio signals to up to seven independent zones.
- Dual Source Selection: Allows selection between two distinct music sources (A or B) in each zone when operating in 2-input mode.
- Nuotolinio valdymo pultas: Includes an IR remote control for convenient operation from a distance of up to 10 meters.
- Front Panel Controls & LEDs: Features status LEDs for Power, Multi-zone, Master/Slave, Zone In/Out Select, In/Out Mode, and Zone Out/In Selector.
- Master-Slave Functionality: A Master-Slave switch on the rear panel enables parallel connection of two ATM-7 units for expanded zone control.
- Atminties funkcija: The remote control includes a backup memory function to retain settings.
- Pasyvus dizainas: A passive device, requiring external impedance matching for ampkeltuvo apsauga.
3. Pakuotės turinys
Išpakuodami patikrinkite, ar visi daiktai yra komplekte ir geros būklės.
- OSD Audio ATM-7 Speaker Selector Unit
- IR nuotolinio valdymo pultas
- Maitinimo adapteris (nuolatinė srovė 12 V 1.5 A)
- External IR Receiver (for remote placement)
- Vartotojo vadovas (šis dokumentas)
4. Saugos informacija
Norėdami užtikrinti saugų darbą ir išvengti žalos, laikykitės šių atsargumo priemonių:
- Maitinimo šaltinis: Naudokite tik pateiktą maitinimo adapterį. Įsitikinkite, kad įtampatage atitinka jūsų vietinį maitinimo šaltinį.
- Vėdinimas: Neužblokuokite ventiliacijos angų. Užtikrinkite pakankamą oro cirkuliaciją aplink įrenginį, kad jis neperkaistų.
- Drėgmė: Do not expose the unit to water, moisture, or excessive humidity. Avoid placing liquids near the device.
- Vieta: Pastatykite įrenginį ant stabilaus, lygaus paviršiaus. Venkite jo statyti šalia šilumos šaltinių ar tiesioginiuose saulės spinduliuose.
- Aptarnavimas: Nebandykite patys atlikti įrenginio techninės priežiūros. Visus techninės priežiūros darbus patikėkite kvalifikuotiems specialistams.
- Varžos suderinimas: As a passive device, the ATM-7 does not provide impedance protection. Always use impedance matching volume controls or ensure your amplifier can handle the combined speaker load to prevent damage to your ampgyvesnis.
5. Sąranka ir diegimas
Follow these steps to connect your OSD Audio ATM-7 speaker selector:
- Išjunkite visą įrangą: Prieš atlikdami bet kokius sujungimus, įsitikinkite, kad jūsų amplifier and all audio sources are powered off and unplugged from the wall outlet.
- Prisijunkite Ampstiprintuvo išėjimas: Connect the speaker output terminals from your amplifier to the "ZONE IN/OUT" terminals on the rear of the ATM-7. The ATM-7 supports two input modes: 2-input (for dual source selection) or 7-input (for individual zone control). Refer to the rear panel diagram for correct wiring.
- Prijunkite garsiakalbius: Connect your speakers to the corresponding "ZONE OUT" terminals on the rear of the ATM-7. Ensure correct polarity (+ to + and - to -) for all connections.
- Install Impedance Matching Volume Controls (Recommended): For optimal performance and amplifier protection, install impedance matching in-wall volume controls between the ATM-7 and your speakers. This is crucial to maintain a safe impedance load for your amplifier, especially when multiple zones are active.
- Prijunkite IR imtuvą: If the ATM-7 unit will be placed out of direct line of sight for the remote control, connect the external IR receiver to the "EXT IR Receiver" port on the rear panel. Position the IR receiver in a location where it can receive signals from the remote.
- Prijunkite maitinimą: Plug the provided DC 12V 1.5A power adapter into the "DC 12V 1.5A" input on the rear of the ATM-7, then plug the adapter into a wall outlet.

Figure 5.1: Rear panel connections of the ATM-7, including speaker terminals, IR receiver port, and power input.

5.2 pav. Išsamus view of the speaker wire terminals on the rear of the ATM-7, showing positive and negative connections for a zone.
6. Naudojimo instrukcijos
The ATM-7 can be operated using the front panel controls or the included IR remote control.
6.1 Priekinio skydelio valdikliai

Figure 6.1: Front panel of the ATM-7, displaying power button, status LEDs, and zone selectors.
- Įjungimo mygtukas: Press to turn the unit On or Off. The "ON" LED indicates power status.
- Multi Zone Enable: Activates or deactivates multi-zone operation.
- MUTE mygtukas: Mutes all active audio outputs.
- Master/Slave Control Select (M/S): Toggles between Master and Slave mode when chaining two ATM-7 units.
- Zone In/Out Select: Toggles individual zones between input and output modes.
- IN/OUT Mode (2 IN / 7 IN): Selects between 2-input mode (allowing selection of Source A or B for each zone) or 7-input mode (where each zone acts as an independent input/output).
- ZONE OUT/IN SELECTOR (ZONE1-ZONE7): Buttons to individually activate or deactivate each of the seven zones. Corresponding LEDs indicate active zones.
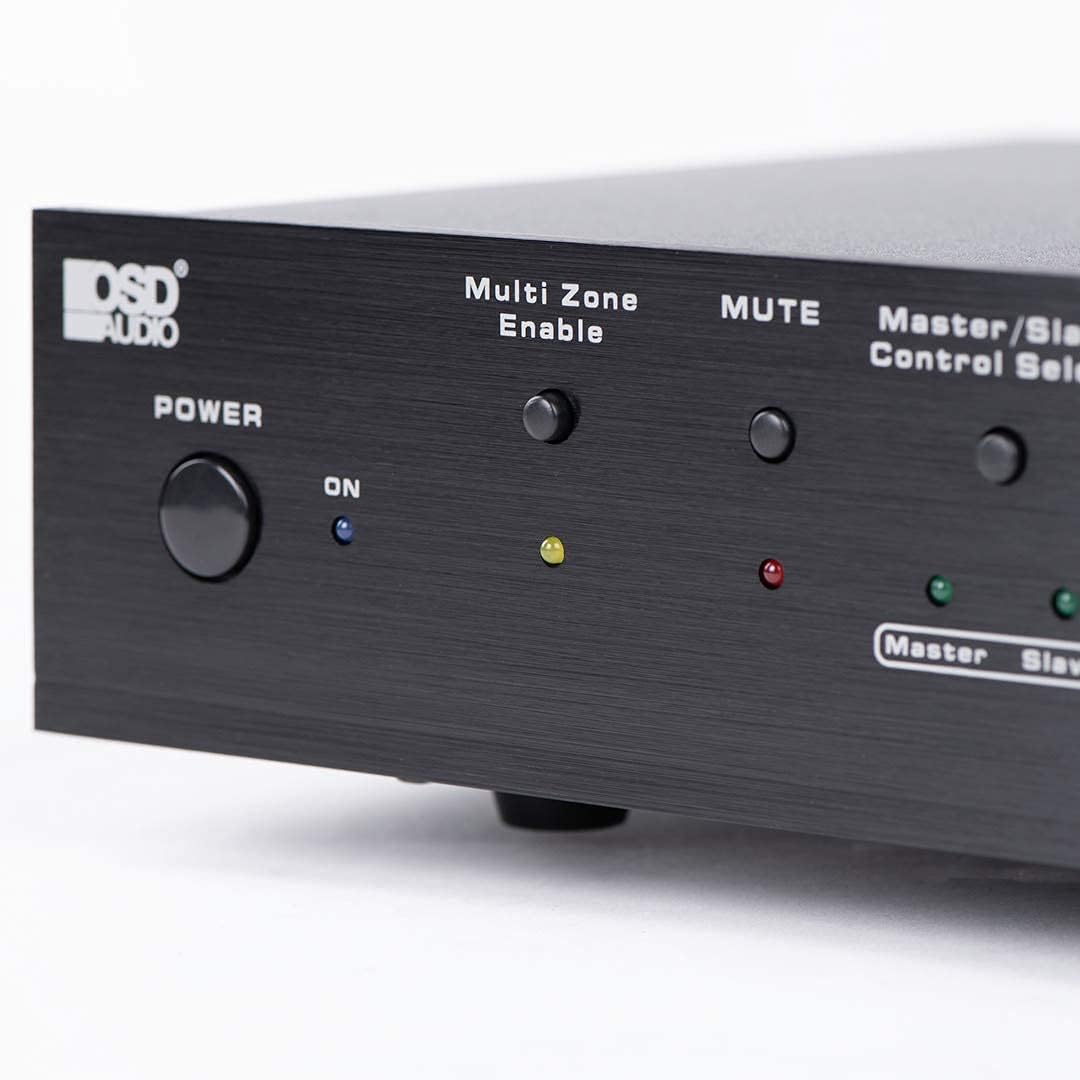
Figure 6.2: Detail of the Power and Multi Zone Enable buttons on the ATM-7 front panel.

Figure 6.3: Detail of the IN/OUT Mode (2 IN / 7 IN) and individual Zone Selector buttons on the ATM-7 front panel.
6.2 IR nuotolinio valdymo pultas
The included IR remote control provides full functionality for the ATM-7. Point the remote towards the unit's IR sensor or the external IR receiver.
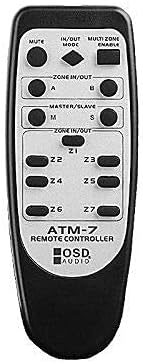
Figure 6.4: The ATM-7 remote control, featuring buttons for mute, input/output mode, master/slave, and individual zone selection.
- Nutildyti: Nutildo visą garso išvestį.
- IN/OUT MODE: Toggles between 2-input and 7-input modes.
- MULTI ZONE ENABLE: Activates or deactivates multi-zone operation.
- ZONE IN/OUT (A/B): In 2-input mode, selects between Source A and Source B for the active zones.
- MASTER/SLAVE (M/S): Selects Master or Slave mode for multi-unit configurations.
- Z1-Z7 Buttons: Individually activate or deactivate each of the seven zones.
The remote control has a backup memory function, retaining the last settings even after power cycling the unit. This allows for integration with smart plugs or switched outlets.
7. Priežiūra
The OSD Audio ATM-7 requires minimal maintenance. Follow these guidelines to ensure longevity:
- Valymas: Išorinį įrenginio paviršių valykite minkštu, sausu skudurėliu. Nenaudokite skystų valiklių ar abrazyvinių cheminių medžiagų.
- Vėdinimas: Reguliariai tikrinkite, ar ventiliacijos angos nėra dulkių ir šiukšlių.
- Jungtys: Ensure all speaker wire connections remain secure and free from corrosion.
8. Problemų sprendimas
| Problema | Galima priežastis | Sprendimas |
|---|---|---|
| No audio output from speakers. |
|
|
| Nuotolinio valdymo pultas neveikia. |
|
|
| Sound distortion or low volume. |
|
|
9. Specifikacijos
| Funkcija | Specifikacija |
|---|---|
| Modelio numeris | ATM-7 |
| Gaminio matmenys | 21.5 x 12 x 5.5 colio |
| Prekės svoris | 7 svaro |
| Spalva | Juoda |
| Jungties tipas | Speaker Wire (Banana Plugs compatible) |
| Kabelio tipas | Garsiakalbio laidas |
| Gamintojas | OSD garsas |
| Maitinimo įvestis | DC 12V 1.5A |
| Remote Operating Distance | Iki 10 metrų |
10. Informacija apie garantiją
Warranty information for the OSD Audio ATM-7 Speaker Selector is typically provided with the product at the time of purchase or can be found on the official OSD Audio website. Please retain your proof of purchase for warranty claims. For detailed terms and conditions, please visit the OSD Audio official websvetainėje arba susisiekite su jų klientų aptarnavimo tarnyba.
11. Pagalba klientams
For technical assistance, troubleshooting, or general inquiries regarding your OSD Audio ATM-7, please contact OSD Audio customer support. You can find contact information, FAQs, and additional resources on the official OSD Audio websvetainė: