
1. Įvadas
Ačiū, kad pirkoteasing the Caliber RMD 068-2 Car Radio USB/SD Player. This manual provides detailed instructions for the installation, operation, and maintenance of your new car radio. Please read this manual thoroughly before using the product to ensure proper functionality and safety. Keep this manual for future reference.
2. Saugos informacija
- Montavimas: Ensure the unit is installed by a qualified technician to prevent damage to the vehicle's electrical system. Incorrect wiring can cause fire or electrical shock.
- Maitinimas: Prijunkite įrenginį tik prie 12 V nuolatinės srovės automobilio akumuliatoriaus su neigiamu įžeminimu.
- Saugikliai: Always replace fuses with new ones of the specified rating. Using an incorrect fuse can cause damage to the unit or vehicle.
- Garsumo lygis: Do not operate the unit at excessively high volume levels, as this may impair your ability to hear external traffic sounds and could be dangerous.
- Valymas: Valymui naudokite minkštą, sausą šluostę. Nenaudokite abrazyvinių valiklių ar tirpiklių.
- Drėgmė: Saugokite įrenginį nuo drėgmės ar vandens.
3. Pakuotės turinys
Prašome patikrinti, ar yra visi daiktai:
- Caliber RMD 068-2 Car Radio Unit
- Nuimamas priekinis skydelis
- ISO laidų laidai
- Montavimo rėmas
- Išardymo raktai (2 vnt.)
- Vartotojo vadovas (šis dokumentas)
4. Produktas baigtasview
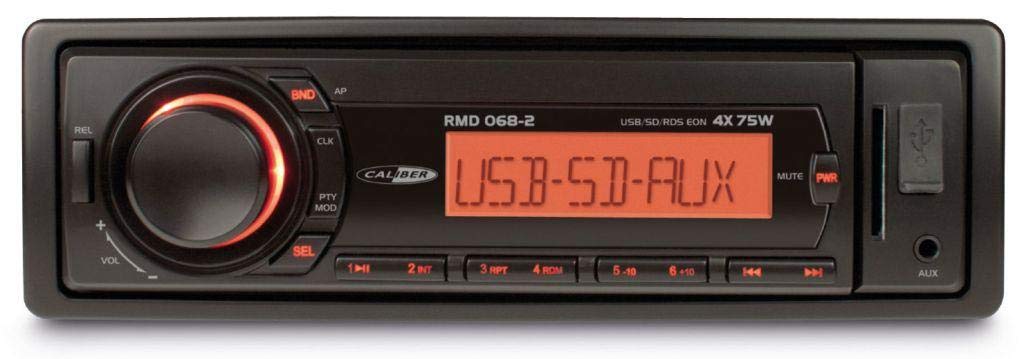
1 pav.: priekis view of the Caliber RMD 068-2 Car Radio. This image shows the main unit with its detachable front panel, including the display, control buttons, USB port, and SD card slot.
4.1 Priekinio skydelio valdikliai
- MAITINIMO/REŽIMO mygtukas: Press to turn on/off. Short press to switch between Radio, USB, SD, AUX modes.
- GARSUMO rankenėlė: Rotate to adjust volume. Press to access audio settings (Bass, Treble, Balance, Fader).
- DISPLAY: Shows current time, radio frequency, track information, etc.
- USB prievadas: Prijunkite USB atmintines, kad galėtumėte atkurti medijos failus.
- SD kortelės lizdas: Insert SD cards for media playback.
- AUX įvestis (3.5 mm lizdas): Prijunkite išorinius garso įrenginius.
- BAND/AMS Button: In radio mode, press to select radio band (FM1, FM2, FM3). Long press for Automatic Memory Store.
- IŠANKSTINIŲ NUSTATYMŲ mygtukai (1–6): Store and recall radio stations. In USB/SD mode, use for direct track selection.
- PLAY/PAUSE mygtukas: Paleisti arba pristabdyti medijos atkūrimą.
- FORWARD/BACKWARD Buttons: Skip tracks or tune radio frequency.
- Išstūmimo mygtukas: Release the detachable front panel.
4.2 Galinės jungtys
The rear of the unit features standard ISO connectors for power and speakers, along with an antenna input.
- ISO Power Connector: For connecting to the vehicle's power supply (constant 12V, ignition 12V, ground).
- ISO Speaker Connector: For connecting to the vehicle's speakers (Front Left, Front Right, Rear Left, Rear Right).
- Antenos įvestis: Automobilio radijo antenos prijungimui.
5. Sąranka
5.1 diegimas
- Atjunkite akumuliatorių: Before starting, disconnect the negative terminal of your car battery to prevent short circuits.
- Pašalinti seną įrenginį: Atsargiai nuimkite esamą automobilio radiją nuo prietaisų skydelio.
- Montavimo rėmo montavimas: Insert the supplied mounting frame into the dashboard opening and bend the tabs to secure it.
- Prijunkite laidus: Refer to the wiring diagram in section 5.2. Connect the ISO wiring harness to the car's wiring and then to the Caliber RMD 068-2 unit. Connect the antenna cable.
- Slide Unit In: Carefully slide the Caliber RMD 068-2 unit into the mounting frame until it clicks into place.
- Iš naujo prijunkite akumuliatorių: Prijunkite neigiamą automobilio akumuliatoriaus gnybtą.
- Pritvirtinkite priekinį skydelį: Pritvirtinkite nuimamą priekinį skydelį prie pagrindinio įrenginio.
5.2 Sujungimo schema
The Caliber RMD 068-2 uses standard ISO connectors. Ensure correct connections as shown below. If your vehicle does not have ISO connectors, an adapter may be required.
| Smeigtukas Nr. | Wire Color (Typical) | Funkcija |
|---|---|---|
| 4 | Geltona | Nuolatinė 12 V įtampa (baterija) |
| 7 | Raudona | Perjungiama 12 V (uždegimas) |
| 8 | Juoda | Žemė |
| 5 | Mėlyna | Antenna Remote Out |
| Smeigtukas Nr. | Wire Color (Typical) | Funkcija |
|---|---|---|
| 1 | Violetinė | Galinė dešinė (+) |
| 2 | Violetinė/Juoda | Galinė dešinė (-) |
| 3 | Žalia | Galinė kairė (+) |
| 4 | Žalia/juoda | Galinis kairysis (-) |
| 5 | Pilka | Priekinė dešinė (+) |
| 6 | Pilka/juoda | Priekinė dešinė (-) |
| 7 | Baltas | Priekinis kairysis (+) |
| 8 | Balta/Juoda | Priekyje kairėje (-) |
Note: Wire colors may vary depending on vehicle manufacturer. Always consult your vehicle's wiring diagram.
6. Naudojimo instrukcijos
6.1 Pagrindinės funkcijos
- Maitinimo įjungimas/išjungimas: Paspauskite MAITINIMAS / REŽIMAS mygtuką, kad įjungtumėte arba išjungtumėte įrenginį.
- Garsumo valdymas: Pasukite TOMAS rankenėlę sukite pagal laikrodžio rodyklę, norėdami padidinti garsumą, prieš laikrodžio rodyklę, norėdami sumažinti.
- Režimo pasirinkimas: Trumpai paspauskite MAITINIMAS / REŽIMAS button to cycle through available modes: Radio (FM), USB, SD, AUX.
- Garso nustatymai: Paspauskite TOMAS knob to enter audio settings. Rotate the knob to select settings like BASS, TREBLE, BALANCE, FADER. Press the knob again to confirm or move to the next setting.
6.2 Radijo valdymas
- Juostos pasirinkimas: Radijo režime paspauskite BAND/AMS mygtuką, norėdami perjungti FM1, FM2 ir FM3 diapazonus.
- Rankinis derinimas: Trumpai paspauskite PIRMYN/ATGAL mygtukais, kad tiksliai sureguliuotumėte dažnį.
- Automatinė paieška: Ilgai paspauskite mygtuką PIRMYN/ATGAL mygtukus, kad automatiškai ieškotų kitos stiprios stoties.
- Parduotuvės išankstiniai nustatymai: Tune to your desired station. Long press one of the IŠANKSTINIS NUSTATYMAS (1–6) buttons until you hear a beep. The station is now stored.
- Atšaukti išankstinius nustatymus: Short press one of the IŠANKSTINIS NUSTATYMAS (1–6) buttons to recall a stored station.
- Automatic Memory Store (AMS): Ilgai paspauskite mygtuką BAND/AMS mygtuką, kad automatiškai nuskaitytų stipriausias stotis ir išsaugotų jas dabartinės juostos iš anksto nustatytuose nustatymuose.
6.3 USB/SD atkūrimas
- Įterpti mediją: Insert a USB flash drive into the USB port or an SD card into the SD card slot. The unit will automatically switch to USB/SD mode and begin playback.
- Leisti / pristabdyti: Paspauskite PALEISTI / PAUZĖ mygtuką, norėdami pristabdyti arba tęsti atkūrimą.
- Praleisti takelį: Trumpai paspauskite PIRMYN/ATGAL mygtukai, norėdami pereiti prie kito arba ankstesnio takelio.
- Greitas atsukimas pirmyn/atgal: Ilgai paspauskite mygtuką PIRMYN/ATGAL mygtukai, skirti persukti takelį į priekį arba atgal.
- Aplankų naršymas: Naudokite NUSTATYMAS 5 ir NUSTATYMAS 6 buttons to navigate between folders on your USB/SD media.
6.4 AUX įvestis
- Prijunkite įrenginį: Connect your external audio device (e.g., smartphone, MP3 player) to the 3.5mm AUX input jack on the front panel using an audio cable.
- Pasirinkite AUX režimą: Paspauskite MAITINIMAS / REŽIMAS button repeatedly until "AUX" is displayed.
- Valdykite atkūrimą: Control playback (play, pause, skip) directly from your connected external device. The car radio will control the volume.
7. Priežiūra
- Įrenginio valymas: Use a soft, dry cloth to wipe the front panel and display. Do not use harsh chemicals, cleaning sprays, or abrasive cloths, as these can damage the surface.
- Nuimamas priekinis skydelis: When detaching the front panel, handle it carefully. Store it in a protective case (if supplied) to prevent scratches or damage.
- USB/SD prievadai: Keep the USB port and SD card slot free from dust and debris.
8. Problemų sprendimas
| Problema | Galima priežastis | Sprendimas |
|---|---|---|
| Nėra galios | Perdegęs saugiklis; Neteisingas laidų sujungimas; Atsilaisvinęs prijungimas | Check and replace fuse; Verify wiring connections (Yellow to constant 12V, Red to ignition 12V, Black to ground); Ensure front panel is securely attached. |
| Nėra garso | Volume too low; Mute activated; Incorrect speaker wiring; Damaged speakers | Increase volume; Check if mute is active; Verify speaker connections; Test with known good speakers. |
| Radijo ryšys prastas | Antenna not connected; Damaged antenna; Weak signal area | Ensure antenna is securely connected; Check antenna for damage; Try tuning to a stronger station or move to a different location. |
| USB/SD negroja | Nepalaikoma file format; Corrupted media; Incorrectly inserted media; Max capacity exceeded | Užtikrinti files are MP3/WMA format; Try a different USB/SD card; Reinsert media correctly; Check media capacity (max 32GB recommended). |
| Front panel cannot be detached | Eject button not fully pressed; Mechanism jammed | Press the EJECT button firmly; Do not force the panel. |
If the problem persists after trying these solutions, please contact your dealer or a qualified service center.
9. Specifikacijos
- Modelis: Caliber RMD 068-2
- Galia: 4 x 75 Watts Max
- Maitinimas: 12V DC (10.8V-15.6V), Negative Ground
- Lydusis saugiklis: 10A
- Palaikomi garso formatai: MP3, WMA (per USB/SD)
- USB/SD Compatibility: Iki 32 GB (FAT32 formatas)
- FM imtuvas: RDS, 18 Presets
- AUX įvestis: 3.5 mm stereo lizdas
- Nuimamas priekinis skydelis: Taip
- Svoris: Apytiksliai 0.95 kg (2.09 svaro)
10. Garantija ir palaikymas
This Caliber product is covered by a warranty in accordance with applicable European laws. For detailed warranty terms and conditions, please refer to the warranty card included with your product or visit the official Caliber website. For technical support, troubleshooting assistance, or service inquiries, please contact your authorized Caliber dealer or the customer service department in your region. Please have your product model number (RMD 068-2) and proof of purchase ready when contacting support.
Note: Specifications and design are subject to change without notice for improvement.