
1. Įvadas
The Lorex LW2731AC1 is an add-on wireless camera designed to expand your existing Lorex 7-Inch LCD Wireless Home Monitoring System. This camera provides additional surveillance capabilities, allowing you to monitor more areas of your home or property. It features day and night viewing, two-way audio communication, and a secure digital wireless signal for reliable performance.
This manual provides essential information for the proper installation, operation, and maintenance of your LW2731AC1 add-on camera.
2. Pakuotės turinys
Patikrinkite, ar pakuotėje yra visi komponentai:
- 1 x Indoor/Outdoor Wireless Camera (LW2731AC1)
- 1 x Power Adapter for Camera
3. Produkto ypatybės
The LW2731AC1 camera is equipped with several features to enhance your monitoring experience:
- VGA (640 x 480) Resolution Sensor: Provides clear video footage.
- 52 laipsnių Viewpakreipimo kampas: Offers a focused field of view for specific areas.
- 40 pėdų IR naktinio matymo funkcija: Enables monitoring in low-light or complete darkness, with black and white video.
- IR supjaustytas filtras: Ensures accurate color reproduction during daylight conditions.
- Advanced Day/Night Mode: Automatically switches between color (day) and black and white (night) modes for optimal clarity.
- Passive Infrared (PIR) Motion Detection: Detects movement to trigger recording or alerts.
- Dvipusis garsas: Built-in microphone and speaker allow for listening and speaking through the camera.
- Secure Digital Wireless Signal: Utilizes Frequency Hopping Spread Spectrum (FHSS) technology for private and secure video and audio transmission.
- Atsparus oro sąlygoms dizainas: Suitable for both indoor and outdoor installation. For outdoor use, install under shelter to protect from direct exposure to rain or snow.

3.1 pav.: Priekinė kampinė dalis view of the Lorex LW2731AC1 Add-on Camera, showing the lens, IR LEDs, and antenna.

3.2 pav.: Priekinis vaizdas iš arti view of the camera, highlighting the lens, infrared LEDs, and the motion sensor below.
4. Sąranka
4.1 Fizinis įrengimas
- Pasirinkite vietą: Select a suitable location for your camera. Consider the desired viewing area, proximity to a power outlet, and wireless signal strength to your Lorex 7-Inch LCD monitor. For outdoor use, ensure the camera is installed under shelter to protect it from direct weather exposure.
- Sumontuokite fotoaparatą: Use the provided mounting hardware to securely attach the camera to a wall or ceiling. Adjust the camera's angle to cover the desired area.
- Prijunkite maitinimą: Plug the camera's power adapter into the camera and then into a standard electrical outlet. The camera requires a local power outlet for operation.
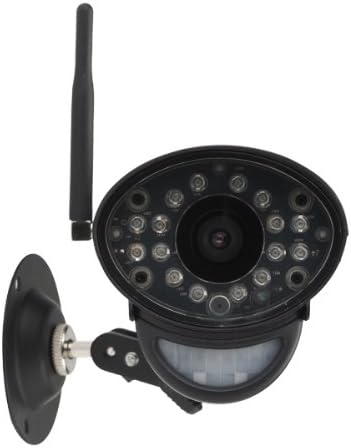
4.1 pav.: priekis view of the camera with its adjustable mounting bracket, ready for installation.
4.2 Pairing with Your Monitoring System
To integrate the LW2731AC1 add-on camera with your Lorex 7-Inch LCD monitoring system, follow the pairing instructions provided with your main monitoring system. Typically, this involves:
- Access the menu on your Lorex 7-Inch LCD monitor.
- Navigate to the 'Camera Pairing' or 'Add Camera' section.
- Select an unused channel for the new camera.
- Follow the on-screen prompts, which usually instruct you to press a 'Pair' or 'Sync' button on the back of the camera within a specified timeframe (e.g., 30 seconds).
- Once successfully paired, the camera's video feed will appear on the selected channel of your monitor.
Note: Refer to your Lorex 7-Inch LCD monitoring system's manual for specific pairing instructions, as steps may vary slightly by model.
5. Operacija
Once paired, the LW2731AC1 camera operates in conjunction with your Lorex 7-Inch LCD monitoring system. Refer to your main system's manual for detailed instructions on:
- Viewrežimai: How to switch between single camera view, scan mode (automatic switching), and quad split-screen mode (if supported by your monitor).
- Judesio aptikimo nustatymai: Adjusting sensitivity and recording triggers for the camera's passive infrared motion sensor.
- Dvipusis garsas: Using the talk-back function to communicate through the camera.
- Įrašymas ir atkūrimas: Managing video recordings stored on your monitoring system's SD card.
The camera's digital wireless signal ensures a private and secure connection, minimizing interference and unauthorized access to your video feed.
6. Priežiūra
6.1 Kameros valymas
To maintain optimal image quality, periodically clean the camera lens and housing:
- Prieš valydami įsitikinkite, kad kamera yra išjungta.
- Use a soft, lint-free cloth to gently wipe the lens. If necessary, damplt šluostę šiek tiek patrinkite vandeniu arba švelniu lęšių valymo tirpalu.
- Wipe the camera housing with a soft, damp skudurėliu. Venkite stiprių cheminių medžiagų ar abrazyvinių valiklių.
6.2 Aplinkosaugos aspektai
While the camera is weather-resistant, extreme conditions can affect its performance and lifespan:
- Avoid installing the camera in direct sunlight for prolonged periods, as this can cause overheating.
- Protect the camera from direct exposure to heavy rain, snow, or hail. Install under an overhang or eave when used outdoors.
- Ensure the power adapter is protected from moisture.
7. Problemų sprendimas
If you encounter issues with your LW2731AC1 add-on camera, consider the following common solutions:
- Nėra vaizdo signalo:
- Ensure the camera is powered on and its power adapter is securely connected to a working outlet.
- Verify the camera is within range of your Lorex 7-Inch LCD monitor. Obstructions like thick walls or multiple floors can reduce wireless range.
- Attempt to re-pair the camera with your monitoring system (refer to Section 4.2).
- Check for sources of interference (e.g., other wireless devices, microwaves) near the camera or monitor.
- Prasta vaizdo kokybė:
- Clean the camera lens (refer to Section 6.1).
- Ensure adequate lighting in the monitored area during the day.
- For night vision, ensure there are no obstructions directly in front of the camera's IR LEDs.
- Judesio aptikimas neveikia:
- Check the motion detection settings on your Lorex 7-Inch LCD monitor to ensure it is enabled and sensitivity is appropriately set.
- Ensure the camera's motion sensor is not obstructed.
- Dvipusio garso problemos:
- Verify the volume settings on your Lorex 7-Inch LCD monitor.
- Įsitikinkite, kad nėra jokių fizinių kliūčių, blokuojančių kameros mikrofoną ar garsiakalbį.
If problems persist, consult the support section of the Lorex website or contact Lorex customer support for further assistance.
8. Specifikacijos
| Funkcija | Specifikacija |
|---|---|
| Modelio numeris | LW2731AC1 |
| Vaizdo įrašymo raiška | 640 x 480 (VGA) |
| Laukas View | 52 laipsnių |
| Naktinio matymo diapazonas | Iki 40 pėdų (12 m) |
| Ryšio technologija | Belaidis (FHSS) |
| Maitinimo šaltinis | Su laidu elektra |
| Garsas | Dvipusis garsas (įmontuotas mikrofonas ir garsiakalbis) |
| Judesio aptikimas | Pasyvus infraraudonasis (PIR) |
| Naudojimas viduje / lauke | Indoor, Outdoor (Weather-Resistant) |
| Matmenys (I x P x A) | 9.6 x 3.6 x 3.4 colio (24.4 x 9.1 x 8.6 cm) |
| Prekės svoris | 1.05 svaro (0.48 kg) |
| Spalva | Juoda |
| Tarptautinis apsaugos įvertinimas | IP67 |
9. Garantija ir palaikymas
For information regarding product warranty, technical support, and additional resources, please visit the official Lorex website. You can typically find FAQs, software downloads, and contact information for customer service there.
Websvetainė: www.lorex.com