
1. Įvadas
The Amped Wireless REC10 High Power 600mW Compact Wi-Fi Range Extender is designed to expand the range of your existing 802.11b/g/n wireless network. It repeats the signal from your wireless router, redistributing it to new, extended locations, providing up to 6,500 sq ft of additional Wi-Fi coverage. This manual provides essential information for setting up, operating, and maintaining your device.
2. Pakuotės turinys
- 1 x High Power 600mW Compact Wi-Fi Range Extender
- 1 x Detachable High Gain 2dBi Antenna
- 1 x Sąrankos vadovas
- 1 x CD: Users Guide, Installation Video
3. Produktas baigtasview
The REC10 features advanced dual 600mW amplifiers and a high gain 2dBi detachable antenna to significantly boost your Wi-Fi signal. Its compact, plug-in design allows for discreet placement in any room. The device also includes a wired Ethernet port for connecting additional network devices.
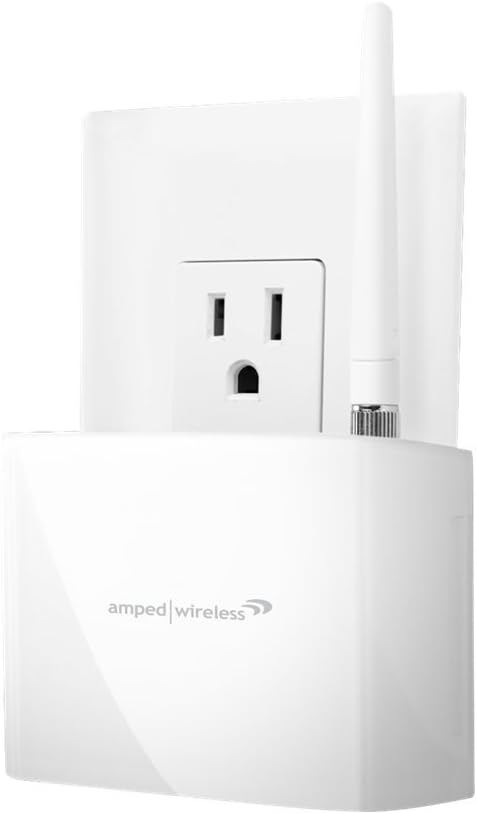
1 pav.: priekis view iš Amped Wireless REC10 Wi-Fi Range Extender, showing it plugged into a wall outlet with its antenna attached.

2 paveikslas: viršuje view iš Amped Wireless REC10 Wi-Fi Range Extender, highlighting the wired Ethernet port, reset button, and WPS button.
4. Sąranka
Setting up your REC10 Range Extender is a straightforward process that can be completed wirelessly using a tablet, smartphone, or laptop. Follow these general steps:
- Plug the REC10 into a power outlet.
- Connect your device (tablet, smartphone, or laptop) to the Range Extender's Wi-Fi network.
- Atidarykite a web browser and navigate to the setup URL provided in the Setup Guide.
- Access the Setup Wizard, scan for your existing wireless network, and select it.
- Vykdykite ekrane pateikiamus nurodymus, kad užbaigtumėte sąranką.
For detailed, step-by-step instructions, please refer to the included Setup Guide or the User Guide on the provided CD.
5. Naudojimo instrukcijos
Once the REC10 is successfully set up, it will automatically extend your Wi-Fi network, providing enhanced coverage. You can now enjoy seamless internet access for your devices throughout your home or office.
Laidinių įrenginių prijungimas
The Range Extender includes a wired Ethernet port (RJ-45 10/100 LAN) located on the device. This port allows you to connect and bridge an additional network device, such as a PC, server, printer, Internet-enabled television, Blu-ray player, or game console, directly to your extended Wi-Fi network.
6. Priežiūra
Siekiant užtikrinti optimalų jūsų veikimą ir ilgaamžiškumą Amped Wireless REC10, consider the following maintenance tips:
- Vieta: Laikykite prietaisą gerai vėdinamoje vietoje, atokiau nuo tiesioginių saulės spindulių, šilumos šaltinių ir drėgmės.
- Valymas: Įrenginio išorę valykite minkštu, sausu skudurėliu. Nenaudokite skystų valiklių ar aerozolių.
- Firmware atnaujinimai: Periodiškai tikrinkite Amped Wireless website for available firmware updates. Keeping your device's firmware up-to-date can improve performance, add new features, and enhance security.
- Maitinimo ciklas: If you experience minor performance issues, try power cycling the device by unplugging it from the outlet for 10 seconds and then plugging it back in.
7. Problemų sprendimas
Jei susidursite su problemomis su savo Amped Wireless REC10, please refer to the following common troubleshooting steps:
- Nėra interneto prieigos: Ensure the Range Extender is properly connected to your main Wi-Fi router. Check the status lights on the extender to confirm it's receiving a signal. Try restarting both the extender and your main router.
- Prastas signalo stiprumas: Relocate the extender to a position that is roughly halfway between your main router and the area where you need improved coverage. Avoid placing it near large metal objects or other electronic devices that may cause interference.
- Nepavyksta pasiekti sąrankos puslapio: Verify that your device is connected to the extender's Wi-Fi network (usually named 'Amped_Wireless_2.4GHz' or similar) and that you are entering the correct setup URL.
- Pamiršote slaptažodį: If you forget your extender's administrative password, you may need to perform a factory reset. Refer to the User Guide for instructions on how to reset the device.
For more comprehensive troubleshooting and support, consult the detailed User Guide on the included CD or visit the Amped Wireless support websvetainę.
8. Specifikacijos
| Funkcija | Aprašymas |
|---|---|
| Modelis | REC10 |
| Technologijos | Belaidis ryšys |
| Juostos | 2.4 GHz, 802.11 b/g/n |
| Belaidis greitis | 300Mbps (Rx), 300Mbps (Tx) |
| Antenos | 1 x Detachable High Gain 2dBi Antenna, 1 x Internal High Gain Antenna |
| Ethernet prievadai | 1 x RJ-45 10/100 (LAN) |
| Ampgelbėtojai | Dual 2.4GHz 600mW Amplifiers, Dual Low Noise Ampgelbėtojai |
| Sąrankos reikalavimai | Wireless 802.11b/g/n 2.4GHz network, computer, tablet or smartphone with Wi-Fi access and a web naršyklė |
| OS suderinamumas | Works with all OS, including Windows and Mac |
| Prekės svoris | 1 svaro |
| Gaminio matmenys | 9.25 x 7.5 x 2.6 colio |
9. Garantija ir palaikymas
The Amped Wireless REC10 comes with the Amped Wireless Range Increase Guarantee, ensuring guaranteed performance and results. Amped Wireless is committed to providing excellent customer service and technical support.
- Elite Support: Enjoy free, US-based, in-house technical support 7 days a week.
- Dokumentacija: Please refer to the User Manual and the User Guide (on the included CD) for comprehensive information and assistance.
Dėl papildomos pagalbos apsilankykite oficialioje svetainėje Amped Wireless websvetainėje arba susisiekite tiesiogiai su jų klientų aptarnavimo tarnyba.