
1. Svarbios apsaugos priemonės
Naudojant elektros įrangą, visada reikia laikytis pagrindinių saugos priemonių, įskaitant:
- Neleiskite maitinimo laidams liesti karštų paviršių.
- Nemontuokite šalia dujinių ar elektrinių šildytuvų.
- Įranga turi būti montuojama tokiose vietose ir tokiame aukštyje, kur jos lengvai nepalies tampneleistino personalo.
- Naudodami ne gamintojo patvirtintą priedą, galite sukelti nesaugią būklę.
- Nenaudokite šios įrangos ne pagal paskirtį.
- Šios įrangos techninę priežiūrą turi atlikti kvalifikuotas techninės priežiūros personalas.
WARNING: This product contains chemicals known to the State of California to cause cancer, birth defects and/or other reproductive harm. Thoroughly wash hands after installing, handling, cleaning, or otherwise touching this product.
WARNING: Make sure that power is OFF before making any Electrical Connections.
Nenaudojami laidai turi būti uždengti pridedamomis vielinėmis veržlėmis.

Image: Important Safeguards and Installer Information. This image displays critical safety warnings and installation guidelines for the emergency light, emphasizing the need for qualified personnel for servicing.
2. Produktas baigtasview
The Hubbell Compass CU2RC is a dual-head LED emergency light designed for commercial applications. It features a durable thermoplastic housing and adjustable lamp heads for versatile lighting direction.
Pagrindinės funkcijos:
- Patikimas apšvietimas: Suitable for emergency or security backup in commercial areas such as pool areas, parking decks, hallways, offices. NFPA 101, NFPA 70, and OSHA certified.
- Energiją taupantis: LED system with a 10-year lifespan.
- Extended Use Battery: Nickel-cadmium battery provides 90 minutes of emergency power during outages.
- Patvari medžiaga: White high-impact flame-rated thermoplastic housing.
- Montavimo universalumas: Can be mounted on walls or ceilings.
- Dual-Voltage Įvestis: Supports 120/277 AC input.
- Nuotolinio nuotolio talpa: Ability to power up to two external indoor or outdoor remote lamps.
- Bandomasis jungiklis: Water-proof self-test switch for battery/charger monitoring.

Image: Hubbell Compass CU2RC Emergency Light Features. This image highlights the white thermoplastic housing, remote capacity, fully adjustable lamp-heads, and the test button/AC-ON indicator.

Image: Emergency Light Usage Locations. This image indicates that the product is suitable for use in conditioned spaces, damp locations, stairwells, hallways, offices, retail, or commercial settings.
3. Specifikacijos
| Funkcija | Detalė |
|---|---|
| Modelio numeris | CU2RC |
| Gamintojas | Compass (Hubbell) |
| Prekės svoris | 1 svaras |
| Gaminio matmenys | 3 x 9 x 4 colio (gylis x plotis x aukštis) |
| Spalva | Baltas |
| Medžiaga | Plastic (Thermoplastic) |
| Maitinimo šaltinis | AC/DC |
| ttage | 120/277 voltų (kintamoji srovė) |
| Vattage | 1 vatų |
| Lemputės tipas | LED |
| Montavimo tipas | Tvirtinimas prie lubų, sieninis |
| Baterijos tipas | Nickel Oxyhydroxide (Product Specific, included) |
| Avarinio veikimo laikas | 90 minučių |
| Sertifikatai | NFPA 101, NFPA 70, OSHA, UL924, Title 20 |

Image: Product Dimensions Diagram. This diagram illustrates the unit's dimensions: 9 inches in width, 4 inches in height, and 2.75 inches in depth.

Image: Key Specifications of Emergency Light. This graphic highlights the LED life-cycle of more than 10 years, dual-voltage 120/277 AC input, and the Nickel Cadmium battery for UL recognized 90-minute emergency lighting.

Image: Emergency Light Material and Finish. This image shows the product and specifies its material as thermoplastic and its finish as white.
4. Montavimas
The unit is designed for quick and easy installation. Ensure power is OFF before beginning any electrical connections.
4.1 J-Box Mounting
- Feed fixture leads through main bottom case and connect AC power supply.
- Prijunkite laidus per J-Box. Pritvirtinkite galinę plokštę prie J dėžutės varžtais.
- Connect battery only after AC power can be provided to the unit.
- Align snaps and push housing directly onto back plate. Supply AC power and press "TEST" button to check light.
4.2 Conduit Mounting
- Pritvirtinkite galinę plokštę prie sienos paviršiaus. Nuveskite laidus per angą vamzdžio flanše ir sujunkite vamzdį.
- Connect battery only after AC power can be provided to the unit.
- Align snaps and push housing directly onto back plate. Supply AC power and press "TEST" button to check light.
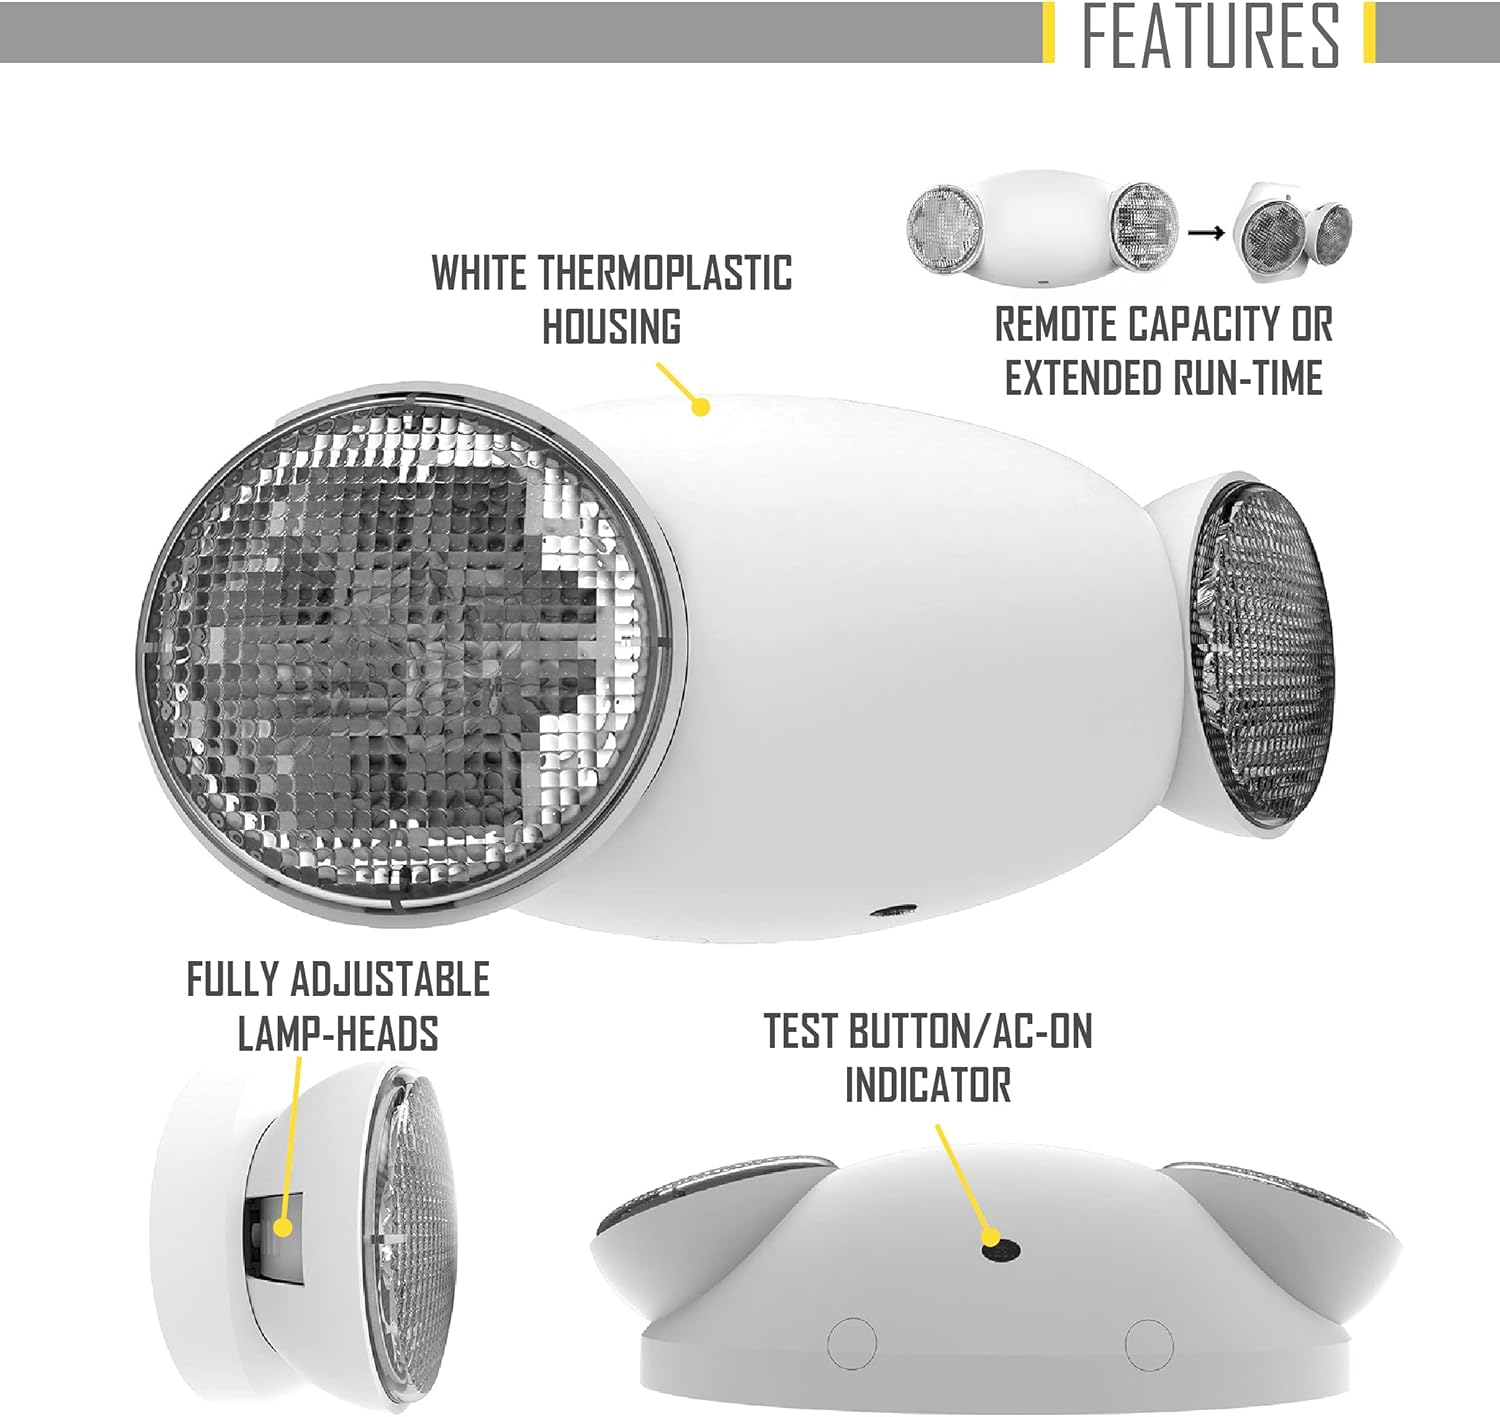
Image: Installation Figure A: J-Box Mounting. This diagram shows the initial wiring connections for J-Box mounting.

Image: Installation Figure B: Battery Connection. This diagram illustrates how to connect the battery within the unit.

Image: Installation Figure C: Housing Assembly. This diagram shows the final step of aligning and pushing the housing onto the back plate.
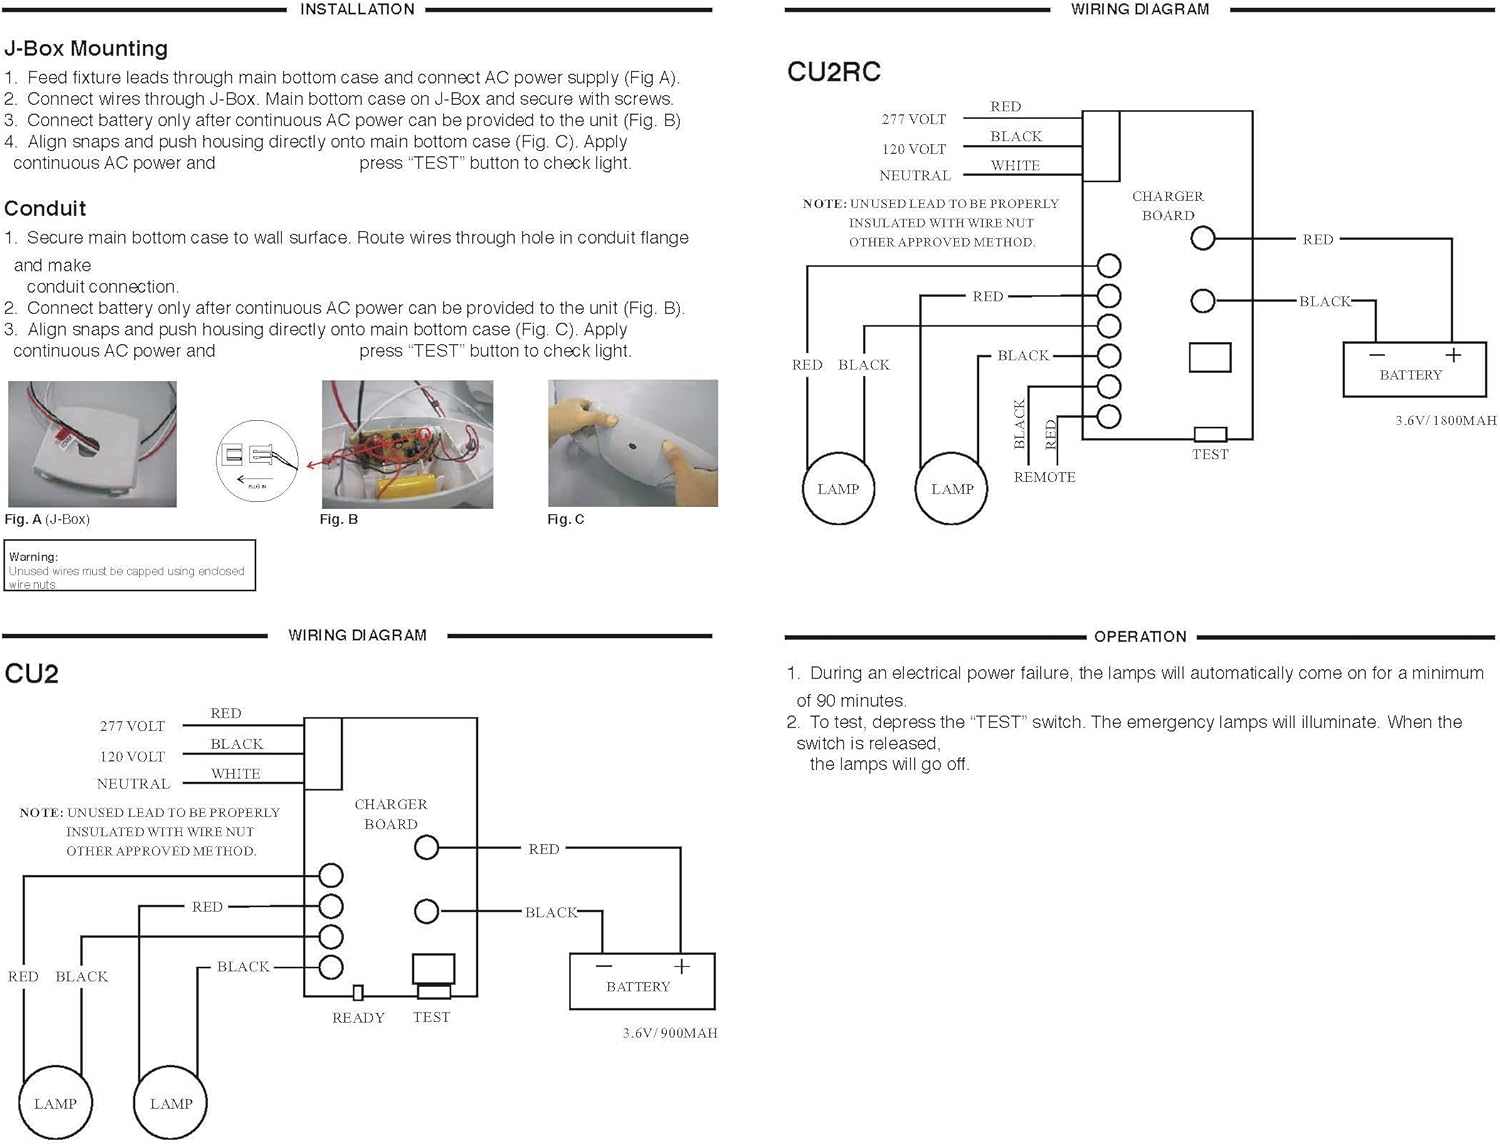
Image: Wiring Diagram for CU2RC. This diagram illustrates the electrical connections for the CU2RC model, including the charger board, battery, and lamp connections for both 120V and 277V inputs.
5. Operacija
Once the unit is properly installed according to the installation instruction sheet and AC power supplied, it will come ON. The dual color LED indicator will also come ON and the self-diagnostic test function will automatically initiate.
5.1 Pradinis eksploatavimas
- Nutrūkus elektros tiekimui, lamps ant įrenginio automatiškai įsijungs mažiausiai 90 minučių.
- To test this unit, let it charge correctly with AC power supply for a minimum of 24 hours after its first installation and then depress the "TEST" switch; the emergency lamps apšvies. Atleidus jungiklį, lamps išsijungs.
- For the unit with Self-Diagnostic, connect as below:
- When customer doesn't need remote lamp, please insert terminal to N.
- When customer needs remote lamp, please insert terminal to Y.
5.2 Self-Diagnostic Service
The self-diagnostic function is factory preset without any allowable field adjustment. The automatic self-diagnostic feature serves the following tests:
- On-line real time monitoring of battery and lamps (both local and remote) indicates battery charging, disconnection and failure along with local and remote lamp nesėkmės.
- Savaiminis patikrinimas ir 15 minučių iškrovimas kartą per 30 dienų, kai kintamosios srovės maitinimas buvo tiekiamas mažiausiai 24 valandas.
- Self-testing and a 90-minute discharge once every year, after AC power has been supplied for a minimum of 24 hours.
5.3 Manual Testing
The unit also provides for manual testing by pushing the test button in a specific pattern. The different patterns and the resulting tests are listed in the table below:
| Veiksmas | Reakcija ir LED indikacija |
|---|---|
| Paspauskite bandymo mygtuką vieną kartą (per 2 sekundes) | 30 sekundžių testas: mirksinti žalia spalva |
| Paspauskite bandymo mygtuką du kartus (per 2 sekundes) | 15-minute test: Green BLINKING twice |
| Paspauskite bandymo mygtuką tris kartus (per 2 sekundes) | 90-minute test: Green Blinking three times |

Image: Self-Diagnostic and Manual Testing Instructions. This image details the self-diagnostic service features, fault indications with corresponding LED signals, and a table for manual testing procedures and their outcomes.
6. Priežiūra
The emergency light unit requires minimal maintenance. Regular testing ensures the battery and lamps are functioning correctly.
6.1 Akumuliatoriaus priežiūra
The unit is equipped with a long-life nickel-cadmium battery. The self-diagnostic feature automatically performs monthly 15-minute tests and annual 90-minute tests to ensure battery health. If a battery failure is indicated (Red BLINKING '2' TIMES), the battery may need replacement.
6.2 Valymas
Nuvalykite įrenginio išorę minkšta, damp audinys. Nenaudokite abrazyvinių valiklių ar tirpiklių.
7. Problemų sprendimas
The self-diagnostic system provides fault indications via the LED. Refer to the table below for common fault descriptions and their corresponding LED indications.
| Gedimo aprašymas | LED indikacija |
|---|---|
| Akumuliatoriaus atjungimas | STEADY Raudona |
| Battery Recharge Failure | mirksinti raudona |
| Baterijos gedimas | Red BLINKING '2' TIMES |
| LED Failure (Exits Only) | Red BLINKING '3' TIMES |
| Nuotolinis Lamp Failure (Emergency Lights Only) | Red BLINKING '4' TIMES |
If a fault persists after attempting basic troubleshooting, contact qualified service personnel.
8. Informacija apie garantiją
Hubbell Lighting, Inc. ("Hubbell") warrants to the original end user that its products will be free from defects in material and workmanship for the periods specified below.
- Full Unit Warranty: 2 years from the date of shipment.
- LED Fixtures and LED Drivers: 5 years from the date of shipment.
- Baterijos: 90 days from the date of shipment.
This warranty is subject to certain exclusions and limitations. For complete warranty details, refer to the full unit warranty document provided with the product or available from Hubbell Lighting, Inc.
Atsakomybės apribojimas: In no event shall Hubbell be liable for any indirect, special, incidental, consequential, exemplary, punitive or multiple damages, even if informed of the possibility of such damages.

Image: Product Certifications and Hubbell Warranty. This image displays various certifications such as UL924, Title 20, NFPA 70, NFPA 101, and the Hubbell Warranty shield, indicating compliance and product assurance.
9. Pagalba klientams
For technical assistance, warranty claims, or additional information, please contact Hubbell Lighting customer service.
Visit the official Hubbell Lighting websvetainė, kurioje rasite daugiau išteklių: www.hubbell.com/hubbelllighting/en