Produktas baigtasview
The Orbit Irrigation Easy 9 Electric Sprinkler Timer is designed for efficient and flexible control of your irrigation system. Featuring Easy-Set Logic programming, this 9-zone controller simplifies watering schedules for various landscape needs. Its waterproof enclosure makes it suitable for both indoor and outdoor installation.
Pagrindinės savybės
- 9 independent watering zones.
- 3 independent programs (A, B, C) with up to 4 start times each.
- Watering duration adjustable from 1 to 99 minutes per zone.
- Rain sensor compatibility for automatic watering suspension.
- Rain delay function with options for 24, 48, or 72 hours.
- Manual watering option for immediate irrigation.
- Easy-Set Logic for simplified programming.
- Waterproof enclosure for versatile indoor/outdoor use.
- Internal transformer eliminates the need for an external AC adapter.
- Large LCD display and intuitive dial for easy programming and monitoring.
- Easy-access wiring with simple insertion terminals and a hinged door.
- Self-resetting circuit breaker (no fuses required).
- Pump start/master valve terminal for system integration.
- Lithium backup battery for program retention during power outages.
Sąranka ir diegimas
Laikmačio montavimas
The Orbit Easy 9 timer can be mounted indoors or outdoors. Choose a location near a power outlet and away from direct sunlight or extreme weather conditions. Ensure the mounting surface is stable.

Image: The Orbit Easy 9 timer mounted on a garage wall, demonstrating an indoor installation. The timer is positioned above a workbench with tools.

Image: The Orbit Easy 9 timer mounted on an outdoor brick wall, demonstrating an outdoor installation. Wiring conduits are visible below the unit.
- Open the timer's front cover.
- Use the provided mounting template or hold the timer against the wall and mark the mounting holes.
- Jei reikia, išgręžkite kreipiamąsias skyles ir įstatykite sieninius inkarus.
- Secure the timer to the wall using screws.
Laidai
Ensure power is disconnected before wiring. The Easy 9 features simple insertion wiring terminals.

Paveikslėlis: Atvira view of the Orbit Easy 9 timer's interior, showing the wiring terminals for zones, common, pump/master valve, and sensor. The battery compartment is also visible.
- Connect each zone valve wire to its corresponding terminal (1-9).
- Connect the common wire from your valves to the "COM" terminal.
- If using a pump start relay or master valve, connect its wire to the "PUMP" terminal.
- If installing a rain sensor, connect its wires to the "SENSOR" terminals. Refer to your rain sensor's manual for specific wiring instructions.
- Close the wiring compartment door.
Maitinimo prijungimas
The timer has an internal transformer. Connect the power cord to a standard electrical outlet.
Operacija
Dabartinio laiko ir datos nustatymas
- Pasukite ratuką į padėtį „NUSTATYTI LAIKRODĮ“.
- Use the "+" and "-" buttons to adjust the time. Press "NEXT" to move between hours and minutes.
- Turn the dial to "SET DATE" and adjust year, month, and day.
Laistymo grafikų programavimas
The Easy 9 allows for 3 independent programs (A, B, C) with up to 4 start times each.
- Turn the dial to "PROGRAM A".
- Set the first start time using "+" and "-" buttons. Press "NEXT" to confirm.
- Set the watering duration for each zone (1-9) for Program A. Use "+" and "-" to adjust, "NEXT" to move between zones.
- Set the watering days for Program A. Select specific days or an interval (e.g., every 2 days).
- Repeat steps for additional start times within Program A, or for Programs B and C.
Rankinis laistymas
To water manually outside of programmed schedules:
- Turn the dial to "MANUAL".
- Select the zone you wish to water using the "NEXT" button.
- Set the desired watering duration for that zone.
- The timer will begin watering the selected zone.
- To stop manual watering, turn the dial to "OFF" or "AUTO".
Lietaus vėlavimas
The rain delay feature allows you to temporarily suspend watering for a set period.
- With the dial in "AUTO" position, press the "DELAY" button.
- Select 24, 48, or 72 hours using the "+" button.
- The timer will resume its schedule after the delay period.

Image: The Orbit Easy 9 timer mounted on an outdoor brick wall with its front cover open, revealing the control panel with the dial and LCD display.
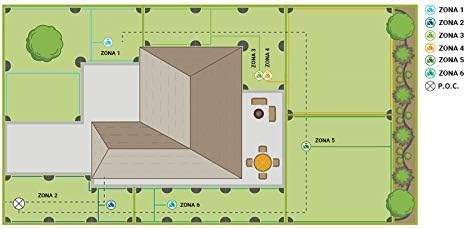
Image: A diagram showing a house with six distinct irrigation zones (Zona 1 to Zona 6) marked on the surrounding lawn and garden areas, illustrating a typical layout for a multi-zone system.
Priežiūra
Baterijos keitimas
The timer uses a lithium backup battery to retain programming during power outages. Replace the battery annually or when the low battery indicator appears.
- Open the front cover and locate the battery compartment (refer to the wiring image in the Setup section).
- Išimkite seną bateriją.
- Insert a new lithium battery, ensuring correct polarity.
- Uždarykite skyrių.
Valymas
Nuvalykite laikmačio išorę reklamaamp Nenaudokite abrazyvinių valiklių ir nemerkite įrenginio į vandenį.
Trikčių šalinimas
Bendros problemos ir sprendimai
- Timer display is blank: Check power connection. Ensure the outlet is functional. Verify the internal transformer connection. Check the backup battery.
- Zones not watering: Ensure the timer is in "AUTO" mode. Check programming for start times and durations. Verify valve wiring and ensure common wire is connected. Check for tripped circuit breaker (the timer has a self-resetting one). Ensure water supply is on.
- Watering continuously: Turn the dial to "OFF" to stop. Check for stuck valve solenoids.
- Rain sensor not working: Ensure the sensor is properly wired and not obstructed. Check the sensor's settings (if applicable).
Jei problemos išlieka, susisiekite su klientų aptarnavimo tarnyba.
Specifikacijos
| Funkcija | Detalė |
|---|---|
| Modelio numeris | 94899 |
| Zonų skaičius | 9 |
| Programos | 3 (A, B, C) |
| Programos pradžios laikas | Iki 4 |
| Laistymo trukmė | 1-99 minutes |
| Lietaus vėlavimas | 24, 48, 72 valandų |
| Maitinimo šaltinis | Internal Transformer (AC) |
| Atsarginė baterija | Lithium (for program retention) |
| Medžiaga | Plastikiniai |
| Matmenys (I x P x A) | 20.8 x 11 x 23.9 cm |
| Svoris | 1.5 kg |
Garantija ir palaikymas
Informacija apie garantiją
The product packaging indicates a 6-year warranty. Please retain your proof of purchase for warranty claims. For specific warranty terms and conditions, refer to the documentation included with your product or visit the official Orbit websvetainę.
Pagalba klientams
For technical assistance, troubleshooting, or parts inquiries, please contact Orbit customer support. Contact details can typically be found on the manufacturer's websvetainėje arba produkto pakuotėje.