
1. Produktas baigtasview
The HP ProDisplay P17A is a 17-inch LED-backlit LCD monitor designed for general computing tasks. It features a 5:4 aspect ratio with a maximum resolution of 1280 x 1024 pixels, providing clear and consistent visuals. This monitor is equipped with both VGA and HDMI connectivity options, offering versatility for various system configurations. Its compact design and energy-efficient LED backlighting make it suitable for a range of environments.

1 pav.: priekis view of the HP ProDisplay P17A monitor, showcasing jo ekraną ir stovą.
2. Sąrankos instrukcijos
2.1 Monitoriaus išpakavimas
Atsargiai išimkite visus komponentus iš pakuotės. Įsitikinkite, kad yra šie daiktai:
- HP ProDisplay P17A Monitor
- Monitor Stand (base and neck)
- Maitinimo kabelis
- VGA Cable (may vary by region/package)
- HDMI kabelis (gali skirtis priklausomai nuo regiono / pakuotės)
2.2 Stovo surinkimas
- Padėkite monitorių ekranu žemyn ant minkšto, švaraus paviršiaus, kad nesusibraižytumėte.
- Attach the stand neck to the back of the monitor, aligning the tabs and pushing until it clicks into place.
- Attach the stand base to the bottom of the stand neck, securing it with the captive screw if present.
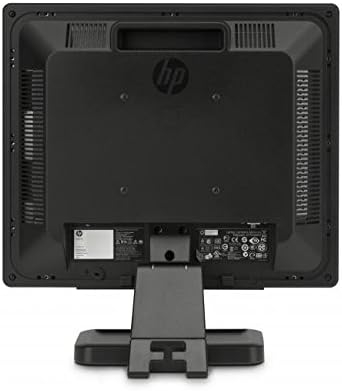
2 pav.: galinis view of the monitor, illustrating the stand attachment point and various connectivity ports.
2.3 Jungiamieji kabeliai
- Maitinimo jungtis: Prijunkite maitinimo laidą prie monitoriaus maitinimo įvesties, o tada – prie įžeminto elektros lizdo.
- Vaizdo jungtis:
- For VGA: Connect one end of the VGA cable to the VGA port on the monitor and the other end to the VGA port on your computer. Tighten the screws on the VGA connector.
- For HDMI: Connect one end of the HDMI cable to the HDMI port on the monitor and the other end to the HDMI port on your computer.
- Įsitikinkite, kad visos jungtys yra saugios.
3. Naudojimo instrukcijos
3.1 Įjungimas / išjungimas
Norėdami įjungti arba išjungti monitorių, paspauskite maitinimo mygtuką, esantį monitoriaus priekiniame skydelyje. Maitinimo indikatoriaus lemputė užsidegs, kai monitorius įjungtas.
3.2 Ekrano nustatymų reguliavimas (OSD meniu)
The On-Screen Display (OSD) menu allows you to adjust various monitor settings. Use the buttons on the front bezel to navigate and select options.
- Meniu mygtukas: Atidaro OSD meniu.
- Naršymo mygtukai (+ / - or Up/Down): Move through menu options and adjust values.
- Pasirinkti/gerai mygtukas: Patvirtina pasirinkimą arba įeina į submeniu.
- Išėjimo mygtukas: Išeina iš dabartinio meniu arba OSD.
Įprasti reguliuojami nustatymai apima:
- Ryškumas / kontrastas: Reguliuoja bendrą šviesumą ir skirtumą tarp šviesių ir tamsių sričių.
- Spalvų valdymas: Allows adjustment of color temperature, RGB levels, or preset color modes.
- Įvesties pasirinkimas: Manually switches between VGA and HDMI input sources.
- Vaizdo valdymas: Adjusts sharpness, aspect ratio, and auto-adjustment for analog signals.
- Valdymas: Power-saving options, OSD timeout, language selection.
4. Priežiūra
4.1 Monitoriaus valymas
- Prieš valydami visada išjunkite monitorių ir atjunkite maitinimo laidą.
- Lengvai naudokite minkštą, nepūkuotą audinį dampnuplaukite vandeniu arba neabrazyviniu ekrano valikliu.
- Nepurkškite valiklio tiesiai ant ekrano ar monitoriaus casing.
- Avoid using benzene, thinner, ammonia-based cleaners, or abrasive materials, as these can damage the surface.
4.2 Bendroji priežiūra
- Stenkitės nestatyti monitoriaus tiesioginiuose saulės spinduliuose arba šalia šilumos šaltinių.
- Užtikrinkite tinkamą vėdinimą aplink monitorių.
- Neuždenkite vėdinimo angų.
- Saugokite ekraną nuo aštrių daiktų ar per didelio spaudimo.
5. Problemų sprendimas
Before contacting support, try the following basic troubleshooting steps:
5.1 Ekrane nėra vaizdo
- Ensure the monitor's power cable is securely connected to both the monitor and a working electrical outlet.
- Verify the power indicator light on the monitor is on. If not, press the power button.
- Check that the video cable (VGA or HDMI) is securely connected to both the monitor and the computer.
- Ensure the correct input source is selected on the monitor (use the OSD menu to switch inputs).
- Iš naujo paleiskite kompiuterį.
5.2 Prasta vaizdo kokybė
- Fuzzy or Blurry Image: Įsitikinkite, kad jūsų kompiuterio ekrano skiriamoji geba nustatyta pagal monitoriaus natūraliąją skiriamąją gebą (1280 x 1024).
- Neteisingos spalvos: Adjust color settings through the OSD menu or your computer's display settings.
- Image Off-Center/Incorrect Size (VGA only): Use the "Auto Adjust" function in the OSD menu.
- Mirkėjimas: Check the refresh rate setting on your computer; ensure it is set to 60 Hz.
5.3 Monitor Not Responding to Buttons
- Unplug the monitor's power cable, wait 10 seconds, then plug it back in and try again.
- Įsitikinkite, kad nėra užstrigusių mygtukų.
6. Techninės specifikacijos
| Funkcija | Specifikacija |
|---|---|
| Prekės ženklas | HEWLETT PACKARD |
| Modelio pavadinimas | HP P17A |
| Modelio numeris | F4M97AAABA |
| Ekrano dydis | 17 colių |
| Ekrano tipas | LED apšvietimas LCD |
| Gimtoji raiška | 1280 x 1024 (SXGA) |
| Krašto santykis | 5:4 |
| Kontrasto santykis | 1000:1 |
| Atnaujinimo dažnis | 60 Hz |
| Reagavimo laikas | 5 milisekundės |
| Viewing kampas | 170 laipsnių |
| Ryšys | 1x VGA, 1x HDMI |
| Energijos suvartojimas | 25 vatų (maksimaliai) |
| Elemento matmenys (D x P x A) | 8.12 "D x 14.85" P x 15.24" A |
| Prekės svoris | 8.2 svaro |
| Montavimo tipas | Sieninis laikiklis (suderinamas su VESA) |
| Papildomos funkcijos | Apsauginis ekranas nuo akinimo |

Figure 3: Dimensions of the HP ProDisplay P17A monitor.
7. Garantija ir palaikymas
7.1 Informacija apie garantiją
This product is often sold as a refurbished item. Refurbished products typically come with a limited warranty provided by the refurbisher or seller. Please refer to your purchase documentation for specific warranty terms and conditions, including duration and coverage details.
7.2 Techninė pagalba
For technical assistance, troubleshooting beyond this manual, or warranty claims, please contact the vendor or HP customer support. Have your monitor's model number (F4M97AAABA) and serial number ready when contacting support.
You can find additional support resources, drivers, and documentation on the official HP support websvetainę.