
Įvadas
This manual provides comprehensive instructions for the installation, operation, maintenance, and troubleshooting of your Orbit 94906 Easy-Set Logic 6-Station Automatic Outdoor Irrigation Programmer with Remote Control. Please read this manual thoroughly before operating the device to ensure proper function and longevity.
The Orbit 94906 is designed to manage up to 6 independent watering zones, offering flexible programming options and convenient remote control functionality for efficient outdoor irrigation.
Produktas baigtasview
The Orbit 94906 irrigation programmer features a digital display, large buttons, and a rotary dial for intuitive programming. It includes a protective cover with a key lock, making it suitable for both indoor and outdoor installations. A wireless remote control is provided for convenient manual operation and system adjustments from a distance.

Image: The Orbit 94906 irrigation programmer (main unit) and its accompanying wireless remote control. The main unit is shown with its protective cover open, revealing the control panel and wiring compartment.

Vaizdas: Stambus planas view of the Orbit 94906 control panel, showing the LCD screen, rotary dial with settings like SET CLOCK, SET DATE, START TIME, RUN TIME, HOW OFTEN, BUDGET, AUTO, and OFF, along with CLEAR, ENTER MANUAL, PROGRAM, RAIN DELAY buttons, and plus/minus buttons.
Sąranka ir diegimas
1. Mounting the Programmer
Select a suitable location for mounting the programmer. It should be protected from direct sunlight and extreme weather conditions, although the unit is designed for outdoor use with its protective cover. Ensure the location allows for easy access to electrical power and irrigation valve wiring.
- Use appropriate screws and anchors to securely mount the unit to a wall or sturdy surface.
- Ensure the unit is level to prevent moisture accumulation.

Image: The Orbit 94906 irrigation programmer mounted on a brick wall, demonstrating a typical outdoor installation.
2. Elektrinis sujungimas
The programmer includes an integrated 240V to 24V transformer. Connect the power cord to a standard electrical outlet. Ensure the outlet is protected by a Ground Fault Circuit Interrupter (GFCI) if installed outdoors.
- The unit has an internal button battery to retain programming during power outages.
3. Wiring to Valves
Connect the wires from your irrigation valves to the corresponding terminals inside the programmer. Each zone (1-6) requires a separate wire. A common wire is also required for all valves.

Paveikslėlis: Atvira view of the Orbit 94906's wiring compartment, showing the terminal block for connecting irrigation valve wires.
- Refer to your valve manufacturer's instructions for specific wiring details.
- Ensure all connections are secure and waterproof, especially for outdoor installations.
4. Rain Sensor Connection (Optional)
The programmer includes a connection for a rain sensor. Installing a rain sensor can help conserve water by automatically suspending watering cycles during rainfall.
- Connect the rain sensor wires to the designated terminals as per the sensor's instructions.
Naudojimo instrukcijos
1. Initial Setup: Setting Clock and Date
- Pasukite sukamąjį ratuką į padėtį NUSTATYTI LAIKRODĮ.
- Naudokite + ir - mygtukais, kad sureguliuotumėte dabartinį laiką.
- Paspauskite Įveskite VADOVĄ patvirtinti.
- Pasukite sukamąjį ratuką į padėtį NUSTATYTI DATĄ.
- Naudokite + ir - buttons to adjust the current date (month, day, year).
- Paspauskite Įveskite VADOVĄ patvirtinti.
2. Laistymo grafikų programavimas
The programmer supports 3 independent programs (A, B, C) with up to 4 start times each, allowing for a total of 12 watering cycles per day across 6 zones.
- Pasukite sukamąjį ratuką į padėtį PROGRAMA.
- Naudokite PROGRAMA mygtuką, kad pasirinktumėte programą A, B arba C.
- Pasukite ratuką į PRADŽIOS LAIKAS. Naudokite + ir - to set the desired start time for the first cycle. Repeat for up to 4 start times per program.
- Pasukite ratuką į VYKDYTI LAIKĄ. Pasirinkite zoną (1–6) naudodami + ir - buttons, then set the watering duration from 1 to 99 minutes for each zone.
- Pasukite ratuką į KAIP DAŽNAI. Select the watering frequency (e.g., specific days of the week, odd/even days, or interval days).
- Baigę programuoti, pasukite ratuką į AUTO automatiniam veikimui.
3. Using the Rain Delay Function
The Rain Delay function allows you to temporarily suspend watering for a set period, conserving water after rainfall.
- Paspauskite LIETAUS ATLĖVIMAS mygtuką.
- Naudokite + or - mygtukais pasirinkite 24, 48 arba 72 valandų atidėjimą.
- The system will automatically resume its programmed schedule after the delay period.
4. Rankinis laistymas
You can manually water specific zones or all zones without affecting the programmed schedule.
- Paspauskite Įveskite VADOVĄ mygtuką.
- Naudokite + or - buttons to select the desired zone(s) or "ALL" for all zones.
- Nustatykite norimą laistymo trukmę.
- Paspauskite Įveskite VADOVĄ again to start manual watering.
- Norėdami sustabdyti rankinį laistymą, pasukite ratuką į IŠJUNGTA arba paspauskite IŠVALYTI.
5. Belaidžio nuotolinio valdymo pulto naudojimas
The wireless remote control allows you to operate the irrigation system from up to 90 meters away, useful for testing sprinklers or performing quick manual watering.

Image: The Orbit 94906 irrigation programmer and its remote control placed on a lawn, illustrating outdoor use.
- ON/OFF mygtukai: Activate or deactivate the remote.
- KITAS: Cycles through zones.
- VISI: Activates all zones.
- Numbered buttons (1-6): Activate specific zones.
- LIETUVOS DELĖJIMAS: Activates the rain delay function.
- The remote allows manual watering for one or more zones without interrupting the main programmer's schedule.

Image: A person kneeling to adjust a sprinkler head, demonstrating a scenario where the remote control would be useful for testing.
Priežiūra
- Laikyti dangtį uždarytą: Always ensure the protective cover is closed and latched to prevent weather damage, especially during rain or extreme temperatures.
- Baterijos keitimas: The internal button battery retains programming during power outages. If the programmer loses its settings frequently after power interruptions, the battery may need replacement. Refer to the internal compartment for battery type and replacement instructions.
- Valymas: Nuvalykite įrenginį su skelbimuamp šluoste pagal poreikį. Nenaudokite abrazyvinių valiklių ar tirpiklių.
- Žieminimas: In colder climates, it is recommended to disconnect the programmer and drain the irrigation system to prevent freezing damage.
Trikčių šalinimas
| Problema | Galima priežastis | Sprendimas |
|---|---|---|
| Programmer display is blank. | No power, faulty transformer, or dead internal battery. | Check power connection. Ensure outlet is functional. Replace internal battery if necessary. |
| Zones do not water. | Programmer is OFF, Rain Delay is active, faulty wiring, or valve issues. | Ensure dial is set to AUTO. Check if Rain Delay is active and cancel if needed. Inspect wiring connections to valves. Check individual valves for proper function. |
| Watering occurs at incorrect times. | Incorrect clock/date setting or programming error. | Verify current time and date settings. Review and correct watering program start times and frequencies. |
| Nuotolinio valdymo pultas neveikia. | Dead remote battery, out of range, or interference. | Replace remote control battery. Move closer to the main unit. Ensure no obstructions are blocking the signal. |
| Watering continues after cycle. | Valve stuck open or programming error. | Check individual valves for debris or damage. Review programming to ensure no overlapping cycles or incorrect durations. |
Specifikacijos
| Modelio numeris | 94906 |
| Zonų skaičius | 6 nepriklausomos zonos |
| Laistymo trukmė | 1 to 99 minutes per zone |
| Programos | 3 independent programs (A, B, C) |
| Pradėti Times " | Up to 4 start times per program (max 12 per day) |
| Lietaus vėlavimas | 24, 48 arba 72 valandų |
| Nuotolinio valdymo pulto diapazonas | Up to 90 meters (wireless) |
| Įvesties tomastage | 240V AC (integrated transformer) |
| Išėjimas ttage | 24V kintamoji srovė |
| Medžiaga | Plastikiniai |
| Ekrano tipas | LCD |
| Matmenys (I x P x A) | 11 x 20.5 x 27.5 cm |
| Svoris | 390 gramų |
| UPC | 046878949065 |
| Kilmės šalis | Ispanija |
Garantija ir palaikymas
Informacija apie garantiją
This Orbit product typically comes with a 3-year warranty. Please refer to the product packaging or Orbit's official websvetainėje rasite naujausias ir išsamias garantijos sąlygas.
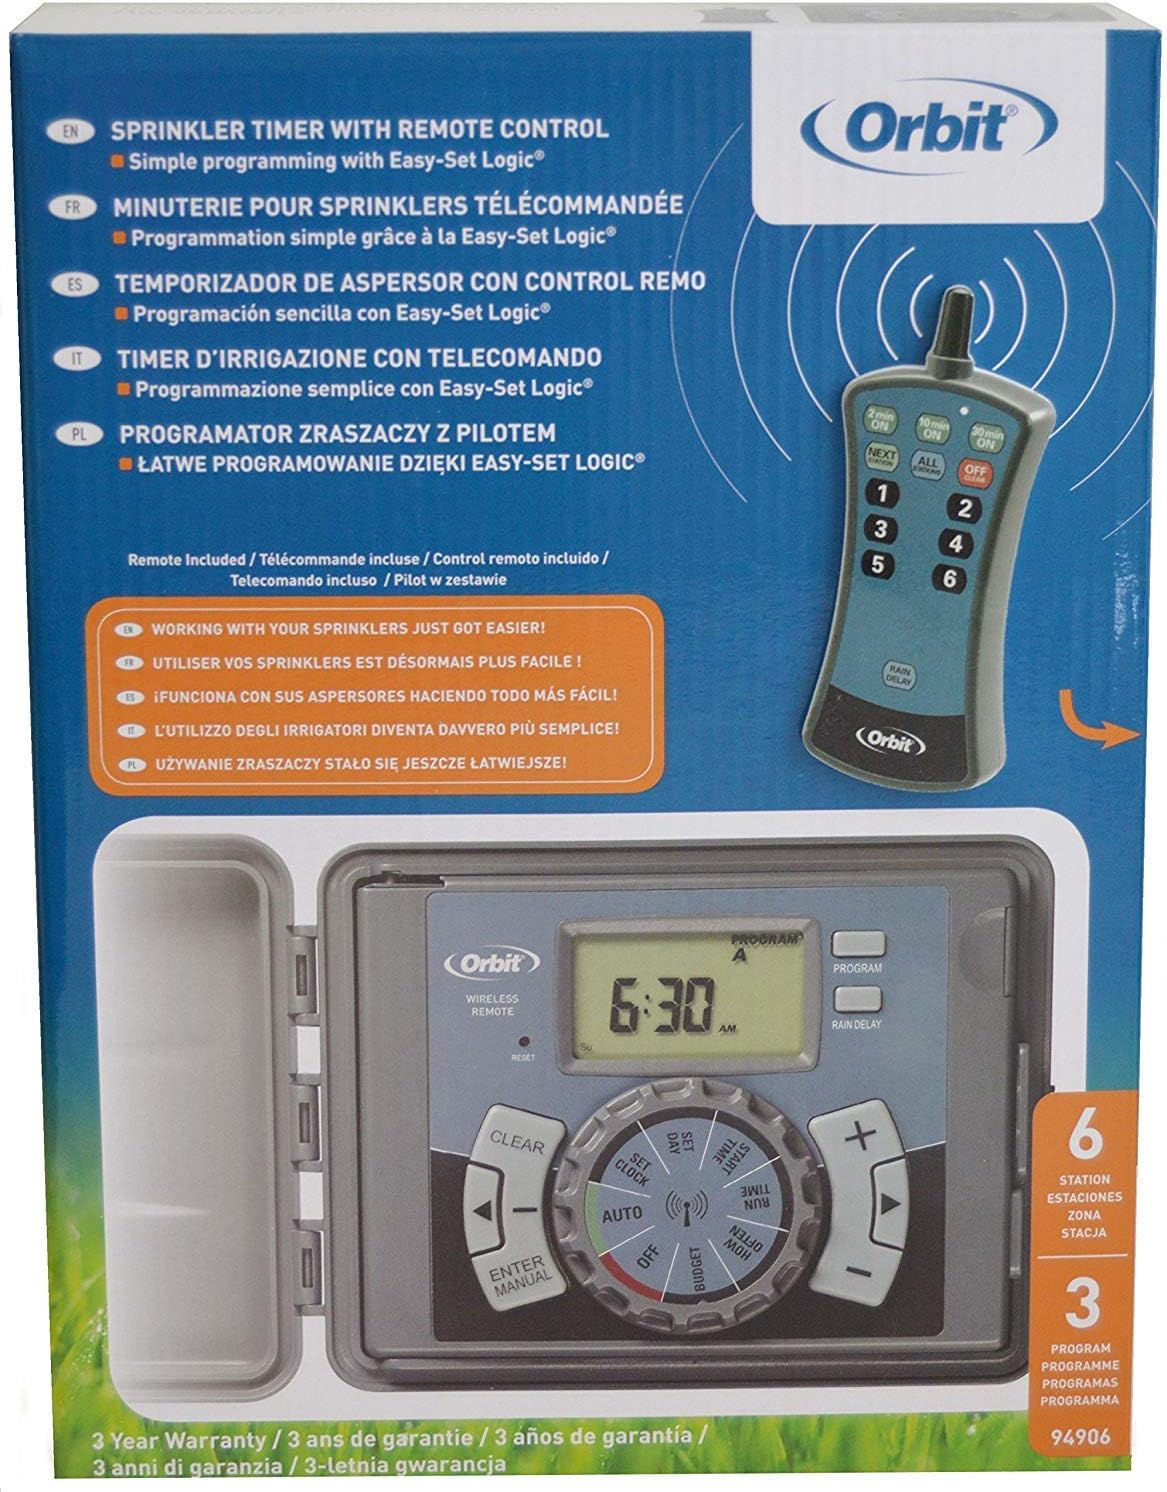
Image: The product packaging for the Orbit 94906, indicating a 3-year warranty.
Pagalba klientams
For technical assistance, troubleshooting, or warranty claims, please contact Orbit Customer Service:
- Telefonas: 1-800-298-5555
- Websvetainė: www.orbitonline.com
Kreipdamiesi į palaikymo tarnybą, turėkite po ranka savo produkto modelio numerį (94906) ir pirkimo informaciją.