Svarbi saugos informacija
Read all instructions carefully before installation and operation. Failure to follow these instructions may result in electric shock, fire, or serious injury. This device is intended for indoor use only.
- ĮSPĖJIMAS: Elektros smūgio pavojus. Prieš montuodami ar atlikdami techninę priežiūrą, atjunkite maitinimą nuo grandinės pertraukiklio arba saugiklių dėžutės.
- Montavimą turėtų atlikti kvalifikuotas elektrikas arba apmokytas personalas.
- Įsitikinkite, kad visi laidų sujungimai yra tvirti ir atitinka vietinius elektros kodeksus.
- Neviršykite maksimalių laikmačio elektros vardinių verčių.
- Keep children away from the timer and wiring during installation and operation.
Produktas baigtasview
The Intermatic 610224 is a digital 7-day programmable timer designed to automate the ON/OFF switching of electrical loads such as lights, fans, and other appliances. It features a clear digital display and intuitive controls for setting daily or weekly schedules. This timer operates at 120V AC and can handle loads up to 15 Amperes.
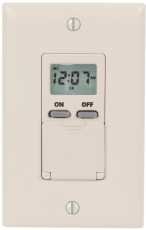
Vaizdas: Priekyje view of the Intermatic 610224 Digital 7-Day Timer. The image displays the timer's ivory-colored faceplate with a digital screen at the top and several control buttons below it. The buttons are arranged for setting time, programming, and manual override functions.
Montavimas
Follow these steps to properly install your Intermatic 610224 Digital 7-Day Timer.
- Išjungti maitinimą: Locate the circuit breaker or fuse that controls the power to the switch you are replacing. Turn off the power completely. Verify power is off using a voltage testeris.
- Pašalinti esamą jungiklį: Carefully remove the wall plate and unscrew the existing switch from the wall box. Disconnect the wires from the old switch, noting which wire is connected to which terminal (Line, Load, Neutral, Ground).
- Laidų jungtys: The Intermatic 610224 timer requires Line (hot), Load, Neutral, and Ground connections. Connect the wires from the wall box to the corresponding terminals on the timer:
- Prijunkite Linija (karšta) wire (usually black) from the power source to the terminal marked 'LINE'.
- Prijunkite Įkelti wire (usually black, going to the fixture) to the terminal marked 'LOAD'.
- Prijunkite Neutralus wire (usually white) to the terminal marked 'NEUTRAL'.
- Prijunkite Žemė wire (usually bare copper or green) to the terminal marked 'GROUND'.
Note: A wiring diagram is typically included with the product packaging. Ensure all connections are tight and secure.
- Montavimas: Gently push the wired timer into the wall box. Secure it with the provided screws. Attach the new wall plate.
- Atkurti maitinimą: Turn the power back on at the circuit breaker or fuse box. The timer display should illuminate.
Naudojimo instrukcijos
This section details how to set the current time and program ON/OFF events for your timer.
Dabartinio laiko ir dienos nustatymas
- Press the 'CLOCK' button. The time display will flash.
- Use the 'HOUR' and 'MIN' buttons to adjust the current hour and minute.
- Press the 'DAY' button to select the current day of the week.
- Press 'CLOCK' again to save the settings and exit.
Programming ON/OFF Events
The timer allows for multiple ON/OFF programs per day. Refer to your specific model's manual for the exact number of programs (typically up to 14 ON and 14 OFF events).
- Press the 'PROG' button. The display will show '1 ON' and the time will flash.
- Use the 'HOUR' and 'MIN' buttons to set the desired ON time for program 1.
- Press the 'DAY' button repeatedly to select the day(s) of the week for this program (e.g., Mon-Sun, Mon-Fri, Sat-Sun, individual days).
- Press 'PROG' again. The display will show '1 OFF' and the time will flash.
- Use the 'HOUR' and 'MIN' buttons to set the desired OFF time for program 1.
- Press the 'DAY' button to select the day(s) for this OFF program, matching the ON program.
- Repeat steps 1-6 for additional ON/OFF programs (e.g., '2 ON', '2 OFF', etc.).
- After setting all desired programs, press the 'CLOCK' button to exit programming mode.
Rankinis nepaisymas
Norėdami laikinai pakeisti dabartinę programą jos neištrindami:
- Press the 'MANUAL' button. This will cycle the output between ON, OFF, and AUTO modes.
- In 'AUTO' mode, the timer follows the programmed schedule.
- In 'ON' or 'OFF' mode, the timer will remain in that state until the next programmed event or until 'MANUAL' is pressed again to return to 'AUTO'.
Vasaros laiko reguliavimas
Some models may have an automatic Daylight Saving Time adjustment feature. If not, manually adjust the time by one hour forward or backward as required using the 'HOUR' button in clock setting mode.
Priežiūra
The Intermatic 610224 Digital 7-Day Timer requires minimal maintenance.
- Valymas: To clean the timer, wipe the surface with a soft, damp šluoste. Nenaudokite abrazyvinių valiklių ar tirpiklių, nes jie gali pažeisti apdailą ar vidinius komponentus.
- Baterijos atsarginė kopija: This timer typically includes an internal battery backup to retain programmed settings during power outages. The battery is usually non-replaceable by the user and designed to last the life of the product. If the display is blank or programs are lost after a power outage, the battery may be depleted, indicating the unit may need replacement.
Trikčių šalinimas
If you encounter issues with your timer, refer to the following common problems and solutions.
| Problema | Galima priežastis | Sprendimas |
|---|---|---|
| Laikmačio ekranas tuščias. | Laikmatis negauna maitinimo. | Patikrinkite grandinės pertraukiklį arba saugiklį. Įsitikinkite, kad laidų jungtys yra tvirtos. |
| Laikmatis neįsijungia/neišsijungia užprogramuotu laiku. | Incorrect programming; Timer is in Manual ON/OFF mode. | Review programming steps. Ensure timer is in 'AUTO' mode (press 'MANUAL' button until 'AUTO' is displayed). |
| Laikas neteisingas po elektros energijos tiekimo nutraukimotage. | Internal battery backup depleted. | Reset the current time and day. If this occurs frequently, the timer may need replacement. |
| Load (light/appliance) does not turn on. | Load is faulty; Wiring issue; Timer is OFF. | Test the load directly. Check wiring connections. Ensure timer is programmed to ON or manually set to ON. |
Specifikacijos
- Modelis: 610224
- ttage: 120V AC 60Hz
- Dabartinis įvertinimas: 15A Resistive, 10A Tungsten, 1/2 HP
- Program Cycles: 7 dienų
- Programos: Up to 28 ON/OFF events (14 ON, 14 OFF)
- Darbinė temperatūra: nuo 0°C iki 50°C (32°F iki 122°F)
- Korpusas: Ivory, Wall Mount
Garantija ir palaikymas
„Intermatic“ produktai gaminami laikantis aukštų kokybės standartų ir jiems suteikiama gamintojo garantija. Dėl konkrečios garantijos informacijos žr. prie produkto pridėtą garantijos kortelę arba apsilankykite oficialioje „Intermatic“ svetainėje. websvetainę.
For technical support, troubleshooting assistance, or to inquire about replacement parts, please contact Intermatic customer service. Contact information can typically be found on the product packaging or the manufacturer's websvetainę.