
Casella CEL-246/K1
Casella CEL-246/K1 Digital Logging Integrating Sound Level Meter Type 2 Kit User Manual
Model: CEL-246/K1
Brand: Casella
1. Įvadas
This manual provides comprehensive instructions for the proper use, setup, operation, and maintenance of the Casella CEL-246/K1 Digital Logging Integrating Sound Level Meter Type 2 Kit. This device is designed for precise sound level measurements, incorporating Digital Signal Processing (DSP) technology for accurate and reliable data.
The CEL-246/K1 offers a wide measurement range, selectable frequency weightings (A and C), and time responses (Slow, Fast, Impulse). It features a non-decaying maximum hold function and a clear display showing current, highest, and average noise levels, along with a time history trend. Data logging capabilities are available via a USB output port.
2. Kas įskaičiuota
The Casella CEL-246/K1 Kit includes the following components:
- One (1) Casella CEL-246/K1 Sound Level Meter
- One (1) Acoustic Calibrator
- One (1) Foam Windscreen
- Vienas (1) nešiojimo dėklas
- One (1) Calibration Certificate
- Three (3) AA Batteries
3. Sąranka
3.1 Akumuliatoriaus įdėjimas
- Locate the battery compartment on the rear of the sound level meter.
- Atidarykite skyriaus dangtelį.
- Įdėkite tris (3) AA baterijas, užtikrindami teisingą poliškumą (+/-).
- Saugiai uždarykite akumuliatoriaus skyriaus dangtelį.
3.2 Attaching the Foam Windscreen
Gently slide the foam windscreen over the microphone at the top of the sound level meter. This helps to reduce wind noise during outdoor measurements.
3.3 Pradinis įjungimas
Press the power button to turn on the device. The display will illuminate, showing the current measurement mode and readings.
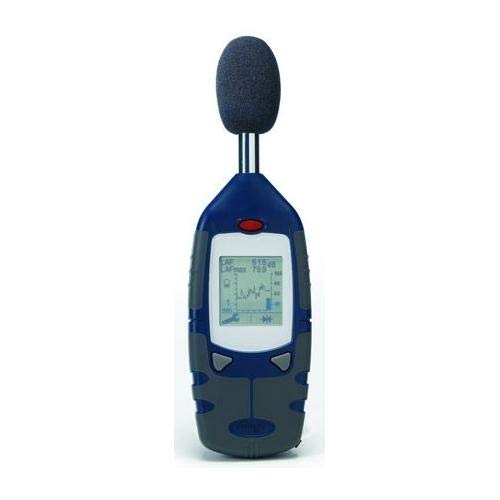
An image showing the Casella CEL-246/K1 Digital Logging Integrating Sound Level Meter. The device is blue and grey, with a display screen showing measurement data and a graph. A black foam windscreen is attached to the top microphone.
4. Naudojimo instrukcijos
4.1 Pagrindinės operacijos
The CEL-246/K1 features simple two-button operation for ease of use. Refer to the on-screen prompts and the full user guide for detailed button functions.
4.2 Frequency Weighting
The meter supports two frequency weighting scales:
- A svertinis koeficientas: Attenuates lower frequencies to approximate the human ear's response, which is most sensitive between 3000 and 4000 Hz. Use for general noise measurements.
- C svertinis koeficientas: Reads all frequencies more uniformly, providing a better response to higher frequencies than A-weighting. Useful for pinpointing problems when A-weighted readings are very high.
4.3 Time Weighting
Selectable time responses include:
- Lėtas: Provides a slower response, suitable for measuring steady noise levels.
- Greitai: Offers a quicker response, ideal for capturing fluctuating noise levels.
- Impulsas: Designed for very short, sharp noise events.
4.4 Maximum Hold Feature
The non-decaying maximum hold feature captures and displays the highest sound pressure level detected until manually reset. This is useful for identifying peak noise events.
4.5 Data Logging and USB Output
The meter includes a USB output port for simple data logging. Connect the device to a PC to download stored data or for real-time data analysis using the optional software package. Data can be exported in spreadsheet format for further analysis.
4.6 Automatinis kalibravimas
The CEL-246/K1 supports auto calibration at a selected decibel level using the included acoustic calibrator. Refer to the full user guide for detailed calibration procedures to ensure measurement accuracy.
5. Priežiūra
5.1 Valymas
Wipe the meter's exterior with a soft, dry cloth. Do not use abrasive cleaners or solvents. Ensure no moisture enters the device.
5.2 Akumuliatoriaus keitimas
Replace batteries when the low battery indicator appears on the display. Always use three (3) new AA batteries of the same type.
5.3 Saugykla
When not in use for extended periods, remove the batteries to prevent leakage. Store the meter in its carrying case in a cool, dry place, away from direct sunlight and extreme temperatures.
5.4 Kalibravimas
Regular calibration is crucial for maintaining measurement accuracy. Use the provided acoustic calibrator according to the instructions in Section 4.6 and the full user guide. It is recommended to calibrate the device before each critical measurement session.
6. Problemų sprendimas
6.1 Meter Not Powering On
- Patikrinkite, ar baterijos įdėtos teisingai, laikantis poliškumo.
- Pakeiskite naujus AA tipo elementus.
- Įsitikinkite, kad maitinimo mygtukas yra tvirtai paspaustas.
6.2 Netikslūs rodmenys
- Perform an auto calibration using the acoustic calibrator.
- Ensure the foam windscreen is properly attached to minimize wind noise.
- Verify that the correct frequency (A or C) and time weighting (Slow, Fast, Impulse) are selected for your measurement environment.
- Check for any physical damage to the microphone or device.
6.3 Data Logging Issues
- Įsitikinkite, kad USB laidas yra tvirtai prijungtas tiek prie matuoklio, tiek prie kompiuterio.
- Verify that the necessary software drivers are installed on your PC.
- Consult the software manual for specific data transfer instructions.
7. Specifikacijos
| Funkcija | Specifikacija |
|---|---|
| Modelio numeris | CEL-246/K1 |
| Matavimo diapazonas | nuo 30 iki 130 dB |
| Dažnio koeficientas | A arba C |
| Laiko svoriai | Slow, Fast, Impulse |
| Ekranas | Current, Highest, Average Noise Level, Time History Trend |
| Išvesties prievadas | USB for data logging |
| Maitinimo šaltinis | 3 x AA baterijos |
| Pakuotės matmenys | 17 x 12.5 x 4 colio |
| Pakuotės svoris | 3.9 svaro |
| Kilmės šalis | Jungtinė Karalystė |
| Gamintojas | Cole-Parmer |
8. Garantija ir palaikymas
For warranty information and technical support, please refer to the documentation provided with your purchase or contact Casella customer service directly. Keep your purchase receipt as proof of purchase.
Manufacturer: Cole-Parmer
Ask a question about this manual
Ask about setup, troubleshooting, compatibility, parts, safety, or missing instructions. Manuals+ will review the question and use this page’s manual context to help answer it.