
1. Įvadas
This manual provides essential information for the safe and efficient operation, setup, and maintenance of your Scheppach Basa3 12 Band Saw. Please read this manual thoroughly before operating the machine to ensure proper use and to prevent injury or damage.
The Scheppach Basa3 12 is a robust band saw designed for precise cutting of various materials, primarily wood and aluminum. It features a powerful 800 Watt motor, a large cast iron table, and adjustable settings for versatile applications.
2. Bendra saugos informacija
WARNING: Always follow basic safety precautions when using electric tools to reduce the risk of fire, electric shock, and personal injury.
- Darbo zonos sauga: Darbo vieta turi būti švari ir gerai apšviesta. Netvarkingos arba tamsios vietos skatina nelaimingus atsitikimus. Nenaudokite elektrinių įrankių sprogioje aplinkoje, pavyzdžiui, ten, kur yra degių skysčių, dujų ar dulkių.
- Elektros sauga: Elektrinių įrankių kištukai turi atitikti lizdą. Niekada jokiu būdu nekeiskite kištuko. Venkite kūno kontakto su įžemintais paviršiais.
- Asmeninis saugumas: Always wear eye protection, hearing protection, and a dust mask. Do not overreach. Keep proper footing and balance at all times. Dress properly; avoid loose clothing, jewelry, and long hair that can be caught in moving parts.
- Įrankio naudojimas ir priežiūra: Nenaudokite elektrinio įrankio per jėgą. Naudokite savo darbui tinkamą elektrinį įrankį. Prieš atlikdami bet kokius pakeitimus, keisdami priedus ar padėdami elektrinius įrankius sandėliuoti, atjunkite kištuką nuo maitinimo šaltinio.
- Specifinė juostinių pjūklų sauga: Ensure blade guards are in place and properly adjusted. Keep hands clear of the blade path. Use push sticks when cutting small pieces.
3. Komponentai ir pakuotės turinys
Your Scheppach Basa3 12 Band Saw package includes the following main components:
- Band Saw Unit
- Stand/Base Frame
- Cross-cut Gauge (Miter Gauge)
- Rip Fence (Parallel Guide)
- Operating Handle (for mobility)

3.1 pav. Baigtaview of the Scheppach Basa3 12 Band Saw with its stand and included cross-cut gauge.
4. Sąranka ir surinkimas
Before initial operation, the band saw requires assembly of its stand and proper installation of the blade and accessories.
4.1 Stovo surinkimas
Carefully unpack all components. Assemble the stand according to the diagrams provided in the separate assembly instructions. Ensure all bolts and nuts are securely tightened. The stand provides a stable base for the band saw and includes wheels for easy repositioning.

Figure 4.1: The integrated wheels and handle allow for easy tilting and movement of the band saw.
4.2 Mounting the Band Saw Unit
Once the stand is assembled, carefully lift the band saw unit and secure it to the stand using the provided hardware. Ensure it is firmly attached and stable before proceeding.
4.3 Peilio montavimas ir įtempimas
Refer to the specific blade installation instructions for your model. Proper blade tension is crucial for accurate cuts and blade longevity. Adjust the blade tension knob until the blade is taut but not overly stressed.
4.4 Dulkių ištraukimo prijungimas
The Scheppach Basa3 12 is equipped with a dust extraction port. Connect a suitable dust collection system or shop vacuum to this port to minimize sawdust accumulation and improve air quality during operation.
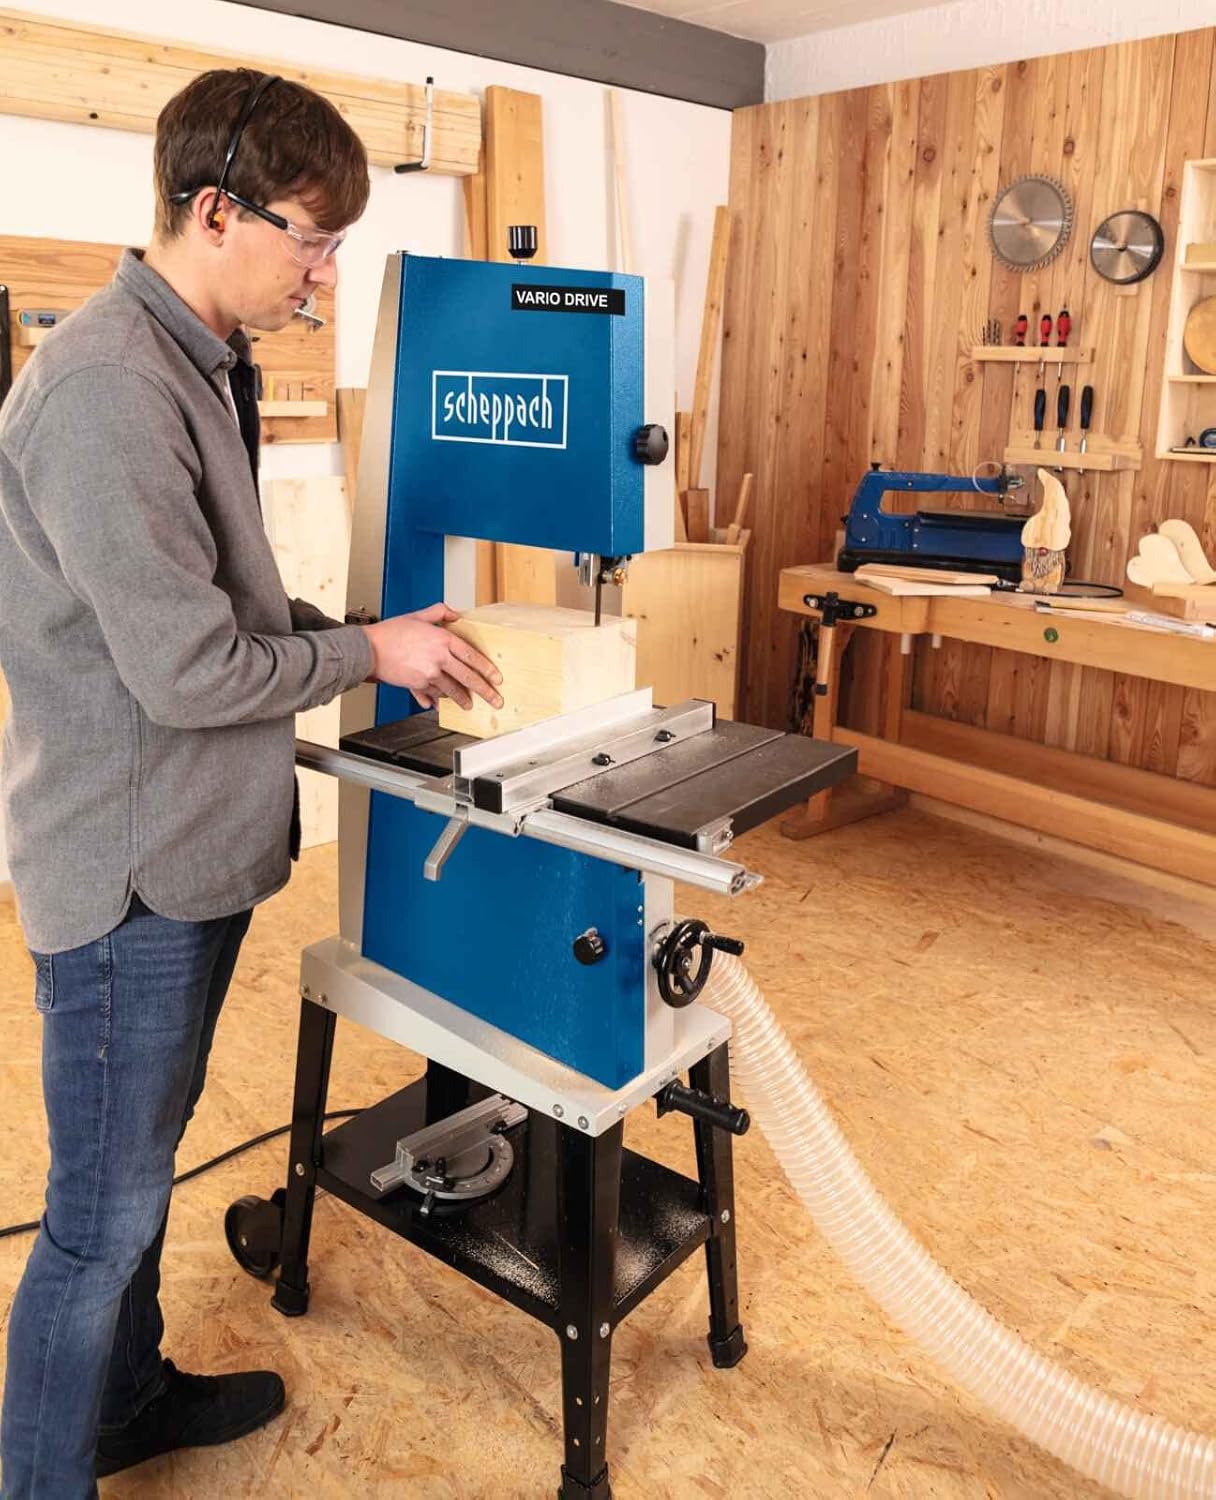
Figure 4.2: Connecting a dust extraction hose to the band saw for cleaner operation.
5. Naudojimo instrukcijos
Prieš atlikdami bet kokius pjovimus, susipažinkite su valdikliais ir reguliavimais.
5.1 Įjungimas / išjungimas
Locate the main power switch, typically a large red button for emergency stop and a green button for start. Ensure the work area is clear before starting the machine.
5.2 Adjusting Blade Guides
The blade guides (upper and lower) must be adjusted to be just clear of the blade, providing support without causing friction. This prevents blade deflection and ensures straight cuts.
5.3 Stalo pakreipimo reguliavimas
The work table can be tilted for angled cuts. Loosen the locking mechanism beneath the table, adjust to the desired angle (up to 45 degrees), and then securely tighten the lock. The machine features continuous table adjustment.

Figure 5.1: Adjusting the work table for angled cuts.
5.4 Using the Rip Fence and Cross-cut Gauge
The rip fence is used for making straight, parallel cuts. Position it at the desired distance from the blade and lock it in place. The cross-cut gauge (miter gauge) is inserted into the table slot and used for making accurate cross-cuts and angled cuts across the width of the workpiece.
5.5 Pjovimo operacija
Place the workpiece firmly on the table. Turn on the machine and allow the blade to reach full speed. Feed the workpiece slowly and steadily into the blade, applying even pressure. Always keep your hands away from the blade path and use a push stick when necessary.

Figure 5.2: Proper technique for feeding material into the band saw.
6. Priežiūra
Regular maintenance ensures the longevity and optimal performance of your band saw. Always disconnect the machine from the power supply before performing any maintenance.
6.1 Valymas
After each use, clean the machine to remove sawdust and debris. Use a brush or vacuum cleaner. Do not use solvents that could damage painted surfaces or plastic components.
6.2 Ašmenų keitimas
Blades will dull over time and need replacement. Follow the instructions for releasing blade tension, removing the old blade, and installing a new one. Ensure the new blade is correctly seated on the wheels and properly tensioned.
6.3 Belt and Pulley Inspection
Periodically inspect the drive belt and pulleys for wear or damage. A worn belt can lead to reduced power and inconsistent blade speed. Replace if necessary.

6.1 pav. Vidinis view of the drive system, showing the belt and pulleys.
7. Problemų sprendimas
Šiame skyriuje aptariamos dažniausiai pasitaikančios problemos, su kuriomis galite susidurti naudodami juostinį pjūklą.
| Problema | Galima priežastis | Sprendimas |
|---|---|---|
| Peilis klajoja arba pjauna netiksliai | Dull blade, incorrect blade tension, misaligned blade guides, worn blade. | Replace blade, adjust blade tension, adjust blade guides, check for blade damage. |
| Motor runs but blade does not move or moves slowly | Loose or broken drive belt, obstruction in blade path. | Inspect and replace drive belt if necessary, remove any obstructions. |
| Pernelyg didelė vibracija ar triukšmas | Loose components, unbalanced blade, worn bearings. | Check all fasteners, replace blade, consult a qualified technician for bearing issues. |
| Dust collection is ineffective | Clogged dust port, inadequate dust collector, loose hose connection. | Clear dust port, use a more powerful dust collector, secure hose connections. |
8. Techninės specifikacijos
Key technical data for the Scheppach Basa3 12 Band Saw:
| Specifikacija | Vertė |
|---|---|
| Modelis | Basa3 - 230 V |
| Gamintojo nuoroda | 1901503901 |
| ttage | 230 voltų |
| Galia | 800 vatų |
| Juostos rato skersmuo | 315 mm |
| Stalo matmenys (ilgis x plotis) | 54.8 x 40 cm |
| Ašmenų ilgis | 306 milimetrų |
| Greitis | 750 aps./min |
| Gaminio matmenys (I x P x A) | 45 x 50 x 20 cm (shipping/package) / 116L x 62W x 42H cm (assembled) |
| Svoris | 9999 Kilograms (Note: This weight appears to be a placeholder or error in source data) |
| Medžiaga (rankena/svirtis) | Metalas ir Plastikas |
| Ašmenų medžiaga | Legiruotasis plienas |
| Rekomenduojamas paviršius | Aliuminis, Mediena |
| Ypatinga funkcija | Continuous table adjustment |
| Sertifikavimas | CE |
9. Garantija ir palaikymas
For warranty information, please refer to the documentation included with your purchase or contact Scheppach customer service directly. Information regarding the availability of spare parts is not explicitly provided in the product details. For technical support or spare parts inquiries, it is recommended to contact Scheppach or your authorized dealer.
You can find more information about Scheppach products and support on their official websvetainėje arba per įgaliotus mažmenininkus.