1. Įvadas
This manual provides detailed instructions for the installation, operation, maintenance, and troubleshooting of your Gateway SX2865 SFF Desktop Motherboard H61 (Model DB.U7411.001). This motherboard is designed for Small Form Factor (SFF) desktop systems, featuring the Intel H61 Express chipset and supporting LGA 1155/1156 CPUs and DDR3 RAM. Please read this manual thoroughly before proceeding with any installation or configuration to ensure proper functionality and safety.
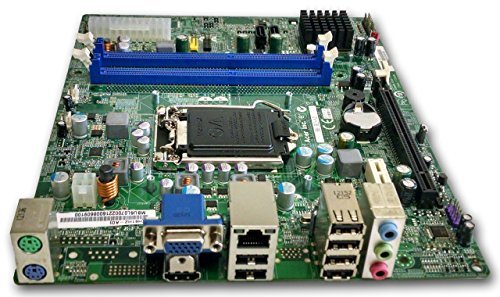
1 paveikslas: Baigėsiview of the Gateway SX2865 SFF Desktop Motherboard H61. This image displays the main components and layout of the motherboard, including the CPU socket, RAM slots, and various connectors.
2. Saugos informacija
Always observe the following safety precautions when handling and installing computer components:
- Prieš montuodami arba išimdami bet kokius komponentus, atjunkite maitinimo laidą nuo sieninio lizdo.
- Dėvėkite antistatinį riešo dirželį, kad išvengtumėte elektrostatinės iškrovos (ESD) žalos jautriems komponentams.
- Pagrindinę plokštę imkite už kraštų, kad neliestumėte jautrių komponentų ar grandinių.
- Užtikrinkite tinkamą ventiliaciją kompiuterio korpuse, kad išvengtumėte perkaitimo.
- Saugokite pagrindinę plokštę nuo drėgmės ar ekstremalių temperatūrų.
- If you are unsure about any installation step, consult a qualified technician.
3. Sąranka ir diegimas
Follow these steps to properly install the Gateway SX2865 SFF Desktop Motherboard into your system:
3.1. Važiuoklės paruošimas
- Open your computer chassis and ensure it is clean and free of dust.
- Install the I/O shield provided with your chassis or motherboard into the rear panel opening.
- Verify that the standoffs in the chassis align with the mounting holes on the motherboard. Adjust if necessary.
3.2. CPU diegimas
- Locate the CPU socket (LGA 1155/1156) on the motherboard.
- Švelniai pakelkite apkrovos svirtį ir atidarykite procesoriaus lizdo dangtelį.
- Carefully align the CPU with the socket, matching the golden triangle on the CPU with the triangle mark on the socket. Do not force the CPU into the socket.
- Uždarykite lizdo dangtelį ir spauskite apkrovos svirtį žemyn, kol ji užsifiksuos vietoje.
- Apply a thin layer of thermal paste to the CPU surface (if not pre-applied on the cooler).
- Install the CPU cooler according to its manufacturer's instructions, ensuring it is securely fastened.
3.3. RAM diegimas
- Pagrindinėje plokštėje suraskite DDR3 DIMM lizdus.
- Atidarykite spaustukus abiejuose DIMM lizdo galuose.
- Suderinkite RAM modulio įpjovą su DIMM lizdo rakteliu.
- Tvirtai spauskite abu RAM modulio galus, kol spaustukai užsifiksuos savo vietoje.
3.4. Pagrindinės plokštės tvirtinimas
- Carefully place the motherboard into the chassis, aligning the mounting holes with the standoffs.
- Secure the motherboard with screws, ensuring not to overtighten.
3.5. Periferinių įrenginių ir maitinimo prijungimas
- Prijunkite 24 kontaktų ATX maitinimo jungtį ir 4 kontaktų CPU maitinimo jungtį iš maitinimo šaltinio prie pagrindinės plokštės.
- Connect SATA data cables from your storage devices (HDD/SSD) to the SATA ports on the motherboard.
- Connect front panel connectors (power button, reset button, USB, audio) to their respective headers on the motherboard. Refer to the motherboard's silkscreen labels for correct orientation.
- Įdėkite visas išplėtimo plokštes (pvz., vaizdo plokštes) į atitinkamus PCIe lizdus ir pritvirtinkite jas.
- Connect all necessary cables to your power supply.
4. Valdymas ir konfigūracija
4.1. Pradinis paleidimas
- After all components are installed and connected, close the chassis.
- Prijunkite monitorių, klaviatūrą ir pelę.
- Prijunkite maitinimo laidą prie maitinimo šaltinio ir sieninio lizdo.
- Paspauskite maitinimo mygtuką kompiuteryje.
4.2. BIOS / UEFI sąranka
The BIOS (Basic Input/Output System) or UEFI (Unified Extensible Firmware Interface) is firmware that initializes hardware during the booting process. To enter the BIOS/UEFI setup utility:
- During the initial boot-up sequence, repeatedly press the designated key (commonly Del, F2, arba F10). The exact key may vary; check the on-screen prompts.
- Within the BIOS/UEFI, you can configure settings such as:
- Sistemos data ir laikas
- Boot Order (to install an operating system from a USB drive or DVD)
- SATA Mode (AHCI, IDE)
- CPU and Memory settings (advanced users)
- Išsaugokite pakeitimus ir išeikite iš BIOS / UEFI, kad tęstumėte paleidimą.
4.3. Operacinės sistemos ir tvarkyklių diegimas
After configuring the BIOS/UEFI, proceed with installing your preferred operating system (e.g., Windows, Linux). Once the OS is installed, install the necessary drivers for the motherboard's components (chipset, audio, LAN, etc.). These drivers are typically available on the manufacturer's website (Acer/Gateway) or can be found through the operating system's update features.
5. Priežiūra
Reguliarus pagrindinės plokštės aptarnavimas padeda užtikrinti jos ilgaamžiškumą ir stabilų veikimą:
- Dulkių šalinimas: Periodically clean the inside of your computer case, including the motherboard, CPU cooler, and fan vents, using compressed air. Ensure the system is powered off and unplugged before cleaning.
- BIOS atnaujinimai: Patikrinkite gamintojo website (Acer/Gateway) for BIOS/UEFI updates. Updates can improve stability, add support for new hardware, or fix bugs. Follow the update instructions carefully to avoid damaging the motherboard.
- Tvarkyklės atnaujinimai: Siekiant užtikrinti optimalų našumą ir suderinamumą, nuolat atnaujinkite sistemos tvarkykles.
- Fizinė apžiūra: Retkarčiais apžiūrėkite pagrindinę plokštę, ar nėra kokių nors pažeidimų, atsilaisvinusių jungčių ar išsipūtusių kondensatorių.
6. Problemų sprendimas
Jei kyla problemų dėl pagrindinės plokštės, žr. šiuos įprastus trikčių šalinimo veiksmus:
- Nėra galios:
- Ensure the power supply is connected correctly to the motherboard (24-pin ATX and 4-pin CPU).
- Check that the power supply switch is in the 'ON' position.
- Verify the power cord is securely plugged into both the power supply and the wall outlet.
- Confirm the front panel power button connector is correctly attached to the motherboard.
- Nėra ekrano:
- Ensure the monitor is powered on and connected to the correct video output (either integrated graphics or a dedicated graphics card).
- Iš naujo įstatykite RAM modulius. Pabandykite paleisti kompiuterį tik su vienu įdiegtu RAM moduliu.
- Iš naujo įstatykite vaizdo plokštę (jei taikoma).
- Check if the CPU cooler is properly installed and the CPU power connector is secure.
- System Fails to Boot / POST Errors:
- Listen for beep codes from the motherboard's speaker (if installed). Consult the motherboard's documentation for beep code meanings.
- Clear the CMOS (Complementary Metal-Oxide-Semiconductor) by removing the CMOS battery for a few minutes or using the clear CMOS jumper (refer to motherboard layout).
- Ensure all essential components (CPU, RAM, GPU) are correctly installed.
- Operacinės sistemos problemos:
- Verify that all necessary drivers are installed and up to date.
- Check SATA cable connections for storage devices.
- Run diagnostic tools for hard drives/SSDs and RAM.
7. Specifikacijos
Key technical specifications for the Gateway SX2865 SFF Desktop Motherboard H61 (Model DB.U7411.001):
| Funkcija | Detalė |
|---|---|
| Prekės ženklas | Vartai |
| Modelio pavadinimas | SX2865 |
| Prekės modelio numeris | DB.U7411.001 |
| Gamintojas | Acer |
| Lustų rinkinio tipas | Intel H61 Express |
| CPU lizdas | LGA 1155 or LGA 1156 |
| Suderinami procesoriai | Intel Xeon (and other compatible LGA 1155/1156 CPUs) |
| RAM atminties technologija | DDR3 |
| Atminties laikrodžio greitis | 2133 MHz (Max supported, actual speed depends on CPU and RAM) |
| Atminties talpa | 16 GB (Maximum supported) |
| Suderinami įrenginiai | Asmeninis kompiuteris |
| Platforma | Linux (and other compatible operating systems) |
| Formos faktorius | uATX (Micro-ATX) |
8. Garantija ir palaikymas
For warranty information and technical support regarding your Gateway SX2865 SFF Desktop Motherboard H61 (Model DB.U7411.001), please refer to the documentation provided with your original system or contact the manufacturer directly.
- Gamintojas: Acer (as per product specifications)
- Prekinis ženklas: Vartai
- Aplankykite pareigūną Vartų palaikymas websvetainę or Acer palaikymas websvetainę vairuotojams, DUK ir kontaktinė informacija.
- Išsaugokite pirkimo įrodymą, kad galėtumėte kreiptis dėl garantijos.