
1. Įvadas
This manual provides essential information for the safe and efficient operation of your KitchenAid 5KMT223GER 2-Slot Automatic Toaster. Please read all instructions carefully before first use and retain for future reference.

1.1 vaizdas: priekis view of the KitchenAid 5KMT223GER 2-Slot Automatic Toaster.
2. Svarbios saugos instrukcijos
Naudojant elektros prietaisus, visada reikia laikytis pagrindinių saugos priemonių, įskaitant:
- Perskaitykite visas instrukcijas.
- Nelieskite karštų paviršių. Naudokite rankenas arba rankenėles.
- Kad apsisaugotumėte nuo elektros smūgio, nemerkite laido, kištukų ar skrudintuvo į vandenį ar kitą skystį.
- Atidžiai prižiūrėti būtina, kai bet kurį prietaisą naudoja vaikai arba jį naudoja šalia vaikų.
- Ištraukite kištuką iš elektros lizdo, kai nenaudojate ir prieš valydami. Prieš uždėdami arba nuimdami dalis, leiskite atvėsti.
- Nenaudokite jokio prietaiso su pažeistu laidu ar kištuku, taip pat po to, kai prietaisas sugedo, buvo numestas ar kitaip pažeistas. Grąžinkite prietaisą į artimiausią įgaliotą techninės priežiūros centrą apžiūrai, remontui ar reguliavimui.
- Prietaiso gamintojo nerekomenduojamų priedų naudojimas gali susižaloti.
- Nenaudoti lauke.
- Neleiskite laidui kaboti virš stalo ar prekystalio krašto ir neliesti karštų paviršių.
- Nedėkite ant įkaitusios dujinės ar elektrinės viryklės ar šalia jos, taip pat į įkaitintą orkaitę.
- Norėdami atjungti, išjunkite bet kurį valdiklį, tada ištraukite kištuką iš elektros lizdo.
- Nenaudokite prietaiso ne pagal paskirtį.
- Į skrudintuvą negalima dėti didelių maisto produktų, metalinių folijos pakuočių ar indų, nes gali kilti gaisro arba elektros smūgio pavojus.
- Gaisras gali kilti, jei skrudintuvai yra uždengti arba liečiasi su degiomis medžiagomis, įskaitant užuolaidas, užuolaidas, sienas ir panašius dalykus.
- Nemėginkite išjudinti maisto, kai skrudintuvas įjungtas.
- Nedirbkite be priežiūros.
- Always remove the crumb tray for cleaning. Do not operate the toaster without the crumb tray in place.
3. Dalys ir savybės
Familiarize yourself with the components of your KitchenAid 2-Slot Automatic Toaster:
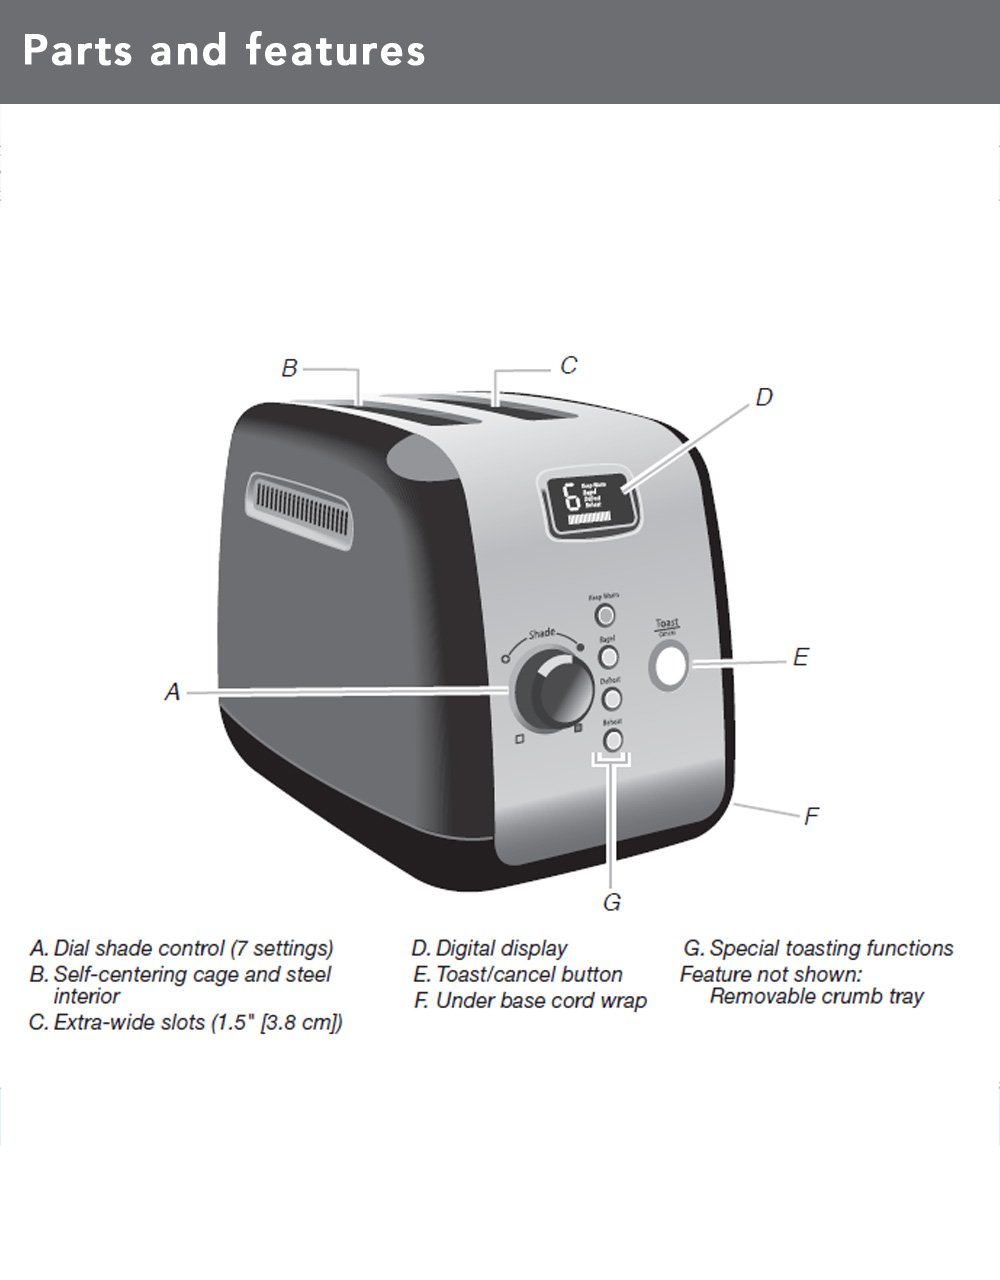
Image 3.1: Diagram illustrating the main parts and features of the toaster.
- Shade Control Dial (A): Adjusts the browning level with 7 settings.
- Self-Centering Bread Racks (B): Automatiškai centruoja duoną, kad skrudinimas būtų tolygus.
- Extra-Wide Slots (C): 3.8 cm (1.5 inches) wide slots accommodate various bread types.
- Digital Display (D): Shows selected shade setting and a countdown timer for toasting progress.
- Toast/Cancel Button (E): Initiates or cancels the toasting cycle. Features motorized lift.
- Under Base Cord Wrap (F): Patogiam laido laikymui.
- Special Toasting Functions (G): Includes Keep Warm, Bagel, Defrost, and Reheat buttons.
- Nuimamas trupinių padėklas: Located at the back for easy cleaning (not shown in diagram).
4. Sąranka
Before using your toaster for the first time:
- Išpakuokite skrudintuvą ir išimkite visas pakavimo medžiagas.
- Nuvalykite skrudintuvo išorę skelbimuamp Prieš įjungdami, įsitikinkite, kad jis visiškai sausas.
- Skrudintuvą pastatykite ant stabilaus, lygaus, karščiui atsparaus paviršiaus, atokiau nuo degių medžiagų.
- Ensure the crumb tray is properly inserted at the back of the toaster.
- For the first use, operate the toaster without bread on the highest shade setting (7) to burn off any manufacturing residues. A slight odor or smoke may be present; this is normal. Allow the toaster to cool completely.
5. Naudojimo instrukcijos
Follow these steps to toast bread and use the special functions:

Image 5.1: Bread slices inserted into the toaster's extra-wide slots.
5.1 Pagrindinis skrudinimas
- Prijunkite skrudintuvą prie įžeminto elektros lizdo.
- Place bread slices into the toasting slots. The self-centering racks will automatically adjust.
- Pasukite Šešėlių valdymo ratukas to select your desired browning level (1 for lightest, 7 for darkest). The digital display will show the selected shade.
- Paspauskite Toast/Cancel Button. The motorized lift will lower the bread into the slots, and the toasting cycle will begin. The digital display will show a countdown.
- Once the cycle is complete, the toaster will automatically raise the toasted bread.
- Norėdami bet kuriuo metu sustabdyti skrudinimo ciklą, paspauskite Toast/Cancel Button. The bread will be raised.
5.2 Specialiosios funkcijos
Your toaster includes dedicated buttons for specialized toasting needs:
- LAIKYTI ŠILTA: Press this button after a toasting cycle to keep toasted food warm for up to one minute. The toaster will gently lower and raise the bread after the warming period.
- BAGELIS: This function toasts the cut-side of a bagel while gently warming the outer surfaces. Insert bagels with the cut side facing inwards. Select your desired shade, then press the BAGELIS mygtuką, po kurio eina Toast/Cancel Button.
- ŠILDYMAS: Use this function to defrost and toast frozen food. Select your desired shade, then press the ATSILIEPUSI mygtuką, po kurio eina Toast/Cancel Button. The toaster will automatically adjust the toasting time.
- ŠILDYKITE: This function quickly reheats previously toasted food without further browning. Press the ŠILDYKITE mygtuką, po kurio eina Toast/Cancel Button.
6. Valymas ir priežiūra
Reguliarus valymas užtikrina optimalų veikimą ir pailgina skrudintuvo tarnavimo laiką.
6.1 trupinių padėklas

Image 6.1: The removable crumb tray for easy cleaning.
- Prieš valydami skrudintuvą, visada atjunkite jį nuo elektros tinklo ir leiskite jam visiškai atvėsti.
- Pull out the removable crumb tray located at the back of the toaster.
- Discard crumbs. The crumb tray can be washed in the top rack of a dishwasher or by hand with warm, soapy water. Rinse thoroughly and dry completely before reinserting.
- Never operate the toaster without the crumb tray properly inserted.
6.2 Išorė
- Nuvalykite skrudintuvo išorę skelbimuamp skudurėliu ir gerai išdžiovinkite.
- Nenaudokite abrazyvinių valiklių ar šveitimo kempinėlių, nes jos gali subraižyti paviršių.
- Niekada nemerkite skrudintuvo į vandenį ar kitą skystį.
7. Problemų sprendimas
If you experience issues with your toaster, refer to the following table for common problems and solutions:
| Problema | Galima priežastis | Sprendimas |
|---|---|---|
| Skrudintuvas neįsijungia. | Neįjungta; maitinimas išjungtastage; suveikė grandinės pertraukiklis. | Įsitikinkite, kad skrudintuvas yra tvirtai įjungtas į veikiantį lizdą. Patikrinkite buitinį elektros grandinės jungiklį. |
| Bread does not lower or raise. | Toaster not powered; Toast/Cancel button not pressed; food jammed. | Ensure power is on. Press Toast/Cancel button. Unplug toaster and carefully remove any jammed food. |
| Netolygus skrudinimas. | Nevienodas duonos storis; trupinių sankaupos. | Ensure bread slices are of similar thickness. Clean crumb tray regularly. |
| Dūmų arba degėsių kvapas. | Food jammed; crumb buildup; high shade setting. | Immediately press Cancel. Unplug and allow to cool. Remove jammed food or clean crumb tray. Reduce shade setting for next use. |
Jei problema išlieka ir išbandžius šiuos sprendimus, susisiekite su „KitchenAid“ klientų aptarnavimo tarnyba.
8. Specifikacijos
| Funkcija | Detalė |
|---|---|
| Modelio numeris | 5KMT223GER |
| Vattage | 1100 vatų |
| ttage | 220 voltų |
| Slot Count | 2 |
| Šešėlių nustatymai | 7 |
| Specialios funkcijos | Keep Warm, Bagel, Defrost, Reheat, Cancel |
| Medžiaga | Metalas |
| Gaminio matmenys (D x P x A) | 25 gylio x 34 pločio x 25.5 aukščio centimetrų |
| Prekės svoris | 2200 gramų |
| Įtraukti komponentai | Pop-up Toaster, Removable Crumb Tray |
9. Garantija ir palaikymas
Your KitchenAid 5KMT223GER 2-Slot Automatic Toaster is covered by a 2 metų ribota garantija nuo įsigijimo datos. Ši garantija taikoma medžiagų ir gamybos defektams, atsiradusiems įprasto naudojimo namuose metu.
For warranty service, technical support, or to order replacement parts, please contact KitchenAid customer service. Keep your purchase receipt as proof of purchase for warranty claims.