
Įvadas
The UNI-T UT151C is a high-reliability handheld digital multimeter designed for precise electrical measurements. It functions as a multimeter, LCR meter, and temperature tester, capable of measuring DC/AC voltage, DC/AC current, resistance, capacitance, and temperature. This manual provides essential information for the safe and effective operation, setup, and maintenance of your UT151C device.
Saugos informacija
Įspėjimas: To avoid electric shock or personal injury, read all safety information before using this product. Use the product only as specified in this manual, or the protection provided by the product may be impaired.
- Visada įsitikinkite, kad bandymo laidai yra geros būklės ir tinkamai prijungti.
- Netepkite daugiau nei vardinis tūristage, kaip pažymėta ant skaitiklio, tarp gnybtų arba tarp bet kurio gnybto ir įžeminimo.
- Būkite ypač atsargūs dirbdami su ttagesant didesnei nei 30 V AC RMS, 42 V pikinei vertei arba 60 V DC įtampai. Šie įtampų lygiaitagtai kelia šoko pavojų.
- Before measuring current, ensure the circuit is de-energized and the meter is connected in series.
- Prieš keisdami funkcijas, atjunkite bandymo laidus nuo bandomosios grandinės.
- Do not operate the meter with the case open or if the battery cover is not securely closed.
- Kad rodmenys būtų tikslūs, pakeiskite bateriją, kai tik pasirodys išsikrovusios baterijos indikatorius.
Produktas baigtasview
Familiarize yourself with the components of your UNI-T UT151C Digital Multimeter.
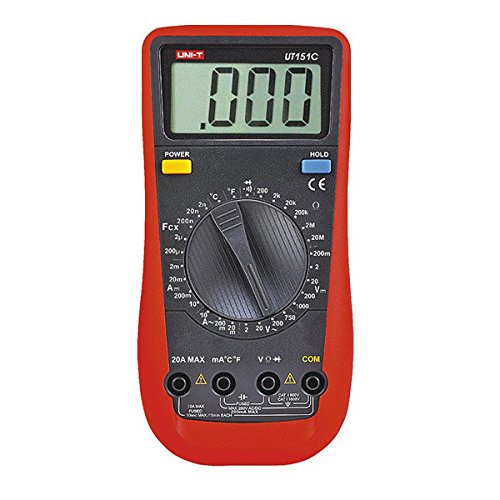
1 paveikslas: Priekyje view of the UNI-T UT151C Digital Multimeter. This image displays the LCD screen, the central rotary function switch, and the input terminals at the bottom. The 'HOLD' button is visible on the right side of the display.
- LCD ekranas: Rodo matavimo rodmenis, vienetus ir funkcijų indikatorius.
- Funkcijos sukamasis jungiklis: Used to select the desired measurement function (e.g., V~, V-, A~, A-, Ω, F, °C/°F, Diode, Continuity).
- Įvesties lizdai: Terminals for connecting test leads. Typically include COM (common), VΩmA (voltage, resistance, small current), and 20A (high current).
- LAIKYMO mygtukas: Įšaldo dabartinį rodmenį ekrane.
- Maitinimo mygtukas: Įjungia arba išjungia įrenginį.
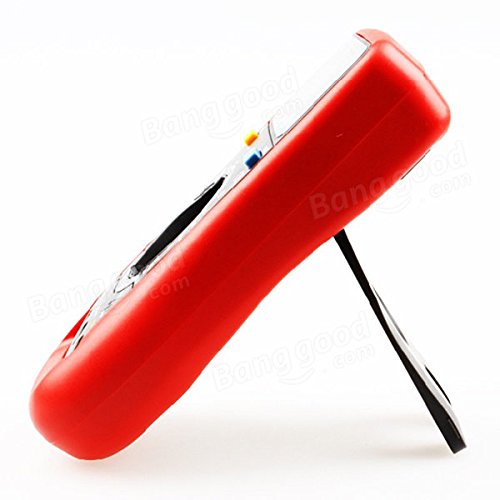
2 paveikslas: Šoninė view of the UNI-T UT151C Digital Multimeter. This image highlights the integrated kickstand, allowing the meter to be propped up for easier viewnaudojimo metu.
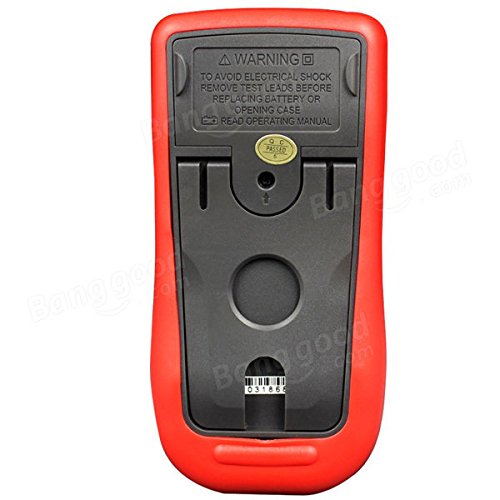
3 paveikslas: Atgal view of the UNI-T UT151C Digital Multimeter. This image shows the battery compartment cover and important safety warnings regarding electrical shock and battery replacement.
Sąranka
1. Akumuliatoriaus įdėjimas
The UNI-T UT151C requires a 9V (6F22) battery for operation. The battery is not included.
- Įsitikinkite, kad multimetras yra išjungtas, ir atjunkite visus bandymo laidus.
- Raskite baterijų skyrių matuoklio gale (žr. 3 pav.).
- Unscrew the retaining screw(s) and remove the battery cover.
- Connect a new 9V battery to the battery clips, observing correct polarity.
- Įdėkite bateriją į skyrių ir uždėkite dangtelį, pritvirtindami jį varžtu (-ais).
Pastaba: Replace the battery immediately when the low battery indicator appears on the display to maintain measurement accuracy.
2. Bandymo laidų prijungimas
Visada prijunkite juodą bandymo laidą prie COM (common) jack. Connect the red test lead to the appropriate input jack based on the measurement type:
- Už ttage, resistance, capacitance, diode, continuity, and temperature measurements, connect the red lead to the VΩmA domkratas.
- For current measurements up to 200mA, connect the red lead to the VΩmA domkratas.
- For current measurements up to 20A, connect the red lead to the 20A domkratas.
Atsargiai: Incorrect lead connection can damage the meter or the circuit under test.
Naudojimo instrukcijos
Follow these steps for various measurement functions.
1. Maitinimo įjungimas/išjungimas
Paspauskite GALIA button to turn the multimeter on. The meter features an auto power-off function to conserve battery life. To turn it off manually, press the GALIA mygtuką dar kartą.
2. Nuolatinės srovės įtampos matavimastage (V-)
- Prijunkite juodą laidą prie COM ir raudonas švinas į VΩmA.
- Nustatykite sukamąjį jungiklį į norimą padėtį V- range (e.g., 2V, 20V, 200V, 1000V). If the voltagJei e nežinoma, pradėkite nuo didžiausio diapazono ir mažinkite pagal poreikį.
- Prijunkite bandymo laidus lygiagrečiai prie matuojamo komponento arba grandinės.
- Perskaitykite ttage reikšmė LCD ekrane.
3. Matavimas AC Voltage (V~)
- Prijunkite juodą laidą prie COM ir raudonas švinas į VΩmA.
- Nustatykite sukamąjį jungiklį į norimą padėtį V~ range (e.g., 2V, 20V, 200V, 750V).
- Connect the test leads in parallel across the AC source or component.
- Perskaitykite AC ttage reikšmė LCD ekrane.
4. Measuring DC Current (A-)
- Atsargiai: Always connect the meter in series with the circuit. Never connect it in parallel across a voltage source when measuring current.
- Atjunkite maitinimą nuo grandinės.
- Nutraukite grandinę toje vietoje, kur reikia matuoti srovę.
- For currents up to 200mA, connect the black lead to COM ir raudonas švinas į VΩmA.
- For currents up to 20A, connect the black lead to COM ir raudonas švinas į 20A.
- Set the rotary switch to the appropriate A- diapazonas.
- Connect the test leads to complete the circuit.
- Apply power to the circuit and read the DC current value.
5. Measuring AC Current (A~)
- Follow the same safety precautions and connection steps as for DC Current measurement.
- Set the rotary switch to the appropriate A~ diapazonas.
- Apply power to the circuit and read the AC current value.
6. Varžos (Ω) matavimas
- Ensure the circuit or component is completely de-energized before measuring resistance.
- Prijunkite juodą laidą prie COM ir raudonas švinas į VΩmA.
- Pasukite sukamąjį jungiklį į padėtį Ω diapazonas.
- Prijunkite bandymo laidus prie komponento.
- Perskaitykite pasipriešinimo vertę ekrane.
7. Measuring Capacitance (F)
- Prieš matavimą įsitikinkite, kad kondensatorius yra visiškai išsikrovęs, kad nepažeistumėte matuoklio.
- Prijunkite juodą laidą prie COM ir raudonas švinas į VΩmA.
- Pasukite sukamąjį jungiklį į padėtį F (Capacitance) range.
- Prijunkite bandymo laidus prie kondensatoriaus gnybtų.
- Ekrane perskaitykite talpos vertę.
8. Measuring Temperature (°C/°F)
- Connect the temperature probe (if included and compatible) to the COM ir VΩmA domkratai, stebint poliškumą.
- Pasukite sukamąjį jungiklį į padėtį °C or °F padėtis.
- Temperatūros zondo galiuką uždėkite ant objekto, kurio temperatūrą norite matuoti, arba šalia jo.
- Nuskaitykite temperatūros vertę ekrane.
9. Diodų testas
- Įsitikinkite, kad diodas yra atjungtas nuo grandinės.
- Prijunkite juodą laidą prie COM ir raudonas švinas į VΩmA.
- Pasukite sukamąjį jungiklį į padėtį Diodas simbolis.
- Prijunkite raudoną laidą prie diodo anodo, o juodą laidą – prie katodo. Tiesioginė įtampatage drop (e.g., 0.5V to 0.8V for silicon diodes) will be displayed.
- Apkeiskite laidus vietomis. Ekrane turėtų būti rodoma „OL“ (atvira kilpa), tai reiškia, kad diodas veikia gerai.
10. Tęstinumo testas
- Įsitikinkite, kad grandinė arba komponentas yra atjungtas nuo įtampos.
- Prijunkite juodą laidą prie COM ir raudonas švinas į VΩmA.
- Pasukite sukamąjį jungiklį į padėtį Tęstinumas symbol (often shared with Diode test).
- Prijunkite bandymo laidus prie komponento arba grandinės kelio.
- If there is continuity (low resistance), the buzzer will sound, and a low resistance value will be displayed. "OL" indicates an open circuit.
11. Duomenų laikymo funkcija
Paspauskite LAIKYTI mygtuką, kad sustabdytumėte dabartinį rodmenį ekrane. Paspauskite jį dar kartą, kad atleistumėte fiksavimą ir tęstumėte tiesioginius matavimus.
Priežiūra
Tinkama priežiūra užtikrina jūsų multimetro ilgaamžiškumą ir tikslumą.
- Valymas: Nuvalykite dėklą su skelbimuamp audiniu ir švelniu plovikliu. Nenaudokite abrazyvinių ar tirpiklių.
- Baterijos keitimas: Replace the 9V battery when the low battery indicator appears. Refer to the "Battery Installation" section for instructions.
- Saugiklio keitimas: If the current measurement function fails, the fuse may need replacement. This typically requires opening the back case. Refer to the safety warnings on the back of the meter (Figure 3) and consult a qualified technician if unsure. Use only fuses of the specified type and rating.
- Saugykla: If the meter is not used for an extended period, remove the battery to prevent leakage. Store the meter in a cool, dry place, away from direct sunlight and extreme temperatures.
Trikčių šalinimas
If you encounter issues with your UNI-T UT151C, refer to the following common problems and solutions:
| Problema | Galima priežastis | Sprendimas |
|---|---|---|
| Nėra ekrano arba ekranas silpnas | Išsikrovusi arba išsikrovusi baterija | Pakeiskite 9 V akumuliatorių. |
| Rodoma „OL“ (perkrova) | Measurement exceeds selected range or open circuit | Select a higher range or check for an open circuit in the component/leads. |
| Neteisingi rodmenys | Incorrect function selected, poor lead connection, or low battery | Verify function selection, ensure leads are securely connected, or replace battery. |
| Srovės matavimas neveikia | Perdegęs saugiklis | Pakeiskite saugiklį (žr. skyrių „Techninė priežiūra“). |
Specifikacijos
Technical specifications for the UNI-T UT151C Digital Multimeter.
| Funkcija | Specifikacija |
|---|---|
| Modelis | UT151C (Internal Model: 365BG1060568) |
| DC ttage (V) | 200mV/2V/20V/200V/1000V; ±(0.5%+1) |
| AC ttage (V) | 2V/20V/200V/750V; ±(0.8%+3) |
| Nuolatinė srovė (A) | 2mA/20mA/200mA/20A; ±(0.8%+1) |
| Kintama srovė (A) | 20mA/200mA/20A; ±(1%+3) |
| Atsparumas (Ω) | 200Ω/2KΩ/20KΩ/200KΩ/2MΩ/20MΩ; ±(1%+2) |
| Talpa (F) | 2nF/20nF/200nF/2µF/100µF; ±(4%+3) |
| Temperatūra (°C) | -40°C ~ 1000°C; ±(1%+3) |
| Temperatūra (°F) | -40°F ~ 1832°F; ±(1%+4) |
| Ekrano skaičius | 1999 |
| Rankinis diapazonas | Taip |
| Diodo testas | Taip |
| Automatinis išjungimas | Taip |
| Tęstinumo garsinis signalas | Taip |
| Išsikrovusio akumuliatoriaus indikatorius | Taip |
| Duomenų sulaikymas | Taip |
| Input Impedance for DC Voltage | ≥10MΩ |
| Maitinimo šaltinis | 9V (6F22) Battery (not included) |
| LCD dydis | 63 mm x 29 mm |
| Produkto spalva | Raudona ir pilka |
| Produkto grynasis svoris | 300g |
Garantija ir palaikymas
Informacija apie produkto garantiją ir klientų aptarnavimą paprastai pateikiama kartu su pirkimo dokumentais arba oficialiame gamintojo dokumente. websvetainėje. Dėl konkrečios informacijos žr. šiuos išteklius.