
1. Įvadas
This manual provides detailed instructions for the installation, operation, and maintenance of your ASRock AB350M-HDV MicroATX Motherboard. The ASRock AB350M-HDV is designed to support AMD Socket AM4 A-Series APUs (Bristol Ridge) and Ryzen Series CPUs (Summit Ridge), featuring a Digi Power design and 7 Power Phase design for stable performance. It supports DDR4 memory and offers various connectivity options including SATA3, USB 3.0, and an Ultra M.2 slot.
2. Produktas baigtasview
The ASRock AB350M-HDV motherboard is a MicroATX form factor board, ideal for compact PC builds. It features essential components for a modern computing system.

2.1 pav.: Kampinis view of the ASRock AB350M-HDV Motherboard, showcasing its compact MicroATX design and various components.
Pagrindinės funkcijos:
- Supports AMD Socket AM4 A-Series APUs (Bristol Ridge) and Ryzen Series CPUs (Summit Ridge).
- DDR4 memory support up to 3200+ (OC) for Ryzen CPUs and 2400 for A-series APUs.
- 1 PCIe 3.0 x16 slot and 1 PCIe 2.0 x1 slot for expansion cards.
- 4 SATA3 ports and 1 Ultra M.2 (PCIe Gen3 x4 & SATA3) slot for storage.
- 6 USB 3.0 ports (2 front, 4 rear) and 2 USB 2.0 ports for peripheral connectivity.
- Integrated Gigabit Ethernet for network connectivity.
- Video outputs: VGA, DVI, HDMI.

2.2 pav.: Iš viršaus į apačią view of the ASRock AB350M-HDV Motherboard, highlighting the CPU socket, RAM slots, M.2 slot, and PCIe slots.
3. Sąranka ir diegimas
Follow these steps carefully to install your ASRock AB350M-HDV motherboard and its components.
3.1 CPU diegimas
- Raskite AM4 procesoriaus lizdą pagrindinėje plokštėje.
- Pakelkite apkrovos svirtį, esančią lizdo šone.
- Suderinkite trikampį žymę ant procesoriaus su atitinkama žyme ant lizdo. Atsargiai įdėkite procesorių į lizdą, jo nespausdami jėgos.
- Nuleiskite apkrovos svirtį, kad pritvirtintumėte procesorių vietoje.
- Įdiekite procesoriaus aušintuvą pagal gamintojo instrukcijas.
3.2 RAM (Memory) Installation
- Locate the DDR4 DIMM slots. This motherboard has 4 slots.
- Atidarykite spaustukus abiejuose DIMM lizdo galuose.
- Suderinkite RAM modulio įpjovą su DIMM lizdo rakteliu.
- Tvirtai įkiškite RAM modulį į lizdą, kol spaustukai užsifiksuos. Įsitikinkite, kad abu spaustukai uždaryti.
3.3 Saugojimo įrenginio diegimas (SATA ir M.2)
SATA diskai:
- Connect one end of a SATA data cable to a SATA3 port on the motherboard.
- Prijunkite kitą SATA duomenų kabelio galą prie standžiojo disko arba SSD disko.
- Prijunkite SATA maitinimo laidą prie maitinimo bloko (PSU) prie atminties įrenginio.
M.2 SSD:
- Locate the Ultra M.2 slot on the motherboard.
- Remove the M.2 screw and standoff from the slot.
- Įdėkite M.2 SSD diską į lizdą 30 laipsnių kampu.
- Push the M.2 SSD down and secure it with the screw and standoff.
3.4 Maitinimo jungtys
- Prijunkite maitinimo bloko 24 kontaktų ATX maitinimo jungtį prie pagrindinės plokštės 24 kontaktų maitinimo lizdo.
- Connect the 8-pin (or 4-pin) ATX 12V power connector from your PSU to the corresponding socket near the CPU.
3.5 Priekinio skydelio jungtys
Connect the cables from your PC case (Power Button, Reset Button, HDD LED, Power LED, USB, Audio) to the corresponding headers on the motherboard. Refer to the motherboard layout diagram in your physical manual for exact header locations.
3.6 Vaizdo plokštės diegimas
- Locate the PCIe 3.0 x16 slot.
- Nuimkite atitinkamą išplėtimo lizdo dangtelį nuo kompiuterio korpuso.
- Align the graphics card with the PCIe slot and press it down firmly until it clicks into place.
- Pritvirtinkite vaizdo plokštę prie korpuso varžtu.
- Connect any required PCIe power cables from your PSU to the graphics card.
4. Naudojimo instrukcijos
4.1 Pirmasis paleidimas ir BIOS / UEFI sąranka
- Surinkę visus komponentus, prijunkite monitorių, klaviatūrą ir pelę.
- Įjunkite sistemą.
- Paleidimo metu kelis kartus paspauskite DEL or F2 klavišą, kad patektumėte į BIOS / UEFI sąrankos programą.
- In the BIOS, you can configure boot order, system time, and other advanced settings. Save changes and exit to boot into your operating system installation media.
4.2 Tvarkyklės diegimas
After installing your operating system, install the necessary drivers for the motherboard components. These typically include chipset drivers, audio drivers, LAN drivers, and any specific utility drivers. Drivers can be found on the ASRock official websvetainė, skirta jūsų konkrečiam pagrindinės plokštės modeliui.
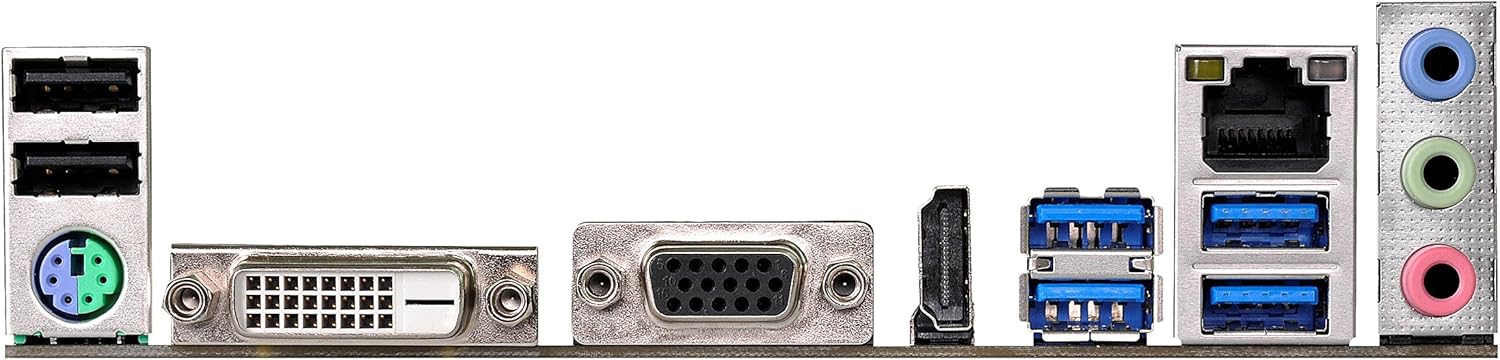
Figure 4.1: Rear I/O panel of the ASRock AB350M-HDV Motherboard, showing USB ports, video outputs (VGA, DVI, HDMI), LAN port, and audio jacks.
5. Priežiūra
Tinkama priežiūra užtikrina jūsų pagrindinės plokštės ilgaamžiškumą ir optimalų veikimą.
5.1 Valymas
- Suslėgtu oru reguliariai valykite dulkes nuo pagrindinės plokštės ir komponentų.
- Prieš valydami, įsitikinkite, kad sistema išjungta ir atjungta nuo elektros tinklo.
- Venkite naudoti skystus valiklius tiesiai ant komponentų.
5.2 BIOS / UEFI atnaujinimai
Reguliariai tikrinkite ASRock website for BIOS/UEFI updates. Updates can improve compatibility, stability, and performance. Follow the instructions provided by ASRock carefully when performing a BIOS update to avoid system damage.
6. Problemų sprendimas
Šiame skyriuje pateikiami dažniausiai pasitaikančių problemų, su kuriomis galite susidurti, sprendimai.
6.1 No Power / No POST (Power-On Self-Test)
- Patikrinkite maitinimo jungtis: Ensure the 24-pin and 8-pin (or 4-pin) CPU power connectors are securely seated.
- Patikrinkite maitinimo šaltinį: Test your power supply unit (PSU) to ensure it is functional and providing adequate power.
- Iš naujo įstatykite komponentus: Remove and re-install the CPU, RAM, and graphics card to ensure they are properly seated.
- Išvalyti CMOS: Refer to your physical manual for instructions on how to clear the CMOS (Complementary Metal-Oxide-Semiconductor) settings, which can resolve boot issues.
6.2 Nėra ekrano išvesties
- Monitoriaus jungtis: Ensure your monitor is correctly connected to the graphics card or motherboard (if using an APU with integrated graphics).
- Vaizdo plokštė: If using a dedicated graphics card, ensure it is properly installed and has sufficient power. Test with another graphics card if possible.
- APU Compatibility: If using an AMD A-Series APU, ensure your monitor is connected to the motherboard's video outputs (VGA, DVI, HDMI). Ryzen CPUs without integrated graphics require a dedicated graphics card.
6.3 Operacinė sistema nepaleidžiama
- Įkrovos tvarka: Check the BIOS/UEFI settings to ensure the correct boot device (e.g., SSD/HDD with OS) is prioritized.
- Saugojimo įrenginys: Verify that your storage device is detected in the BIOS.
- OS diegimas: If the OS is newly installed, ensure the installation process completed successfully.
7. Specifikacijos
| Prekės ženklas | ASRock |
| Modelio pavadinimas | AB350M-HDV |
| CPU lizdas | Lizdas AM4 |
| Lustų rinkinio tipas | AMD Promontory B350 |
| Suderinami procesoriai | AMD A-Series APUs (Bristol Ridge), Ryzen Series CPUs (Summit Ridge) |
| RAM atminties technologija | DDR4 |
| Atminties laikrodžio greitis | 2133 MHz (Base), up to 3200+ (OC) for Ryzen CPU |
| Galimi atminties lizdai | 4 |
| Grafikos plokštės sąsaja | PCI Express (1x PCIe 3.0 x16, 1x PCIe 2.0 x1) |
| Iš viso SATA prievadų | 4 (SATA3) |
| M.2 lizdas | 1 (Ultra M.2, PCIe Gen3 x4 & SATA3) |
| Iš viso USB prievadų | 8 (6 USB 3.0, 2 USB 2.0) |
| Vaizdo išvestys | VGA, DVI, HDMI |
| Pagrindinės maitinimo jungties tipas | 24-Pin ATX |
| Formos faktorius | MicroATX |
| Prekės svoris | 1.3 svaro |
8. Informacija apie garantiją
The ASRock AB350M-HDV Motherboard comes with a 1 metų garantija. For specific terms and conditions, please refer to the warranty card included with your product or visit the official ASRock websvetainę.
9. Parama
For further assistance, technical support, or driver downloads, please visit the official ASRock websvetainė:
You can also find contact information for customer service and support resources on their websvetainę.