
1. Produktas baigtasview
The Homtime C1-PRO is a versatile music alarm clock designed to enhance your daily routine. It features a Bluetooth speaker for audio playback, dual USB ports for charging devices, a personalized alarm ring function, a built-in thermometer, and a 3-level dimmable display for optimal visibility.

Figure 1: Homtime C1-PRO with icons illustrating key features such as snooze, dual USB charging, melody alarm, time/alarm knob, Bluetooth, and thermometer.
Pagrindinės funkcijos:
- „Bluetooth“ garsiakalbis: Connect wirelessly to play audio from your devices.
- Dvi USB įkrovimo prievadai: Conveniently charge two devices simultaneously.
- Personalized Alarm Ring: Customize your alarm sound using a MicroSD card.
- Digital Thermometer: Displays ambient room temperature.
- 3-Level Dimmable Display: Adjust screen brightness for comfort.
- Snaudimo funkcija: Temporarily pause the alarm.

Figure 2: Front panel controls and display elements, including time, alarm clock indicator, snooze on/off, Bluetooth on/off, temperature, and USB charging ports.
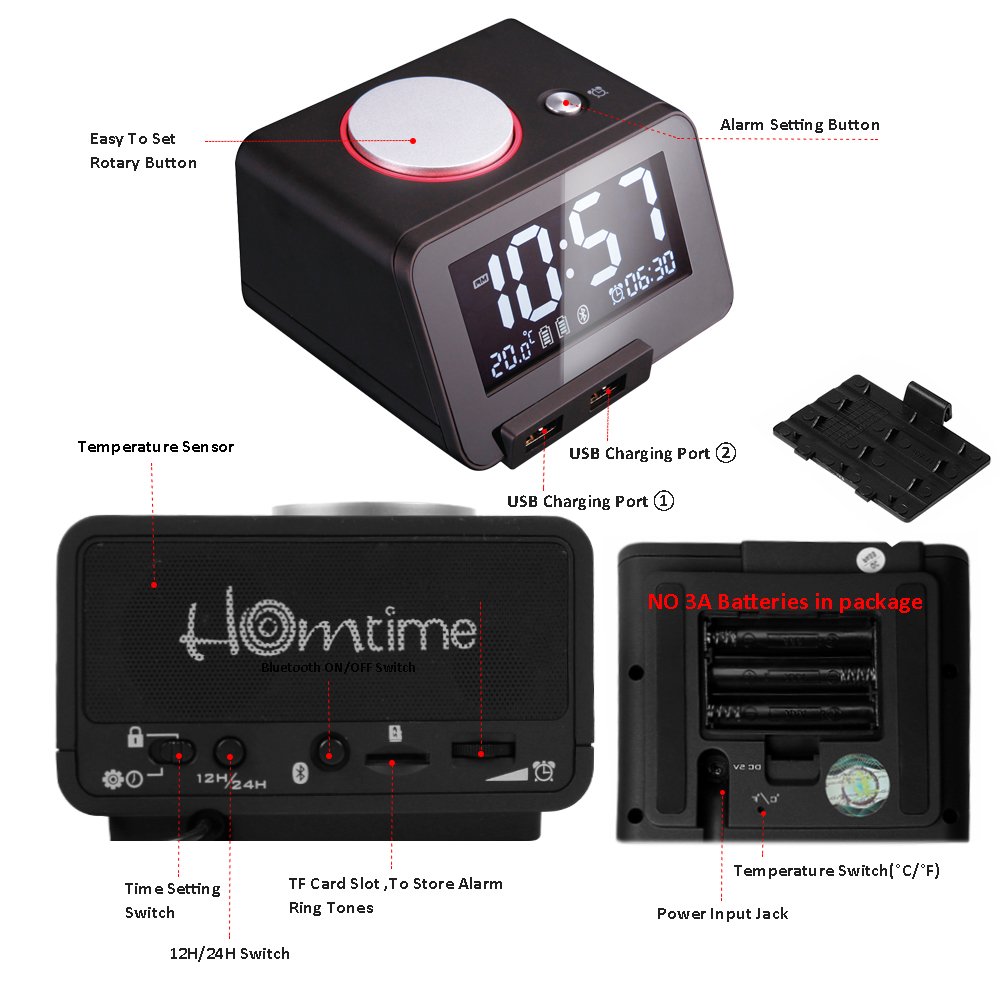
Figure 3: Rear panel controls, including the alarm set button, rotary dial for speaker volume, time set switch, time mode switch (12HR/24HR), Bluetooth on/off switch, MicroSD card slot for alarm personalization, and alarm volume control dial.

Figure 4: Bottom panel details, showing the temperature sensor, USB charging ports, power input jack, battery compartment for 3A batteries (not included), and temperature switch (°C/°F).
2. Sąranka
2.1 Maitinimo jungtis
- Connect the provided power adapter to the "Power Input Jack" located on the bottom of the unit (refer to Figure 4).
- Plug the adapter into a standard wall outlet. The display will illuminate.
2.2 Battery Backup Installation (Optional)
The C1-PRO uses 3A batteries (not included) for backup power to retain time and alarm settings during a power outage. These batteries do not power the main functions of the clock.
- Locate the battery compartment on the bottom of the unit (refer to Figure 4).
- Atidarykite akumuliatoriaus skyriaus dangtelį.
- Insert the required 3A batteries, ensuring correct polarity (+/-).
- Saugiai uždarykite akumuliatoriaus skyriaus dangtelį.
2.3 Pradiniai nustatymai
- Time Format (12HR/24HR): Locate the "Time Mode Switch (12HR/24HR)" on the rear panel (refer to Figure 3). Slide the switch to your preferred time format.
- Temperatūros vienetas (°C/°F): Locate the "Temperature Switch (°C/°F)" on the bottom panel (refer to Figure 4). Slide the switch to select Celsius or Fahrenheit.
3. Naudojimo instrukcijos
3.1 Laiko nustatymas
- Locate the "Time Set Switch" on the rear panel (refer to Figure 3).
- Slide the switch to the "SET" position. The hour digits will begin to flash.
- Rotate the "Knob for time and alarm-setting" (top center, refer to Figure 1) to adjust the hour.
- Press the knob once to switch to minute adjustment. The minute digits will flash.
- Pasukite rankenėlę, kad nustatytumėte minutes.
- Press the knob again or slide the "Time Set Switch" back to "LOCK" to confirm and exit time setting mode.
3.2 Signalizacijos nustatymas
- Press the "Alarm Set Button" on the rear panel (refer to Figure 3). The alarm time will appear on the display, and the hour digits will flash.
- Rotate the "Knob for time and alarm-setting" to adjust the alarm hour.
- Press the knob once to switch to minute adjustment. The minute digits will flash.
- Rotate the knob to adjust the alarm minutes.
- Press the knob again to confirm the alarm time. The alarm icon will appear on the display, indicating the alarm is active.
- To deactivate the alarm, press the "Alarm Set Button" again. The alarm icon will disappear.
3.3 Personalized Alarm Ring (MicroSD Card)
You can use your own audio files as an alarm sound by inserting a MicroSD card.
- Insert a MicroSD card containing your desired MP3 audio files into the "MicroSD Card Slot for Alarm Personalization" on the rear panel (refer to Figure 3).
- When setting the alarm, after confirming the time, the clock will automatically use the first compatible audio file on the MicroSD card as the alarm sound.
- Užtikrinkite garsą fileyra palaikomo formato (pvz., MP3).
3.4 Snausti funkcija
When the alarm sounds, press the large "Snooze/Dimmer Button" on the top of the unit (the large silver button, refer to Figure 1). The alarm will pause for approximately 9 minutes and then sound again. This can typically be repeated multiple times.
3.5 „Bluetooth“ garsiakalbio valdymas
- Locate the "Bluetooth ON/OFF Switch" on the rear panel (refer to Figure 3). Slide it to the "ON" position.
- The Bluetooth icon on the display will flash, indicating it is in pairing mode.
- Savo mobiliajame įrenginyje įjunkite Bluetooth ir ieškokite galimų įrenginių.
- Select "Homtime C1-PRO" from the list to pair. Once paired, the Bluetooth icon on the clock's display will stop flashing and remain solid.
- You can now play audio from your device through the C1-PRO speaker.
- Adjust the speaker volume using the "Rotary Dial for Speaker Volume Control" on the rear panel (refer to Figure 3).
- To disconnect, turn off Bluetooth on your device or slide the "Bluetooth ON/OFF Switch" on the clock to "OFF".
3.6 USB įkrovimas
The C1-PRO features two USB charging ports on the front of the unit (refer to Figure 2). Connect your USB charging cables to these ports to charge compatible devices such as smartphones or tablets.
- Ensure the clock is connected to power for the USB charging function to operate.
- The charging output is standard for most mobile devices.
3.7 Ekrano ryškumo reguliavimas
The display has 3 levels of brightness. To adjust, press the "Snooze/Dimmer Button" (large silver button on top, refer to Figure 1) when the alarm is not sounding. Each press will cycle through the brightness levels.
3.8 Alarm Volume Control
Adjust the alarm volume using the "Alarm Volume Control Dial" located on the rear panel (refer to Figure 3).
4. Priežiūra
- Valymas: Use a soft, dry cloth to clean the surface of the clock. Do not use liquid cleaners or abrasive materials.
- Saugykla: If storing the device for an extended period, disconnect it from power and remove the backup batteries. Store in a cool, dry place.
- Baterijos keitimas: Replace backup batteries annually or when the clock fails to retain settings during a power interruption.
5. Problemų sprendimas
| Problema | Galima priežastis | Sprendimas |
|---|---|---|
| Laikrodžio ekranas išjungtas arba neveikia. | Nėra maitinimo jungties. | Įsitikinkite, kad maitinimo adapteris yra tvirtai prijungtas prie laikrodžio ir veikiančio sieninio lizdo. |
| Signalizacija neskamba. | Alarm is not activated; volume is too low; MicroSD card issue. | Verify the alarm icon is displayed. Adjust the alarm volume dial. If using MicroSD, ensure the card is inserted correctly and contains compatible audio files. |
| „Bluetooth“ nesusijungia. | Bluetooth switch off; device too far; already paired with another device. | Ensure the Bluetooth switch on the clock is ON and flashing. Move your device closer. Disconnect from other Bluetooth devices. |
| USB įkrovimas neveikia. | Clock not powered; faulty cable/device. | Ensure the clock is connected to its power adapter. Try a different USB cable or device to rule out external issues. |
| Laikas / nustatymai prarandami išsijungus elektraitage. | Neįdėtos arba išsikrovusios atsarginės baterijos. | Install fresh 3A backup batteries (refer to Section 2.2). |
6. Specifikacijos
| Funkcija | Detalė |
|---|---|
| Prekės ženklas | Homtime |
| Modelis | C1-PRO |
| Spalva | Juoda |
| Ekrano tipas | Skaitmeninis |
| Ypatingos savybės | Alarm, USB Charging, Bluetooth, Thermometer, Dimmable Display |
| Maitinimo šaltinis | Electrical (with battery backup) |
| Rėmo medžiaga | Plastikiniai |
| Ryšio technologija | Bluetooth |
| Gaminio matmenys (IxPxH) | 10.92 x 10.92 x 6.35 cm (apytiksliai 4.3 x 4.3 x 2.5 colio) |
| Prekės svoris | 259 g (apie 0.57 svaro) |
| Baterijos tipas (atsarginė) | 3A (į komplektą neįeina) |
7. Garantija ir palaikymas
For warranty information and customer support, please refer to the documentation included with your purchase or visit the official Homtime websvetainėje. Išsaugokite pirkimo įrodymą, jei prireiktų pateikti garantinį ieškinį.