
1. Produktas baigtasview
The Evertech 8 Channel HD DVR Security System provides a comprehensive surveillance solution for your home or office. This system includes an 8-channel Digital Video Recorder (DVR) compatible with 1080P, 720P, AHD, TVI, CVI, and Analog cameras, along with four 1080P HD dome cameras featuring manual zoom lenses.
Įtraukti komponentai:
- 1 x 8-Channel H.264 HD Digital Video Recorder (DVR)
- 1 x 1TB Hard Disk Drive (pre-installed for continuous recording)
- 1 x Maitinimo šaltinis DVR
- 1x nuotolinio valdymo pultas
- 1 x USB pelė
- 1 x CD software for PC
- 1 x Naudotojo vadovas (šis dokumentas)
- 4 x 1080P HD 2.8-12mm Manual Zoom Lens Dome Cameras (Day and Night Vision, Indoor & Outdoor)

1 pav. Baigtaview of the Evertech 8 Channel HD DVR Security System components, including the DVR unit, four dome cameras, and accessories.
2. Sistemos sąranka
2.1 DVR jungtys
Follow these steps to connect your Digital Video Recorder (DVR) to the cameras, monitor, and network.
- Prijungti kameras: Attach the BNC cables from your cameras to the 'Video Input' ports on the back of the DVR.
- Prijungti monitorių: Use an HDMI cable to connect the 'HDMI Output' port on the DVR to your monitor or TV. Alternatively, use a VGA cable for the 'VGA Output' port.
- Prijunkite tinklą: Plug an Ethernet cable into the 'Network Port' on the DVR and connect the other end to your router or modem for remote access.
- Prijunkite USB įrenginius: Insert the USB mouse into one of the 'USB' ports for local control.
- Prijunkite maitinimą: Plug the DVR power adapter into the 'DC 12V' power input on the DVR, then connect it to a power outlet.

Figure 2: Rear panel of the DVR showing video input (BNC), HDMI/VGA output, audio input/output, network port, USB ports, and power input.
2.2 Fotoaparato diegimas
The included dome cameras are designed for both indoor and outdoor use. They feature a 2.8-12mm manual zoom lens, allowing you to adjust the field of view and focus after installation.
- Montavimas: Securely mount the cameras to a wall or ceiling using appropriate hardware. Ensure the camera is positioned to cover the desired surveillance area.
- Kabelio maršrutas: Route the camera cables to the DVR, ensuring they are protected from environmental damage.
- Galia: Connect the camera power cables to a suitable 12V DC power source (not included with individual cameras, typically powered by a central power supply or individual adapters).
- Objektyvo reguliavimas: After mounting, manually adjust the zoom and focus rings on the camera lens to achieve the desired view ir aiškumo.

3 pav. Išsamus view of the dome camera, highlighting its durable metal weatherproof casing, double glass design, SMT LEDs for IR range, and 2.8-12mm adjustable varifocal lens for manual zoom and focus.
2.3 Mobile Remote Access Setup
Access your security system remotely via your smartphone or tablet using the dedicated mobile application.
- Atsisiųsti programą: Ieškokite the recommended mobile application (e.g., XMeye App) in your device's app store (Apple App Store for iOS, Google Play Store for Android).
- Įdiekite ir registruokite: Install the app and follow the on-screen instructions to register an account.
- Pridėti įrenginį: Within the app, select the option to add a new device. You will typically be prompted to scan a QR code.
- Nuskaityti QR kodą: Locate the QR code on your DVR unit or in the DVR's system settings menu. Use the app's scanner to scan this code.
- Tiesiogiai Viewing: Once the device is added, you can begin live viewing your camera feeds and accessing recorded footage iš savo mobiliojo įrenginio.

Figure 4: Illustration of remote access capabilities, showing live viewing on a PC monitor, tablet, and smartphone, indicating the flexibility of monitoring your system.
3. Operacija
3.1 Įrašymo režimai
The DVR supports various recording modes to suit your surveillance needs:
- Rankinis įrašymas: Start and stop recording manually at any time.
- Aliarmo įrašymas: Recording is triggered by an external alarm input.
- Judesio aptikimo įrašymas: Recording starts automatically when motion is detected in the camera's field of view. You can customize sensitivity and detection areas.
- Laiko įrašymas: Schedule recording to occur during specific times of the day or week.
3.2 Atkūrimas
The DVR allows for multi-channel real-time playback of recorded footage. Use the USB mouse or remote control to navigate the DVR interface:
- Access the 'Playback' menu from the main interface.
- Select the desired date and time range for playback.
- Choose the camera channels you wish to review.
- Utilize controls for fast-forward, rewind, pause, and frame-by-frame viewing.
3.3 Motion Detection & Email Alerts
Configure motion detection and email alerts to be notified of suspicious activity:
- Navigate to the 'Alarm' or 'Motion Detection' settings in the DVR menu.
- Enable motion detection for specific camera channels.
- Define the detection area and sensitivity levels for each camera.
- Configure email settings, including recipient address and SMTP server details, to receive alerts when motion is detected.
4. Priežiūra
4.1 Kietojo disko valdymas
The DVR comes with a 1TB hard drive pre-installed. The system supports up to a 6TB SATA hard drive. Ensure the hard drive is functioning correctly for continuous recording. Periodically check the hard drive status in the DVR's system settings.
4.2 Sistemos atsarginė kopija
Reguliariai kurkite svarbių duomenų atsargines kopijastage to prevent data loss:
- USB atsarginė kopija: Connect a USB flash drive to the DVR's USB port and use the backup function in the menu to transfer selected recordings.
- Tinklo atsarginė kopija: Utilize the network backup feature to transfer recordings to a connected computer or network storage device.
4.3 Valymas
To ensure optimal performance and image quality:
- Kameros: Gently wipe the camera lenses and housing with a soft, damp audinys. Venkite abrazyvinių valiklių.
- DVR: Keep the DVR unit free from dust. Ensure ventilation openings are not obstructed to prevent overheating.
5. Problemų sprendimas
This section addresses common issues you might encounter with your security system.
5.1 No Video Display on Monitor
- Patikrinkite kabelius: Ensure HDMI or VGA cables are securely connected to both the DVR and the monitor.
- Monitoriaus įvestis: Verify that your monitor is set to the correct input source (HDMI or VGA).
- DVR galia: Confirm the DVR is powered on and its indicator lights are active.
5.2 Cameras Not Displaying Image
- Maitinimas: Ensure cameras are receiving adequate power (12V DC).
- BNC Connections: Check that all BNC cables are firmly connected between the cameras and the DVR.
- Kameros režimas: Verify that the camera's video output mode (AHD, TVI, CVI, Analog) is compatible with the DVR's current settings.
5.3 Nuotolinės prieigos problemos
- Tinklo prisijungimas: Confirm the DVR is connected to the internet and has a stable network connection. Check the network cable and router status.
- Programos konfigūracija: Double-check the device ID or QR code used to add the DVR to the mobile app. Ensure correct network settings (e.g., port forwarding if required by your network setup).
- Ugniasienė: Ensure your network firewall is not blocking the DVR's access to the internet or the mobile app's connection.
5.4 Nėra įrašymo
- Hard Drive Status: Check the DVR's system settings to ensure the hard drive is detected and functioning correctly.
- Įrašymo grafikas: Verify that the recording schedule is properly configured for continuous, motion-triggered, or timed recording.
- Vieta diske: Ensure there is sufficient free space on the hard drive. The system typically overwrites older footage, kai pilna.
6. Specifikacijos
6.1 DVR specifikacijos
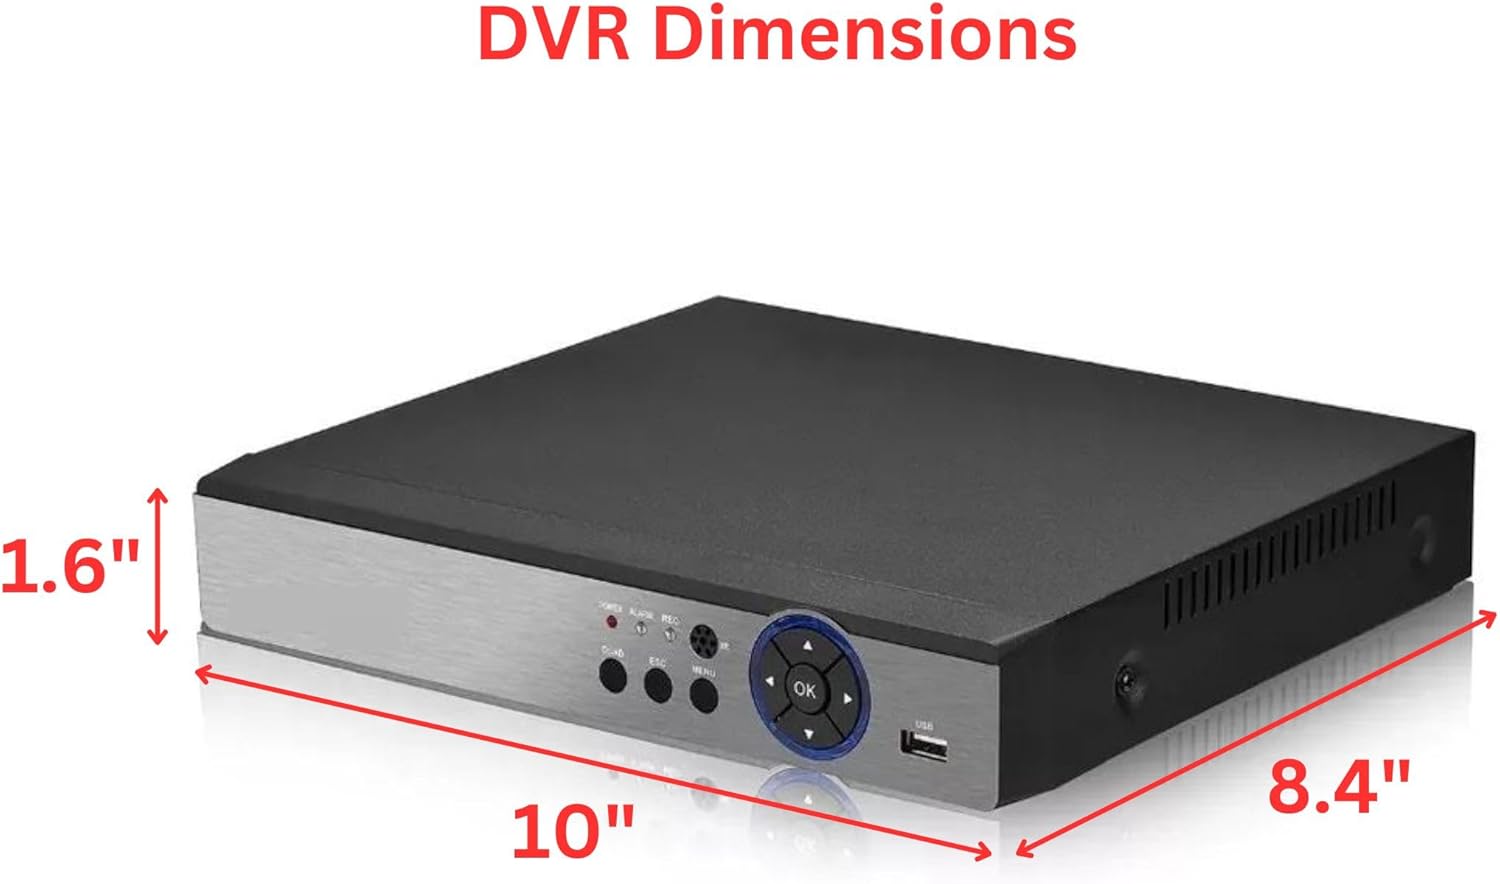
Figure 5: Detailed technical specifications for the 8 Channel H.265/H.264 Digital Video Recorder, including system, display, video, audio, record & playback, storage & backup, and interface details.
| Funkcija | Aprašymas |
|---|---|
| Operacinė sistema | Embedded LINUX Operating System |
| Vaizdo įvestis | 8 Channel BNC (Compatible with 1080P/720P/AHD/TVI/CVI/Analog) |
| Vaizdo išvestis | 1CH VGA, 1CH HDMI (1080P) |
| Garso įvestis/išvestis | 1CH Audio Input (RCA) / 1CH Audio Output (RCA) |
| Ekranas | 1 / 4 / 8 / 9 Screen Layouts |
| Įrašymo režimas | Manual, Alarm, Motion Detection, Timing |
| HDD Port | 1 SATA (supports up to 6TB) |
| Tinklo prievadas | RJ45 10M/100M self-adaptive Ethernet port |
| USB prievadas | 2 x USB 2.0 |
| Maitinimo šaltinis | 12V DC |
| Matmenys (I x P x A) | 260(L) x 221(W) x 44(H) mm (Approx. 10.23" x 8.66" x 1.77") |

Figure 6: DVR dimensions, showing approximate measurements of 10 inches in length, 8.4 inches in width, and 1.6 inches in height.
6.2 Kameros specifikacijos
| Funkcija | Aprašymas |
|---|---|
| Rezoliucija | 1080p (1920 x 1080 Effective Pixels) |
| Vaizdo išvestis | Analog (CVBS), AHD, TVI, CVI |
| IR atstumas | Up to 98ft with SMD IR LED |
| Objektyvas | 2.8-12mm Manual Zoom Lens (Varifocal) |
| Galia | 12V DC |
| Kėbulo konstrukcija | Durable Metal Weatherproof Casing |
| Montavimas | Montuojamas ant sienos ir lubų |
7. Garantija ir palaikymas
7.1 Informacija apie garantiją
This Evertech security system comes with a Vienerių metų garantija nuo įsigijimo datos, apimanti gamybos defektus ir gedimus įprasto naudojimo metu. Išsaugokite pirkimo įrodymą garantiniams reikalavimams.
7.2 Techninė pagalba
For any technical assistance, setup guidance, or troubleshooting not covered in this manual, please contact Evertech customer support. Free technical support is available to assist you with your product.
Please refer to the contact information provided with your product packaging or visit the official Evertech websvetainę, kurioje rasite naujausią pagalbos informaciją.

