1. Įvadas
This manual provides detailed instructions for the installation, operation, and maintenance of your GIGABYTE Z370XP SLI motherboard. Designed for 8th Generation Intel Core processors, this ATX motherboard offers robust performance and features for various computing needs. Please read this manual thoroughly before beginning installation.
2. Pagrindinės savybės
- Supports 8th Generation Intel Core Processors.
- Dual Channel DDR4 memory support with 4 DIMM slots.
- USB 3.1 Gen 2 with USB Type-C for high-speed connectivity.
- 2-Way Graphics Support (SLI/CrossFire) for enhanced visual performance.
- Intel Gigabit LAN for stable and fast network connections.
- GIGABYTE UEFI Dual BIOS for system protection and easy configuration.
- APP Center including Easy Tune and Cloud Station Utilities for system management.
- Realtek ALC1220 Codec for high-definition audio.
- ATX Form Factor (305mm x 225mm).
3. Pakuotės turinys
Verify that all items are present in the package. If any item is missing or damaged, contact your retailer.
- GIGABYTE Z370XP SLI Motherboard
- (Additional accessories such as SATA cables, I/O shield, and manual may be included depending on the region and retailer.)
4. Sąranka ir diegimas
Prieš diegdami pagrindinę plokštę, įsitikinkite, kad jūsų sistemos komponentai yra suderinami ir kad aplinka be statinės elektros.
4.1 Pagrindinė plokštė perview

1 vaizdas: Iš viršaus į apačią view of the GIGABYTE Z370XP SLI Motherboard. This image displays the CPU socket, DIMM slots, PCIe slots, and various headers.

2 vaizdas: Kampuotas view of the GIGABYTE Z370XP SLI Motherboard, highlighting the heatsinks and overall layout.
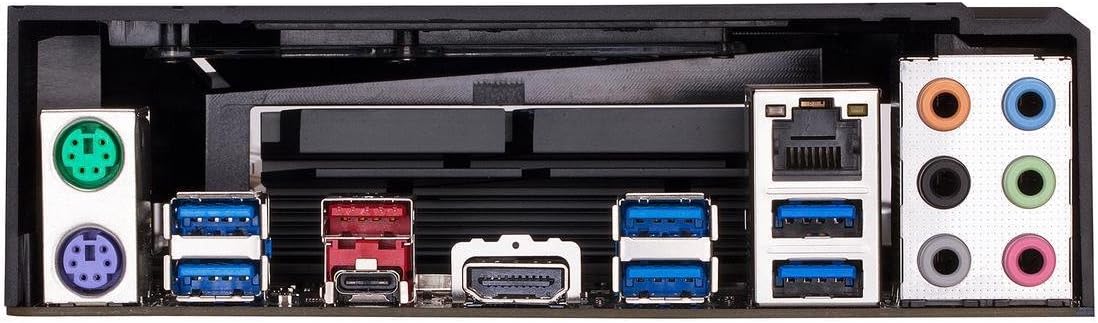
3 vaizdas: Rear I/O panel of the GIGABYTE Z370XP SLI Motherboard, showing the various ports including USB, HDMI, Ethernet, and audio jacks.
4.2 CPU diegimas
- Raskite LGA 1151 procesoriaus lizdą pagrindinėje plokštėje.
- Atidarykite procesoriaus lizdo svirtį ir nuimkite apsauginį dangtelį.
- Atsargiai sulygiuokite procesorių su lizdu, užtikrindami, kad auksinis trikampis ant procesoriaus sutaptų su trikampiu ant lizdo.
- Švelniai įdėkite procesorių į lizdą, jo nespausdami jėgos.
- Uždarykite lizdo svirtį, kad pritvirtintumėte procesorių.
- Įdiekite procesoriaus aušintuvą pagal gamintojo instrukcijas.
4.3 Atminties (RAM) diegimas
- Atidarykite spaustukus abiejuose DIMM lizdų galuose.
- Suderinkite DDR4 atminties modulio įpjovą su DIMM lizdo įpjova.
- Tvirtai įkiškite atminties modulį į lizdą, kol spaustukai užsifiksuos savo vietoje.
- For dual-channel operation, refer to the motherboard manual for recommended slot configurations.
4.4 Saugojimo įrenginio įrengimas
- SATA diskai: Connect SATA data cables from your storage devices (HDDs/SSDs) to the SATA 3 ports on the motherboard. Connect SATA power cables from your power supply to the drives.
- M.2 Pavaros: Locate the M.2 slots. Insert the M.2 drive at an angle and secure it with the provided screw.
4.5 Vaizdo plokštės ir išplėtimo plokštės įdiegimas
- Open the latch on the desired PCI Express x16 slot.
- Align your graphics card or expansion card with the slot and press down firmly until it is seated.
- Pritvirtinkite kortelę prie kompiuterio korpuso varžtu.
- Prijunkite visus reikalingus PCIe maitinimo laidus iš maitinimo šaltinio į vaizdo plokštę.
4.6 Maitinimo jungtys
- Prijunkite 24 kontaktų ATX pagrindinį maitinimo jungtį iš maitinimo šaltinio į atitinkamą pagrindinės plokštės prievadą.
- Prijunkite 8 kontaktų (arba 4+4 kontaktų) ATX 12V procesoriaus maitinimo jungtį prie pagrindinės plokštės.
4.7 Priekinio skydelio jungtys
Connect the front panel cables (power button, reset button, HDD LED, power LED, USB ports, audio jacks) to their respective headers on the motherboard. Refer to the motherboard's silkscreen labels for correct orientation.
5. Naudojimo instrukcijos
5.1 Pradinis sistemos paleidimas
- After all components are installed and connected, close your PC case.
- Prijunkite monitorių, klaviatūrą ir pelę.
- Connect the power cord to your power supply and turn on the power switch.
- Paspauskite kompiuterio korpuso maitinimo mygtuką.
- The system should power on and display the GIGABYTE splash screen.
5.2 BIOS / UEFI sąranka
Norėdami patekti į BIOS / UEFI sąrankos programą, paspauskite DEL key repeatedly during the initial boot process. The BIOS allows you to configure system settings such as boot order, CPU/memory frequencies, and peripheral settings. Save changes before exiting.
5.3 Tvarkyklės diegimas
After installing your operating system, install the necessary drivers for the motherboard chipset, LAN, audio, and other integrated components. These drivers are typically provided on a support DVD or can be downloaded from the GIGABYTE official websvetainę.
6. Priežiūra
- Dulkių šalinimas: Regularly clean dust from inside your PC case, especially from fans and heatsinks, to prevent overheating. Use compressed air for best results.
- BIOS atnaujinimai: Reguliariai tikrinkite GIGABYTE website for BIOS updates. BIOS updates can improve system stability, compatibility, and performance. Follow the instructions provided by GIGABYTE carefully when updating the BIOS.
- Tvarkyklės atnaujinimai: Nuolat atnaujinkite sistemos tvarkykles, kad užtikrintumėte optimalų našumą ir suderinamumą su nauja programine ir aparatine įranga.
7. Problemų sprendimas
Jei kyla problemų, vadovaukitės toliau pateiktais įprastais trikčių šalinimo veiksmais.
- Nėra maitinimo / nėra įkrovos:
- Įsitikinkite, kad visi maitinimo kabeliai (24 kontaktų ATX, 8 kontaktų CPU, GPU) yra tvirtai prijungti.
- Check if the power supply is switched on.
- Patikrinkite priekinio skydelio maitinimo mygtuko prijungimą.
- Nėra ekrano:
- Ensure the monitor is connected to the graphics card (or motherboard if using integrated graphics) and powered on.
- Iš naujo įstatykite grafikos plokštę ir atminties modulius.
- Išbandykite su viena RAM atmintimi, įdėta į skirtingus lizdus.
- Sistemos nestabilumas / gedimai:
- Patikrinkite procesoriaus ir grafikos plokštės temperatūrą.
- Įsitikinkite, kad visos tvarkyklės yra tinkamai įdiegtos ir atnaujintos.
- Paleiskite atminties diagnostikos įrankius, kad patikrintumėte, ar nėra RAM klaidų.
- Atkurkite BIOS nustatymus į numatytuosius.
- On-board Readout/Debug LED: The motherboard may feature an on-board debug LED or POST code display. Consult the full GIGABYTE manual for specific code meanings to diagnose boot issues.
8. Specifikacijos
| Funkcija | Detalė |
|---|---|
| Prekės ženklas | GIGABITAS |
| Modelio pavadinimas | Z370XP SLI |
| CPU lizdas | LGA 1151 |
| Suderinami procesoriai | 8 kartos „Intel Core“. |
| Lustų rinkinio tipas | Intel Z370 |
| RAM atminties technologija | DDR4 |
| Atminties laikrodžio greitis | 2666 MHz (palaiko didesnį dažnį per OC) |
| Galimi atminties lizdai | 4 |
| Ram Memory Maximum Size | 64 GB |
| Grafikos plokštės sąsaja | PCI Express |
| Total PCIe Ports | 4 |
| Iš viso SATA prievadų | 6 |
| M.2 Lizdai | 2 |
| Iš viso USB prievadų | 8 (Rear I/O) + Internal Headers |
| USB 3.1 Gen 2 Type-C | 1 (galinės įvesties/išvesties) |
| Ethernet prievadų skaičius | 1 (Intel Gigabit LAN) |
| Total Number of HDMI Ports | 1 |
| S/PDIF jungties tipas | Optinis |
| Pagrindinės maitinimo jungties tipas | 24-Pin ATX |
| Formos faktorius | ATX (305mm X 225mm) |
| Prekės svoris | 16 uncijos |
| UPC | 889523011324 |
9. Informacija apie garantiją
The GIGABYTE Z370XP SLI motherboard typically comes with a 3 metų ribota garantija. Warranty terms and conditions may vary by region and retailer. Please retain your proof of purchase for warranty claims. For detailed warranty information, visit the official GIGABYTE websvetainę.
10. Techninė pagalba
For further assistance, driver downloads, BIOS updates, or troubleshooting not covered in this manual, please visit the official GIGABYTE support websvetainė: www.gigabyte.com/support. You may also contact GIGABYTE customer service directly.