
1. Įvadas
This manual provides essential information for the safe and efficient operation of your Rigol DS1104Z-S Plus 100 MHz Digital Oscilloscope. Please read this manual thoroughly before using the instrument to ensure proper functionality and to prevent damage. The Rigol DS1104Z-S Plus is a 4-channel digital storage oscilloscope designed for precise signal analysis with a 100 MHz bandwidth and a 1 GSa/s real-time sample norma.
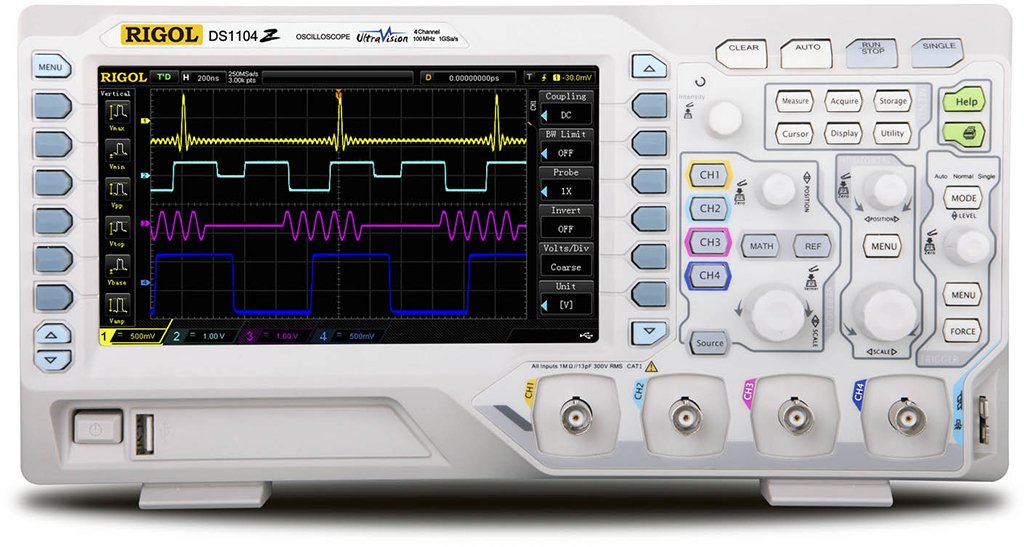
Figure 1: Rigol DS1104Z-S Plus Digital Oscilloscope. This image shows the front panel of the oscilloscope with its display, control knobs, and input channels.
2. Saugos informacija
Kad išvengtumėte sužalojimų ir įrenginio sugadinimo, visada laikykitės šių saugos priemonių:
- Maitinimo šaltinis: Prietaisą junkite tik prie maitinimo šaltinio, kurio įtampa nurodytatage ir dažnis.
- Įžeminimas: Įsitikinkite, kad prietaisas yra tinkamai įžemintas, kad išvengtumėte elektros smūgio.
- Vėdinimas: Neužblokuokite ventiliacijos angų. Užtikrinkite pakankamą oro srautą aplink prietaisą.
- Aplinka: Operate the oscilloscope in a dry, well-ventilated area, away from direct sunlight, high temperatures, and excessive dust.
- Zondai: Use only probes designed for the specified voltage ir dažnio reitingai.
- Aptarnavimas: Visus techninės priežiūros darbus patikėkite kvalifikuotiems techninės priežiūros darbuotojams. Nebandykite taisyti prietaiso patys.
- Valymas: Prieš valydami atjunkite maitinimą. Naudokite minkštą, damp audinys. Nenaudokite abrazyvinių valiklių ar tirpiklių.
3. Pakuotės turinys
Patikrinkite, ar jūsų pakuotėje yra šie elementai:
- Rigol DS1104Z-S Plus Digital Oscilloscope
- Maitinimo laidas
- Passive Probes (4 units)
- USB kabelis
- Trumpas vadovas
- Resource CD (User Manual, Programming Manual, Software)
4. Produktas baigtasview
The Rigol DS1104Z-S Plus features a user-friendly interface and robust design for various measurement applications.
4.1 Priekinis skydelis
The front panel includes the display, control knobs, function buttons, and input connectors for channels 1-4.
- Ekranas: Shows waveforms, measurement results, and menu options.
- Vertikalūs valdikliai: Sureguliuoti ttage per division and position for each channel.
- Horizontalūs valdikliai: Adjust time per division and horizontal position.
- Trigerio valdikliai: Set trigger level, mode, and type.
- Funkciniai mygtukai: Access various menus such as Acquire, Measure, Storage, Utility, etc.
- Channel Inputs (CH1-CH4): BNC connectors for probe connection.
4.2 Galinis skydelis
The rear panel provides power input, USB host/device ports, and LAN port for connectivity.
- Kintamosios srovės įvestis: Maitinimo laido prijungimui.
- USB pagrindinio kompiuterio prievadas: Skirta USB atminties įrenginiams prijungti.
- USB įrenginio prievadas: For connecting to a PC.
- LAN prievadas: Tinklo ryšiui ir nuotoliniam valdymui.
5. Sąranka
5.1 Maitinimo jungtis
- Įsitikinkite, kad maitinimo jungiklis galiniame skydelyje yra IŠJUNGTOJE padėtyje.
- Prijunkite pateiktą maitinimo laidą prie kintamosios srovės maitinimo įvesties, esančios osciloskopo galiniame skydelyje.
- Kitą maitinimo laido galą prijunkite prie įžeminto kintamosios srovės lizdo.
5.2 Zondo jungtis
- Connect the BNC connector of a passive probe to one of the input channels (CH1, CH2, CH3, or CH4) on the front panel.
- Connect the probe's ground clip to the circuit's ground reference.
- Set the attenuation ratio on the probe to match the setting on the oscilloscope (e.g., 1X or 10X).
5.3 Pradinis įjungimas
- Press the power switch on the rear panel to the ON position.
- The oscilloscope will perform a self-test and display the Rigol logo.
- After startup, the default waveform display will appear.
6. Naudojimo instrukcijos
This section covers basic operations for acquiring and analyzing waveforms.
6.1 Pagrindinis bangos formos ekranas
- Vertikalus skalės dydis (VOLTS/DIV): Use the vertical scale knob for the active channel to adjust the voltage jautrumas.
- Vertikali padėtis: Use the vertical position knob to move the waveform up or down on the screen.
- Horizontalus mastelis (SEC/DIV): Use the horizontal scale knob to adjust the time base.
- Horizontali padėtis: Use the horizontal position knob to shift the waveform left or right.
6.2 Suaktyvinimas
Suveikimas stabilizuoja pasikartojančias bangų formas ir fiksuoja vienkartinius įvykius.
- Trigerio lygis: Norėdami nustatyti garsumą, sureguliuokite gaiduko lygio rankenėlętage point at which the trigger occurs.
- Trigger Menu: Paspauskite Trigerio meniu button to configure trigger type (Edge, Pulse, Video, etc.), source, and slope.
- Aktyviklio režimas: Select between Auto, Normal, and Single modes.
6.3 Matavimo funkcijos
The oscilloscope offers various automatic measurement functions.
- Paspauskite Išmatuoti button to display the measurement menu.
- Select desired measurements such as Vpp, Vmax, Vmin, Freq, Period, Rise Time, etc.
- Rezultatai bus rodomi ekrane.
6.4 Duomenų išsaugojimas
Waveforms and settings can be saved to internal memory or a USB storage device.
- Paspauskite Sandėliavimas mygtuką.
- Select the storage type (Waveform, Setup, Image) and destination (Internal, USB).
- Follow the on-screen prompts to save the data.
7. Priežiūra
7.1 Valymas
To maintain the instrument's appearance and performance:
- Prieš valydami atjunkite maitinimo laidą.
- Naudokite minkštą skudurėlį dampened with mild detergent and water to clean the exterior.
- Nenaudokite abrazyvinių valiklių, tirpiklių ar stiprių cheminių medžiagų.
- Įsitikinkite, kad į instrumentą nepateko skysčio.
7.2 Kalibravimas
The oscilloscope is factory calibrated. For optimal performance, periodic calibration by qualified service personnel is recommended, typically every 1-2 years, depending on usage.
7.3 Saugykla
When not in use for extended periods, store the oscilloscope in a dry, dust-free environment within the specified operating temperature range.
8. Problemų sprendimas
This section lists common problems and their solutions. If the problem persists, contact Rigol customer support.
| Problema | Galima priežastis | Sprendimas |
|---|---|---|
| Po įjungimo ekrano nėra | Power cord not connected; Power switch off; Faulty power outlet | Patikrinkite maitinimo laido jungtį; Įsitikinkite, kad maitinimo jungiklis yra ĮJUNGTAS; Išbandykite maitinimo lizdą su kitu įrenginiu |
| Nerodoma bangos forma | Probe not connected; Incorrect channel settings; Trigger level incorrect; Input signal too small/large | Connect probe to active channel; Adjust vertical scale and position; Adjust trigger level; Check input signal source |
| Nestabili bangos forma | Incorrect trigger settings; Noisy signal | Adjust trigger level and mode; Check signal source for noise; Use averaging acquisition mode |
| Cannot save data to USB | USB drive not formatted correctly; USB drive full; USB drive faulty | Format USB drive to FAT32; Delete unnecessary files; Išbandykite kitą USB atmintinę |
9. Specifikacijos
Key technical specifications for the Rigol DS1104Z-S Plus Digital Oscilloscope:
- Pralaidumas: 100 MHz
- Kanalai: 4 analoginių kanalų
- Realiu laiku Sample Įvertinkite: Iki 1 GSa/s
- Atminties gylis: 12 Mpts (Standard), 24 Mpts (Optional)
- Bangos formos fiksavimo greitis: Up to 30,000 wfms/s
- Ekranas: 7-inch TFT LCD (800x480 resolution)
- Vertikalus jautrumas: 1 mV/div iki 10 V/div
- Time Base Range: 2 ns/div to 50 s/div
- Trigger Types: Edge, Pulse, Video, Slope, Alternate, Runt, Window, Delay, Setup/Hold, Nth Edge
- Sąsaja: USB Host, USB Device, LAN, Pass/Fail, Trigger Out
- Maitinimo šaltinis: Su laidu elektra
- Prekės svoris: 1 kilogramo
- Atitiktis: CE
10. Garantija ir palaikymas
Rigol Technologies provides a standard warranty for its products. For detailed warranty terms and conditions, please refer to the warranty card included with your product or visit the official Rigol website. For technical support, service, or inquiries, please contact your local Rigol distributor or Rigol customer service. Contact information can typically be found on the Rigol website or in the documentation provided with your oscilloscope.
Oficialus Websvetainė: www.rigol.com