
1. Įvadas
Ačiū, kad pirkoteasing the Homtime D2qi Bluetooth Speaker with Wireless Charging and Alarm Clock. This device is designed to provide a versatile audio experience with convenient features for your daily life. Please read this manual carefully before use to ensure proper operation and to maximize the product's lifespan.
2. Saugos informacija
- Nelaikykite prietaiso nuo ekstremalių temperatūrų, drėgmės ar tiesioginių saulės spindulių.
- Laikyti atokiai nuo vandens ir kitų skysčių.
- Neardykite ir nebandykite taisyti įrenginio patys. Visus techninės priežiūros darbus patikėkite kvalifikuotiems specialistams.
- Use only the provided or recommended power adapter.
- Stenkitės, kad prietaisas nenumestų ar nepatirtų stipraus smūgio.
3. Pakuotės turinys
Patikrinkite pakuotę, ar joje yra šie daiktai:
- Homtime D2qi Bluetooth Speaker
- Maitinimo adapteris
- Vartotojo vadovas
4. Produktas baigtasview
The Homtime D2qi combines a high-quality Bluetooth speaker with a digital alarm clock and a convenient wireless charging pad. It features intuitive controls for easy operation.

4.1 pav.: priekis view of the Homtime D2qi speaker with a smartphone placed on its top surface for wireless charging.

Figure 4.2: The Homtime D2qi speaker positioned on a book, showcasing its compact design and the digital clock display.

Figure 4.3: The Homtime D2qi speaker in a home setting, demonstrating wireless charging functionality.
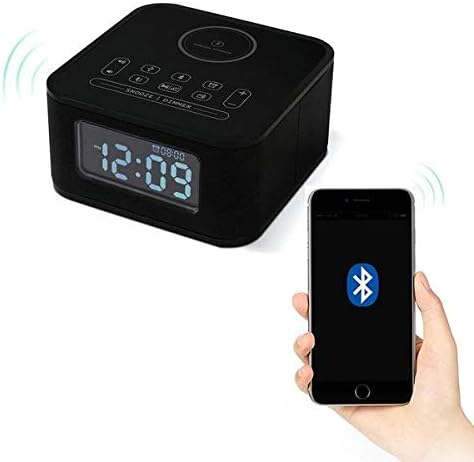
Figure 4.4: The Homtime D2qi speaker connected via Bluetooth to a smartphone.
5. Sąranka
5.1 Maitinimo jungtis
- Connect the provided power adapter to the DC input port on the back of the Homtime D2qi.
- Įjunkite maitinimo adapterį į standartinį sieninį lizdą.
- Ekranas užsidegs, rodydamas, kad įrenginys įjungtas.
5.2 Pradinis laiko nustatymas
Upon first power-on or after a power outage, you may need to set the time. Refer to the 'Operating Instructions' section for detailed steps on setting the clock.
6. Naudojimo instrukcijos
6.1 Bluetooth ryšys
- Paspauskite Bluetooth mygtukas on the top panel to enter Bluetooth pairing mode. The Bluetooth indicator will flash.
- Išmaniajame telefone arba garso įrenginyje įjunkite „Bluetooth“ ir ieškokite galimų įrenginių.
- Select "Homtime D2qi" from the list.
- Kai ryšys bus užmegztas, „Bluetooth“ indikatorius nustos mirksėti ir liks šviesti. Dabar galite leisti garsą per garsiakalbį.
6.2 Belaidis įkrovimas
- Place your Qi-compatible smartphone centrally on the wireless charging pad located on the top surface of the speaker.
- Ensure the phone is properly aligned with the charging coil.
- The charging indicator on your phone will show that charging has begun.
6.3 Žadintuvo funkcija
- Paspauskite Signalizacijos mygtukas Norėdami įjungti žadintuvo nustatymo režimą.
- Naudokite +/- mygtukai , kad sureguliuotumėte valandą ir minutę.
- Paspauskite Signalizacijos mygtukas dar kartą, kad patvirtintumėte kiekvieną nustatymą.
- Norėdami įjungti / išjungti žadintuvą, paspauskite Signalizacijos mygtukas briefly when not in setting mode.
- To snooze, press the Snaudimo / pritemdymo mygtukas kai suskamba žadintuvas.
6.4 Radijo funkcija
- Paspauskite Režimo mygtukas norėdami perjungti į FM radijo režimą.
- Paspauskite ir palaikykite Atkūrimo/pauzės mygtukas to auto-scan and save available stations.
- Naudokite Ankstesnis/Kitas mygtukai to navigate through saved stations.
6.5 Atsiliepimas į skambučius
Prijungus garsiakalbį per „Bluetooth“, jį galima naudoti skambučiams laisvų rankų įranga.
- Norėdami atsiliepti į skambutį, paspauskite Atkūrimo/pauzės mygtukas.
- Norėdami baigti pokalbį, paspauskite Atkūrimo/pauzės mygtukas vėl.
7. Priežiūra
- Prietaisą valykite minkštu, sausu skudurėliu. Nenaudokite abrazyvinių valiklių ar tirpiklių.
- Keep the charging pad free of dust and debris to ensure efficient wireless charging.
- Laikykite prietaisą vėsioje, sausoje vietoje, kai jo ilgesnį laiką nenaudojate.
8. Problemų sprendimas
| Problema | Galima priežastis | Sprendimas |
|---|---|---|
| Nėra galios | Neprijungtas maitinimo adapteris arba sugedęs lizdas. | Ensure power adapter is securely plugged into the device and a working wall outlet. |
| Nėra garso iš garsiakalbio | Bluetooth not connected; volume too low; incorrect mode. | Ensure Bluetooth is paired. Increase volume on both the speaker and your device. Check if the speaker is in the correct mode (Bluetooth/Radio). |
| Belaidis įkrovimas neveikia | Phone not Qi-compatible; phone not aligned; phone case too thick. | Verify phone supports Qi wireless charging. Realign phone on the charging pad. Remove thick phone cases. |
| Buttons difficult to locate in the dark | Buttons are flush with the surface. | Familiarize yourself with button layout during daylight. Use the dimmer function to adjust display brightness. |
| Bluetooth disconnects automatically | Power saving feature; device out of range. | Reconnect Bluetooth manually. Keep devices within Bluetooth range (approx. 10 meters). |
9. Specifikacijos
| Funkcija | Detalė |
|---|---|
| Prekės ženklas | Homtime |
| Modelio numeris | D2qi |
| Spalva | Juoda |
| Garsiakalbio tipas | Bluetooth garsiakalbiai |
| Ryšys | Bevielis |
| Suderinami įrenginiai | Išmanieji telefonai |
| Išėjimo galia | 5–10 vatų |
| Produkto svoris | 0.5 kg |
| Pakuotės matmenys | 19.6 x 18.8 x 14.8 cm |
| Techninės įrangos sąsaja | Audio/Video Port |
10. Garantija ir palaikymas
Homtime products are manufactured to the highest quality standards. For warranty information and customer support, please refer to the warranty card included in your package or visit the official Homtime websvetainėje. Išsaugokite pirkimo kvitą kaip pirkimo įrodymą.