
BOYA BY-DMR7
BOYA BY-DMR7 On-Camera Shotgun Microphone User Manual
Model: BY-DMR7
Įvadas
The BOYA BY-DMR7 is a broadcast-quality supercardioid condenser microphone designed for use with DSLR cameras and camcorders. It features an integrated flash recorder capable of capturing 24-bit/48 kHz WAV audio files directly to a MicroSDHC card (up to 32 GB, sold separately). This manual provides comprehensive instructions for setting up, operating, and maintaining your BY-DMR7 microphone to ensure optimal performance.

Image: The BOYA BY-DMR7 microphone with its foam windscreen, showcasindėl savo kompaktiško dizaino ir integruotų valdiklių.
Kas yra dėžutėje
Patikrinkite pakuotės turinį, kad įsitikintumėte, jog yra visi reikalingi daiktai:
- BOYA BY-DMR7 Shotgun Microphone
- Putų priekinis stiklas
- 3.5mm Gold-Plated Audio Cable
- Vartotojo vadovas (šis dokumentas)

Image: All components included with the BY-DMR7: the microphone unit, the foam windscreen, and the coiled 3.5mm audio cable.
Produktas baigtasview
Familiarize yourself with the various parts and controls of the BY-DMR7 microphone:
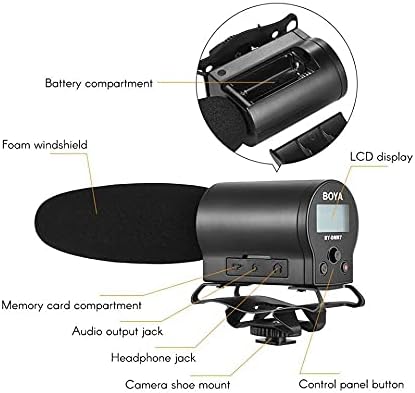
Image: Detailed diagram highlighting key components of the BY-DMR7, including the battery compartment, LCD display, control panel, and various input/output jacks.
- Putplasčio priekinis stiklas: Reduces wind noise and plosives.
- Microphone Barrel: Houses the supercardioid condenser microphone element.
- LCD ekranas: Shows recording status, battery level, and menu options.
- Valdymo skydelio mygtukai: For menu navigation, recording, and playback.
- Ausinių lizdas (3.5 mm): Garso stebėjimui realiuoju laiku.
- Audio Output Jack (3.5mm): Connects to camera's audio input.
- Memory Card Compartment: For MicroSDHC card insertion.
- Baterijų skyrius: Telpa 2 AA baterijos.
- Integruotas amortizatorius: Reduces handling noise.
- Kameros lizdo laikiklis: Attaches to standard camera hot/cold shoe.
Sąranka
1. Akumuliatoriaus įdėjimas
The BY-DMR7 requires two (2) AA batteries for operation.
- Locate the battery compartment on the side of the microphone unit.
- Atidarykite akumuliatoriaus skyriaus dangtelį.
- Įdėkite dvi AA baterijas, užtikrindami teisingą poliškumą (+/-), kaip nurodyta skyriaus viduje.
- Saugiai uždarykite akumuliatoriaus skyriaus dangtelį.
2. MicroSDHC Card Installation
A MicroSDHC card (up to 32 GB) is required for recording audio.
- Locate the memory card compartment.
- Gently insert a MicroSDHC card into the slot until it clicks into place. Ensure the card is oriented correctly.
- Norėdami išimti, šiek tiek paspauskite kortelę, kol ji iššoks.
3. Mikrofono montavimas
The BY-DMR7 can be mounted on a camera's hot/cold shoe.
- Slide the camera shoe mount of the microphone onto your camera's hot/cold shoe.
- Tighten the locking wheel on the shoe mount to secure the microphone in place.

Image: The BY-DMR7 microphone securely attached to a DSLR camera, ready for use.

Image: The BY-DMR7 microphone mounted on a different camera body, demonstrating its versatility.

Image: The BY-DMR7 microphone attached to a camcorder, illustrating its compatibility with various video recording devices.
4. Prisijungimas prie fotoaparato
Use the supplied 3.5mm audio cable to connect the microphone to your camera's audio input.
- Prijunkite vieną 3.5 mm garso laido galą prie Garso išvesties lizdas on the BY-DMR7.
- Prijunkite kitą laido galą prie Mikrofono įvestis jack on your camera or camcorder.
5. Attaching Foam Windscreen
Slide the foam windscreen over the microphone barrel to reduce unwanted wind noise during outdoor recordings or plosives from close-up speech.
Naudojimo instrukcijos
1. Įjungimas/išjungimas
- To power on the device, press and hold the power button (usually part of the control panel) until the LCD display illuminates.
- Norėdami išjungti, dar kartą paspauskite ir palaikykite maitinimo mygtuką, kol ekranas išsijungs.
2. Garso įrašymas
The BY-DMR7 features one-button recording for ease of use.
- Ensure a MicroSDHC card is inserted and batteries are charged.
- Paspauskite skirtą Įrašas button (often marked with a red dot or 'REC'). The recording indicator on the LCD will show that recording is active.
- Norėdami sustabdyti įrašymą, paspauskite Įrašas mygtuką dar kartą. The file will be saved automatically to the MicroSDHC card.
3. Garso stebėjimas
Use the 3.5mm headphone output to monitor your audio in real-time.
- Connect a pair of headphones to the Ausinių lizdas ant mikrofono.
- Adjust the monitoring volume if available through the menu system.
4. Using the Low-Cut Filter
The low-cut filter helps reduce unwanted low-frequency noise such as rumble or air conditioning hum.
- Access the menu system via the control panel buttons.
- Navigate to the audio settings or filter options.
- Enable or disable the low-cut filter as needed for your recording environment.
5. Meniu naršymas ir nustatymai
The LCD display and control panel buttons allow you to adjust various settings.
- Use the navigation buttons (e.g., up/down arrows, 'Menu', 'OK') to browse through options on the LCD.
- Common settings include input gain, headphone volume, low-cut filter, and file valdymas.
6. Atkūrimas ir File Perdavimas
- Atkūrimas: Use the control panel buttons to navigate to recorded files and initiate playback directly on the device through the headphone jack.
- File Pervedimas: To transfer recorded WAV files, remove the MicroSDHC card from the BY-DMR7 and insert it into a compatible card reader connected to a computer. The files can then be copied like any other data.
Priežiūra
- Valymas: Use a soft, dry cloth to clean the exterior of the microphone. Do not use liquid cleaners or solvents.
- Saugykla: When not in use for extended periods, remove the batteries to prevent leakage. Store the microphone in a cool, dry place, away from direct sunlight and extreme temperatures.
- Putplasčio priekinis stiklas: The foam windscreen can be gently cleaned with mild soap and water if it becomes dirty. Ensure it is completely dry before reattaching.
Trikčių šalinimas
| Problema | Galima priežastis | Sprendimas |
|---|---|---|
| Mikrofonas neįsijungia. | Išsikrovusios arba neteisingai įdėtos baterijos. | Pakeiskite baterijas naujomis AA baterijomis, užtikrindami teisingą poliškumą. |
| Nėra garso įrašo. | No MicroSDHC card inserted, card full, or card error. | Insert a MicroSDHC card, check available space, or try formatting the card (this will erase all data). |
| Poor audio quality / excessive noise. | Wind noise, low-cut filter off, incorrect gain settings, or environmental noise. | Ensure foam windscreen is used. Enable low-cut filter. Adjust input gain. Record in a quieter environment. |
| No audio monitoring through headphones. | Headphones not connected properly, headphone volume too low, or faulty headphones. | Check headphone connection. Increase headphone volume. Test with another pair of headphones. |
| Microphone not recognized by camera. | Audio cable not connected properly, or camera audio input settings. | Ensure 3.5mm audio cable is securely connected to both microphone and camera. Check camera's audio input settings (e.g., external mic enabled). |
Specifikacijos
| Funkcija | Detalė |
|---|---|
| Mikrofono formos faktorius | Šautuvas |
| Polinis raštas | Superkardioidinis (vienkryptis) |
| Garso jautrumas | 45 dB |
| Signalo ir triukšmo santykis | 78 dB |
| Triukšmo lygis | 110 dB |
| Įrašymo formatas | 24-bit/48 kHz WAV audio files |
| Saugojimo laikmena | MicroSDHC card (up to 32 GB) |
| Ausinių išvestis | 3.5 mm stereo lizdas |
| Garso išvestis | 3.5 mm lizdas |
| Maitinimo šaltinis | 2 AA baterijos |
| Prekės matmenys (I x P x A) | 9.8 x 3.86 x 1.97 colio |
| Prekės svoris | 5.3 uncijos (apie 150 gramų) |
| Medžiaga | Foam (windscreen) |
| Suderinami įrenginiai | DSLR cameras, camcorders, MiniSDHC cards |
Garantija ir palaikymas
Information regarding product warranty and customer support is not provided within this manual. Please refer to the manufacturer's official website or contact your retailer for details on warranty coverage, technical support, and service options for your BOYA BY-DMR7 microphone.
Dėl papildomos pagalbos galite apsilankyti BOYA parduotuvė „Amazon“ platformoje.
Ask a question about this manual
Ask about setup, troubleshooting, compatibility, parts, safety, or missing instructions. Manuals+ will review the question and use this page’s manual context to help answer it.