
Andoer HDV-Z82
Andoer HDV-Z82 Digital Video Camera Camcorder User Manual
Model: HDV-Z82
1. Įvadas
This manual provides comprehensive instructions for the operation and maintenance of your Andoer HDV-Z82 Digital Video Camera Camcorder. The HDV-Z82 is a versatile device capable of capturing 1080P Full HD video and 24MP still images, featuring a 0.45X wide-angle lens, 3-inch LCD touchscreen, and support for external accessories.

The Andoer HDV-Z82 camcorder, shown with its included remote control, highlighting its compact design and primary lens.

The Andoer HDV-Z82 camcorder is designed to capture vivid and bright moments with its 24MP High Definition CMOS Sensor.
2. Pakuotės turinys
Patikrinkite, ar jūsų siuntinyje yra visi toliau išvardyti daiktai:
- 1 x Andoer HDV-Z82 Digital Camera with Battery (NP-40B 3.7V 1250mAh)
- 1 x Remote Control with Battery (CR2025 3V)
- 1 x 0.45X Wide Angle Lens with 2 Covers
- 1 x objektyvo segtukas
- 1 x Lens Bag
- 1x USB laidas
- 1 x HD kabelis
- 1 x objektyvo dangtelis
- 1 x Camera Bag with Shoulder Strap
- 1 x Lens User Manual (English)
- 1 x Camera User Manual (English/Chinese)
3. Dalių identifikavimas
Familiarize yourself with the various parts of your camcorder:
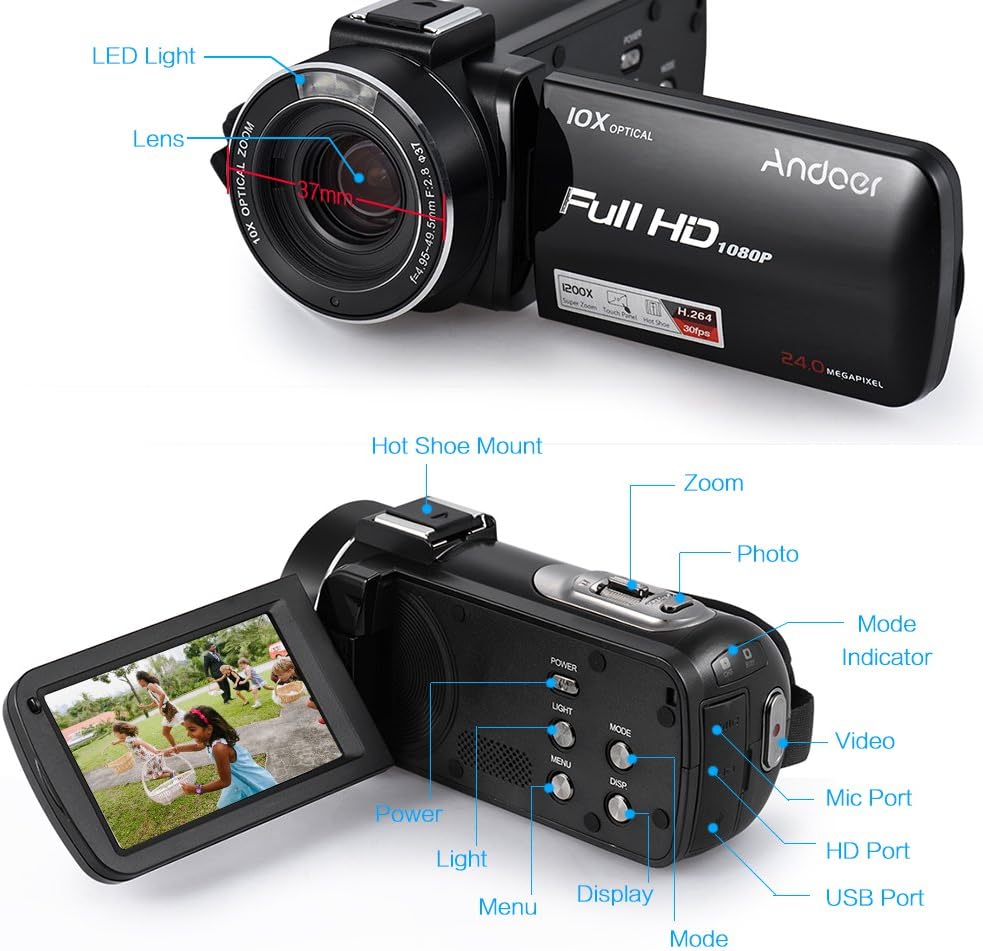
This diagram illustrates the various components of the HDV-Z82 camcorder, including the LED Light, Lens, Hot Shoe Mount, Zoom control, Photo button, Mode selector, Video button, Mic Port, HD Port, USB Port, Power button, Light button, Menu button, Display button, and Mode indicator.
- LED šviesa: Provides supplementary illumination in low-light conditions.
- Objektyvas: The primary optical component for capturing images and videos.
- Karštos jungties laikiklis: For attaching external accessories like microphones or additional LED lights.
- Priartinimo valdymas: Adjusts the optical and digital zoom levels.
- Nuotraukos mygtukas: Press to capture still images.
- Režimo parinkiklis: Switches between video, photo, and playback modes.
- Vaizdo įrašo mygtukas: Pradedamas ir sustabdo vaizdo įrašymą.
- Mikrofono prievadas: Išoriniam mikrofonui prijungti.
- HD prievadas: For connecting the camcorder to an HD display.
- USB prievadas: For connecting to a computer for data transfer or charging.
- Maitinimo mygtukas: Turns the camcorder on or off.
- Šviesos mygtukas: Activates or deactivates the built-in LED light.
- Meniu mygtukas: Accesses the camcorder's settings menu.
- Ekrano mygtukas: Toggles display information on the LCD screen.
- Režimo indikatorius: Rodo dabartinį veikimo režimą.
4. Sąranka
4.1. Akumuliatoriaus įdėjimas
- Atidarykite akumuliatoriaus skyriaus dangtelį.
- Insert the NP-40B battery, ensuring the correct polarity.
- Saugiai uždarykite akumuliatoriaus skyriaus dangtelį.
- Pastaba: The camera and remote control batteries are insulated for secure delivery. Please remove the insulation paste before first use.
4.2. Atminties kortelės įdėjimas
The camcorder supports up to a 64GB memory card (not included). A Class 10 or above memory card is highly recommended for optimal performance.
- Raskite atminties kortelės lizdą.
- Insert the SD/SDHC memory card with the metal contacts facing the correct direction until it clicks into place.
- Norėdami išimti, švelniai paspauskite kortelę, kol ji iššoks.
4.3. Attaching the Wide Angle Lens
The included 0.45X wide-angle lens can be attached to expand your field of view.

This image demonstrates the expanded field of view achieved with the 0.39X Wide Angle + Macro Lens compared to a standard 27mm lens, allowing for capture of wider scenery.

This diagram illustrates the assembly of the Macro Lens and the 0.39X Wide Angle Lens, which can be combined for super wide vision or used separately for macro photography.
- Remove the lens cap from the camcorder's main lens.
- Screw the wide-angle lens onto the camcorder's lens thread until secure.
- Ensure the lens is firmly attached to prevent accidental detachment.
4.4. Nuotolinio valdymo pulto baterija
The remote control uses one CR2025 3V battery, which is included. Remove the insulation tab before first use.
5. Naudojimo instrukcijos
5.1. Maitinimo įjungimas/išjungimas
Paspauskite GALIA button to turn the camcorder on or off. The LCD screen will illuminate upon power-on.
5.2. Režimo pasirinkimas
Naudokite REŽIMAS button to switch between Video Recording Mode, Photo Shooting Mode, and Playback Mode.
5.3. Vaizdo įrašymas
- Perjunkite į vaizdo įrašymo režimą.
- Paspauskite VIDEO button to start recording. A red indicator will typically appear on the screen.
- Paspauskite VIDEO mygtuką dar kartą, kad sustabdytumėte įrašymą.
5.4. Fotografavimas
- Switch to Photo Shooting Mode.
- Kadruokite kadrą naudodami LCD ekraną.
- Paspauskite FOTO mygtuką, kad užfiksuotumėte nejudantį vaizdą.
5.5. Priartinimo funkcija
Naudokite MODYTI controls (T for Telephoto, W for Wide) to adjust the 10X optical zoom and up to 120X digital zoom.
5.6. Using the 3-inch LCD Touchscreen
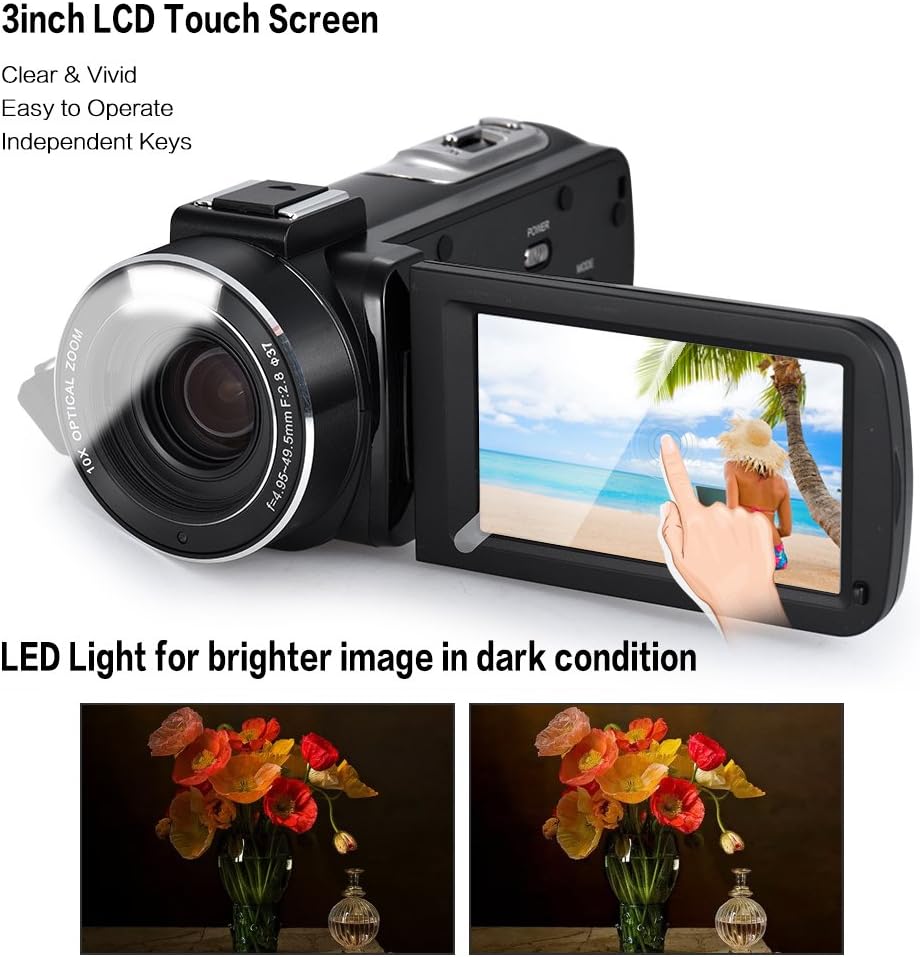
The camcorder features a 3-inch rotary LCD touchscreen for clear and vivid viewing. The built-in LED light enhances image brightness in low-light conditions, as shown in the comparison.
The rotary LCD touchscreen allows for easy navigation of menus and settings. Simply touch the desired option on the screen to select it.
5.7. Išplėstinės funkcijos
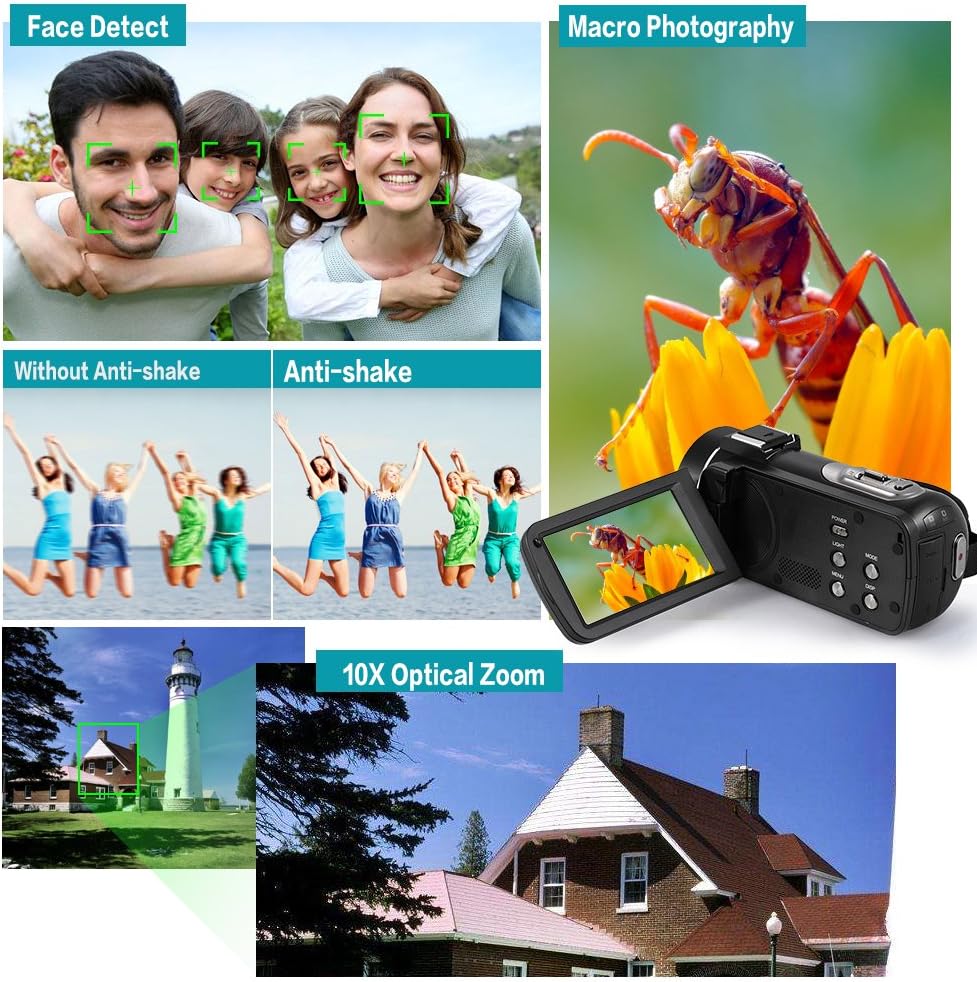
This composite image showcases key functionalities: Face Detect for automatic facial recognition, Anti-shake technology for stable footage, Macro Photography for detailed close-ups, and the powerful 10X Optical Zoom for distant subjects.
- Face Detect: Automatically detects and optimizes focus and exposure for faces in the frame.
- Apsauga nuo drebėjimo: Reduces blur caused by camera movement, ensuring clearer footage.
- Makrofotografija: Allows for close-up shots of small subjects with fine detail.
- Tęsti kadrą: Enables continuous shooting for a series of rapid photos.
- Laikmatis: Set a delay (2/5/10s) before a photo is taken.
- Nutildyti: Įjungia / išjungia garso įrašymą.
- Automatinis išjungimas: Configures the camcorder to automatically power off after a period of inactivity.
- Laikas Švamp: Adds date and time information to your recordings/photos.
5.8. Using the Hot Shoe Mount

The unique hot shoe mount on the camcorder allows for the attachment of external accessories such as microphones and LED lights, enhancing audio quality and illumination for various shooting scenarios.
The hot shoe mount allows you to attach compatible external accessories like microphones for improved audio or additional LED lights for enhanced illumination. Simply slide the accessory onto the mount until it locks into place.
5.9. Connecting to TV/Computer
Use the provided HD Cable to connect the camcorder to an HD television for playback. Use the USB Cable to connect to a computer (Windows XP/Vista/7/8 or above) for transferring files.
6. Priežiūra
- Objektyvo valymas: Use a soft, lint-free cloth specifically designed for camera lenses. Do not use harsh chemicals.
- Kūno valymas: Wipe the camcorder body with a soft, dry cloth. Avoid using water or cleaning solutions directly on the device.
- Saugykla: Laikykite vaizdo kamerą vėsioje, sausoje vietoje, toliau nuo tiesioginių saulės spindulių ir ekstremalių temperatūrų. Jei ilgesnį laiką nenaudosite, išimkite bateriją.
- Akumuliatoriaus priežiūra: Reguliariai įkraukite bateriją, net jei jos nenaudojate, kad išlaikytumėte jos tarnavimo laiką.
7. Problemų sprendimas
| Problema | Galima priežastis | Sprendimas |
|---|---|---|
| Vaizdo kamera neįsijungia. | Battery is dead or not inserted correctly. Insulation tab not removed. | Charge the battery. Reinsert the battery correctly. Remove the insulation tab from the battery. |
| Nepavyksta įrašyti vaizdo / fotografuoti. | Memory card is full, not inserted, or incompatible. Incorrect mode selected. | Insert a compatible memory card. Delete unnecessary files or use a new card. Switch to the correct mode (Video/Photo). |
| Vaizdai / vaizdo įrašai yra neryškūs. | Lens is dirty. Anti-shake feature off. Insufficient lighting. | Clean the lens. Ensure Anti-shake is enabled in settings. Use the LED light or shoot in brighter conditions. |
| Nuotolinio valdymo pultas neveikia. | Battery is dead or insulation tab not removed. Obstruction between remote and camcorder. | Replace the CR2025 battery. Remove the insulation tab. Ensure clear line of sight to the camcorder's IR receiver. |
8. Specifikacijos
| Modelis | HDV-Z82 |
| Vaizdo raiška | 1080P 30fps, 720P 60/30fps, VGA 30fps |
| Nuotraukų raiška | 24M (5600 * 4200), 20M, 16M, 12M, 10M, 7MHD, 5M, 3M, 2MHD, VGA |
| Optinis priartinimas | 10x |
| Skaitmeninis priartinimas | 120x |
| Ekrano dydis | 3 Inches (Rotary LCD Touchscreen) |
| Nuotraukų jutiklių technologija | CMOS |
| Saugojimo laikmena | Supports up to 64GB Memory Card (Class 10 or above recommended) |
| Baterija | NP-40B 3.7V 1250mAh (Camera), CR2025 3V (Remote Control) |
| Sąsaja | HD Out, USB 2.0 |
| Operacinės sistemos palaikymas | Windows XP/Vista/7/8 or above |
| Ypatingos savybės | Face Detect, Anti-shake, Macro Photography, Continue Shot, Self-timer, Mute, Auto OFF, Time Stamp, Built-in LED Light, Hot Shoe Mount |
| Matmenys | 19.5 x 16.2 x 10 cm |
| Svoris | 801 g |
9. Garantija ir palaikymas
For product support, technical assistance, or warranty inquiries, please contact Andoer customer service through the retailer where the product was purchased or visit the official Andoer websvetainė kontaktinei informacijai.
Prašome išsaugoti pirkimo įrodymą bet kokiems garantiniams reikalavimams.
Ask a question about this manual
Ask about setup, troubleshooting, compatibility, parts, safety, or missing instructions. Manuals+ will review the question and use this page’s manual context to help answer it.