
Įvadas
Welcome to the world of sewing with your new Janome IT 1028 Glamour mechanical sewing machine. This manual provides essential information for the safe and efficient operation, setup, maintenance, and troubleshooting of your machine. Please read it thoroughly before using the machine to ensure optimal performance and longevity.
The Janome IT 1028 Glamour is designed for ease of use, featuring 12 stitch types, a free arm for circular sewing, an oscillating hook, automatic buttonholes, and adjustable stitch length and width. It also includes a double presser foot lift, feed dog lowering, a thread cutter, a needle threader, and a soft cover for protection.
Saugos instrukcijos
Kad sumažintumėte elektros smūgio, nudegimų, gaisro ar žmonių sužalojimo riziką:
- Visada atjunkite įrenginį nuo elektros lizdo iškart po naudojimo ir prieš valydami, nuimdami dangčius ar atlikdami bet kokius naudotojo atliekamus techninės priežiūros pakeitimus.
- Do not allow the machine to be used as a toy. Close attention is necessary when the machine is used by or near children.
- Use this machine only for its intended use as described in this manual. Use only attachments recommended by the manufacturer.
- Niekada nenaudokite šio prietaiso, jei pažeistas jo laidas ar kištukas, jei jis neveikia tinkamai, jei buvo numestas, pažeistas arba įmestas į vandenį.
- Niekada nemeskite ir neįkiškite jokio daikto į jokią angą.
- Nenaudoti lauke.
- Nedirbkite ten, kur naudojami aerozoliniai (purškiami) produktai arba kur įvedamas deguonis.
- Pirštus laikykite toliau nuo visų judančių dalių. Siuvimo mašinos adata turi būti ypač atsargi.
- Visada naudokite tinkamą adatos plokštelę. Dėl netinkamos plokštelės adata gali nulūžti.
- Nenaudokite sulenktų adatų.
- Siuvimo metu netraukite ir nestumkite audinio. Tai gali iškreipti adatą ir ji gali nulūžti.
- Išjunkite siuvimo mašiną, kai atliekate bet kokius pakeitimus adatos srityje, pavyzdžiui, įveriate siūlo siūlą, keičiate adatą, įveriate ritinėlį arba keičiate prispaudimo pėdelę.
- Always unplug the machine when removing the light bulb.
- Neištraukite kištuko traukdami už laido. Norėdami atjungti kištuką, imkite už kištuko, o ne už laido.
Produktas baigtasview
Pagrindinės savybės
- 12 Stitch Types: Versatile options for various sewing projects.
- Laisva ranka: Facilitates sewing cuffs, sleeves, and other small, circular items.
- Oscillating Hook: Ensures smooth and consistent stitch formation.
- Reguliuojamas dygsnio ilgis ir plotis: Provides control over stitch appearance.
- Automatic Four-Step Buttonhole: Supaprastina profesionaliai atrodančių kilpų kūrimą.
- Double Presser Foot Lift: Allows for sewing thicker fabrics.
- Feed Dog Lowering: Useful for darning and free-motion quilting.
- Siūlų pjaustytuvas: Conveniently trims threads.
- Adatos įvėriklis: Assists in quickly threading the needle.
- Minkštas viršelis: Protects the machine from dust and damage.
Mašinos komponentai
Familiarize yourself with the main parts of your Janome IT 1028 Glamour sewing machine.

1 pav.: priekis view of the Janome IT 1028 Glamour sewing machine with the soft cover in place. This image shows the overall design and the stitch selection and length dials.

2 pav. Iš arti view of the stitch selector dial (left) and stitch length dial (right) on the Janome IT 1028 Glamour. The decorative illustration on the machine body is also visible.
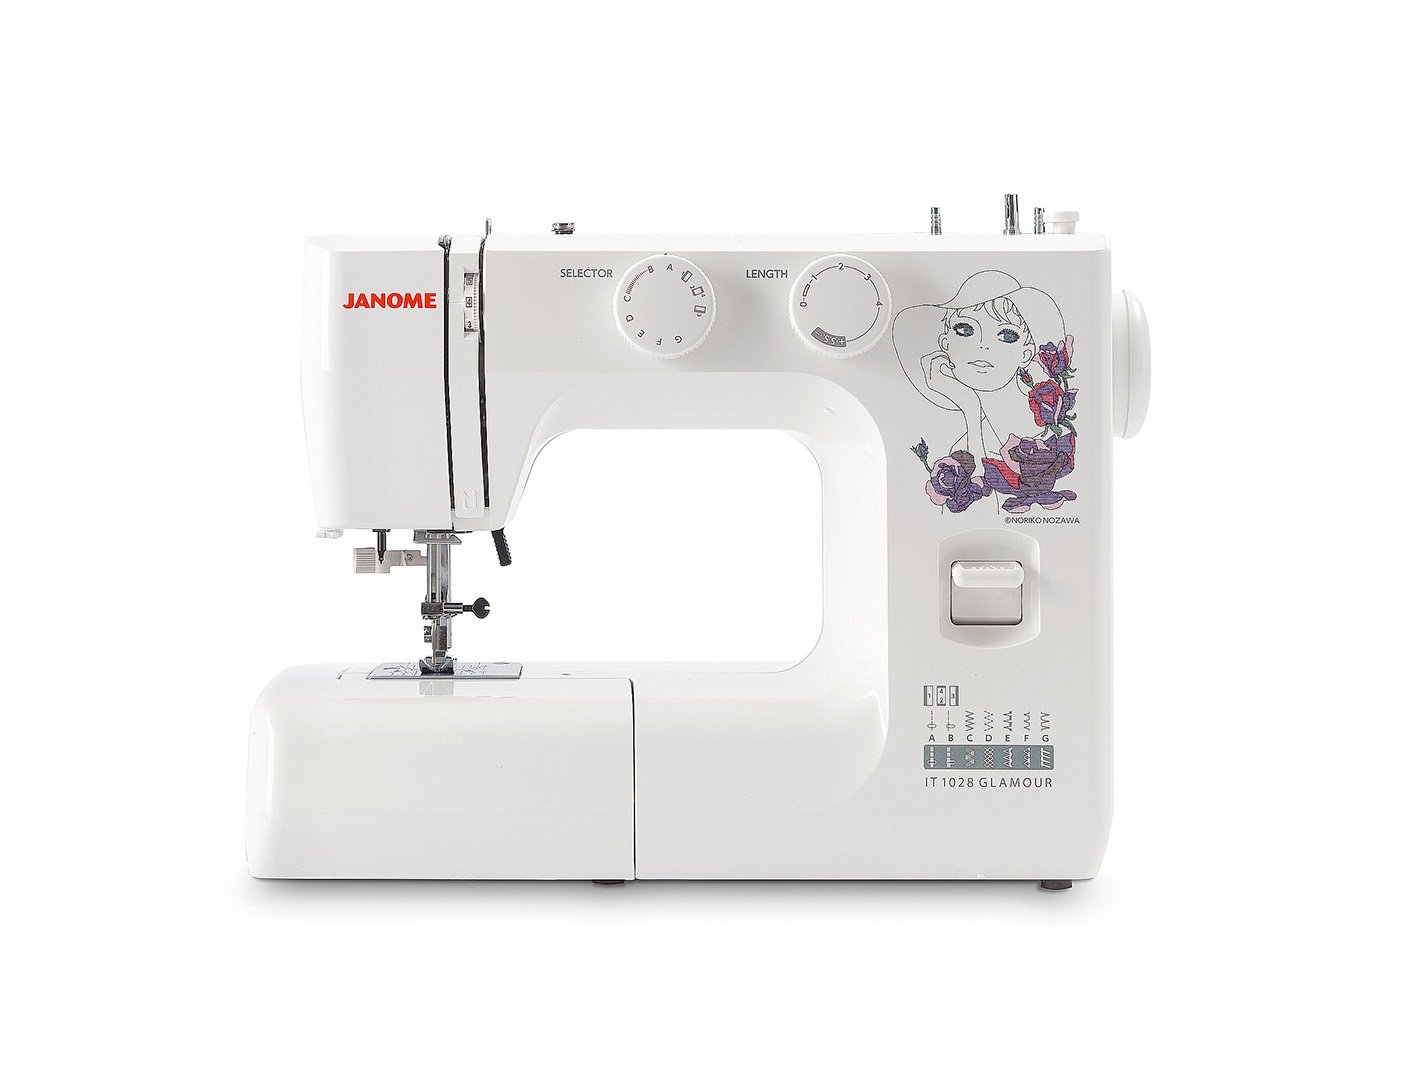
Figure 3: The Janome IT 1028 Glamour sewing machine with the accessory tray removed, revealing the free arm and the bobbin case area. This view is essential for bobbin insertion and cleaning.
Sąranka
1. Išpakavimas ir įdėjimas
- Atsargiai išimkite mašiną iš pakuotės.
- Pastatykite mašiną ant stabilaus, lygaus paviršiaus.
- Remove any protective films or packing materials.
2. Maitinimo prijungimas
- Įsitikinkite, kad įrenginio maitinimo jungiklis yra padėtyje „OFF“ (išjungta).
- Prijunkite maitinimo laidą prie įrenginio maitinimo įvesties lizdo.
- Įkiškite maitinimo laidą į tinkamą elektros lizdą.
3. Ritės vyniojimas
- Uždėkite siūlų ritę ant ritės kaiščio.
- Prakiškite siūlą per viršutinį siūlo kreipiklį ir aplink ritės vyniojimo įtempimo diską.
- Insert the thread through the hole in the bobbin from the inside out.
- Uždėkite ritę ant ritės vyniotuvo veleno ir pastumkite veleną į dešinę.
- Start the machine. The bobbin will wind automatically. Stop when the bobbin is full.
- Cut the thread and push the bobbin winder spindle to the left. Remove the bobbin.
4. Ritės įdėjimas
- Išjunkite mašiną.
- Open the bobbin cover plate located on the free arm.
- Insert the bobbin into the bobbin case with the thread running in the direction indicated by the arrows.
- Pull the thread through the tension spring and into the guide slot.
- Uždarykite ritės dangtelio plokštę.
5. Viršutinio siūlo įvėrimas
- Pakelkite pėdutės keltuvą.
- Uždėkite siūlų ritę ant ritės kaiščio.
- Prakiškite siūlą per viršutinį siūlo kreipiklį.
- Bring the thread down the right channel, up the left channel, and through the take-up lever from right to left.
- Toliau veskite siūlą žemyn iki adatos vedžiotuvo siūlo kreiptuvo.
- Use the built-in needle threader or manually thread the needle from front to back.
- Per adatos akutę ištraukite apie 6 colių siūlo.
6. Ritinio siūlo iškėlimas
- Viršutinį siūlą lengvai laikykite kaire ranka.
- Turn the handwheel towards you to lower the needle into the needle plate and then raise it.
- The upper thread will catch the bobbin thread, forming a loop.
- Pull the loop to bring the bobbin thread up through the needle plate hole.
- Patraukite abu siūlus (viršutinį ir ritininį) po prispaudimo pėdele link mašinos galo.
Naudojimo instrukcijos
1. Dygsnio pasirinkimas
Pasukite Siuvimo pasirinkimo ratukas (refer to Figure 2) to choose your desired stitch pattern. The available stitches are indicated by letters or symbols on the dial.
2. Dygsnio ilgio ir pločio reguliavimas
- Dygsnio ilgis: Naudokite Dygsnio ilgio ratukas (refer to Figure 2) to adjust the length of your stitches. Higher numbers indicate longer stitches.
- Dygsnio plotis: For stitches that allow width adjustment, use the corresponding dial or setting. (Note: The Janome IT 1028 Glamour has adjustable stitch width, typically integrated with the stitch selector or a separate dial. Consult the machine's markings for specific controls.)
3. Basic Sewing
- Padėkite audinį po pėdele.
- Nuleiskite pėdutės keltuvą.
- Įjunkite mašiną.
- Gently press the foot controller to start sewing. The harder you press, the faster the machine will sew.
- Guide the fabric gently with your hands, but do not pull or push forcefully.
- Norėdami pritvirtinti siūlės pradžią ir pabaigą, atbulinės eigos svirtimi atlikite kelis dygsnius atgal.
- When finished, raise the needle to its highest position, lift the presser foot, and pull the fabric away from the machine.
- Use the built-in thread cutter or scissors to trim the threads.
4. Using the Free Arm
To use the free arm, simply slide off the accessory tray (refer to Figure 3). This exposes the narrow free arm, ideal for sewing small, tubular items like sleeves, pant hems, and cuffs.
5. Automatic Four-Step Buttonholes
The Janome IT 1028 Glamour features an automatic four-step buttonhole function. Refer to the stitch selector dial for the buttonhole settings (usually marked with a buttonhole symbol and steps 1-4).
- Pritvirtinkite sagos skylutės pėdelę.
- Pažymėkite kilpos vietą ant audinio.
- Set the stitch selector to the first buttonhole step.
- Siūkite pirmąją sagos kilpos pusę.
- Change the stitch selector to the next step and sew the bar tack.
- Continue through all four steps, following the machine's markings for each segment of the buttonhole.
- Carefully cut open the buttonhole using a seam ripper, ensuring not to cut the stitches.
Priežiūra
1. Mašinos valymas
Regular cleaning helps maintain your machine's performance. Always unplug the machine before cleaning.
- Bobbin Area: Remove the needle plate and bobbin case. Use a small brush to remove lint and dust from the bobbin area and feed dogs.
- Išorė: Išorinius paviršius nuvalykite minkštu, sausu skudurėliu. Nenaudokite stiprių cheminių medžiagų ar abrazyvinių valiklių.
2. Adatos keitimas
Adatą keiskite reguliariai (po 8–10 valandų siuvimo) arba jei ji sulinksta, atbuksta ar pažeidžiama. Pažeista adata gali praleisti dygsnius arba pažeisti audinį.
- Išjunkite mašiną ir atjunkite jį.
- Atlaisvinkite adatą clamp prisukti.
- Nuimkite seną adatą.
- Įkiškite naują adatą plokščiąja puse į mašinos galą ir stumkite ją aukštyn kiek įmanoma aukščiau.
- Priveržkite adatą clamp tvirtai prisukite.
Trikčių šalinimas
Šiame skyriuje aptariamos dažniausiai pasitaikančios problemos, su kuriomis galite susidurti. Dėl problemų, kurios čia nepaminėtos, susisiekite su klientų aptarnavimo tarnyba.
| Problema | Galima priežastis | Sprendimas |
|---|---|---|
| Praleistos siūlės | Netinkama adata, sulenkta adata, netinkamas siūlų įvėrimas, netinkamas adatos dydis audiniui. | Replace needle, re-thread machine, ensure correct needle type/size. |
| Siūlo nutrūkimas (viršutinis) | Neteisingas siūlų įvėrimas, per stiprus įtempimas, prastos kokybės siūlai, sulenkta adata, šerpetojančios adatos plokštelės. | Re-thread machine, adjust upper tension, use quality thread, replace needle, check needle plate for damage. |
| Siūlo nutrūkimas (ritė) | Neteisingai užvyniota ritė, neteisingai įdėta ritė, pūkeliai ritės korpuse, per stiprus įtempimas. | Re-wind bobbin, re-insert bobbin correctly, clean bobbin case, adjust bobbin tension (if adjustable). |
| Nelygios siūlės | Incorrect tension settings, pulling/pushing fabric, wrong presser foot. | Adjust tension, guide fabric gently, use appropriate presser foot. |
| Mašina neužsiveda | Neįjungtas, maitinimo jungiklis išjungtas, kojinis valdiklis neprijungtas. | Check power connections, ensure switch is ON, connect foot controller. |
Specifikacijos
- Modelio numeris: 8100000017663 (IT 1028 Glamour)
- Prekinis ženklas: JANOMAS
- Medžiaga: Plastikiniai
- Svoris: 8 kilogramo
- Dimensions (P x L x H): 10 cm x 35 cm x 25 cm (gylis x plotis x aukštis)
- Maitinimo šaltinis: Elektros kabelis
- Dygsnių tipai: 12
- Kablio tipas: Svyruoja
- Kilpos tipas: Automatic Four-Step
Garantija ir palaikymas
For warranty information, service, or technical support, please refer to the warranty card included with your product or contact your authorized Janome dealer or customer service center. Keep your purchase receipt as proof of purchase.