
1. Įvadas
This manual provides detailed instructions for the setup, operation, and maintenance of your OWLENZ SD60 Wi-Fi Mini Projector. Please read this manual thoroughly before using the product to ensure proper functionality and safety. The SD60 features advanced LED light technology with 1500 lumens brightness, Wi-Fi screen sharing capabilities (Miracast/Airplay), and multiple media playback options for a versatile home theater experience. Its portable and compact design allows for easy installation and use.
2. Svarbi saugos informacija
- Nežiūrėkite tiesiai į projektoriaus objektyvą, kai lamp yra įjungtas.
- Užtikrinkite tinkamą vėdinimą aplink projektorių, kad išvengtumėte perkaitimo.
- Projektorių laikykite atokiau nuo vandens ar kitų skysčių.
- Naudokite tik prie projektorijaus pridėtą maitinimo adapterį.
- Nestatykite projektoriaus ant nestabilių paviršių.
- The LED light technology is designed to be gentle on the eyes and has no radiation.
3. Pakuotės turinys
Patikrinkite, ar pakuotėje yra visi toliau išvardyti daiktai. Jei kurių nors daiktų trūksta arba jie pažeisti, susisiekite su klientų aptarnavimo tarnyba.
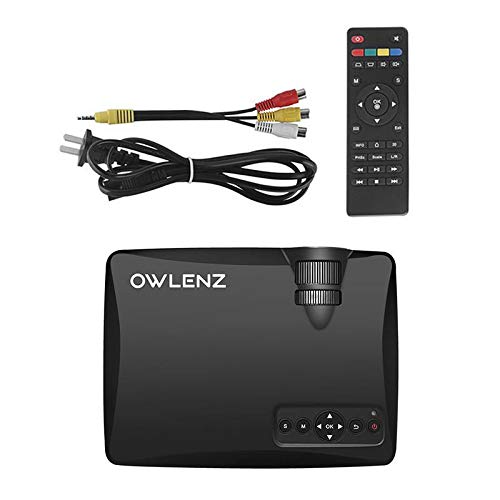
Image: OWLENZ SD60 Projector, remote control, power cable, and AV cables.
- OWLENZ SD60 Mini Projector
- Nuotolinio valdymo pultas
- Maitinimo kabelis
- AV kabelis
- Vartotojo vadovas (šis dokumentas)
4. Produktas baigtasview
Familiarize yourself with the various parts and controls of your OWLENZ SD60 projector.
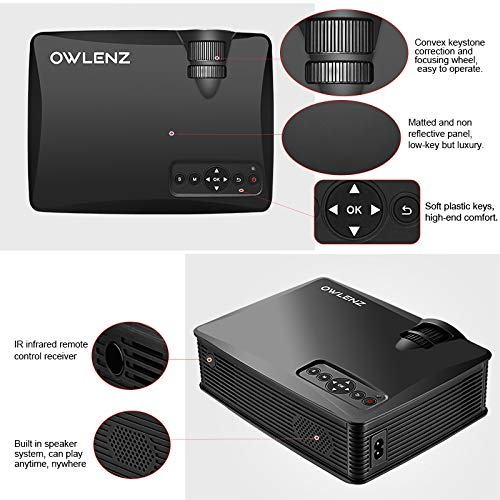
Image: Key features of the OWLENZ SD60 projector, including the focusing wheel, keystone correction, control panel, IR receiver, and built-in speaker.
- Convex Keystone Correction and Focusing Wheel: Located on the top, these allow for easy image adjustment.
- Matted and Non-Reflective Panel: Provides a sleek, low-key appearance.
- Soft Plastic Keys: For comfortable and responsive control.
- IR Infrared Remote Control Receiver: For remote operation.
- Built-in Speaker System: A 3W speaker for integrated audio playback.
- Įvesties prievadai: HDMI, USB, AV, SD Card slot (located on the side/rear).
5. Sąranka
5.1 Maitinimo jungtis
- Prijunkite maitinimo laidą prie projektoriaus maitinimo įvesties prievado.
- Kitą maitinimo laido galą prijunkite prie tinkamo elektros lizdo.
- Paspauskite projektoriaus arba nuotolinio valdymo pulto maitinimo mygtuką, kad jį įjungtumėte.
5.2 Įvesties šaltinių prijungimas
The projector supports various input options:
- HDMI: Connect an HDMI cable from your device (laptop, gaming console, etc.) to the projector's HDMI port.
- USB: Insert a USB drive into the USB port for direct media playback.
- APIE: Norėdami prijungti įrenginius su AV išvestimi, naudokite pridedamą AV kabelį.
- SD kortelė: Insert an SD card into the SD card slot for media playback.
After connecting, select the appropriate input source from the projector's menu using the remote or control panel.
5.3 Wi-Fi Screen Sharing (Miracast / Airplay)
The SD60 supports wireless screen sharing from compatible smartphones and tablets.
- Įsitikinkite, kad jūsų mobilusis įrenginys ir projektorius prijungti prie to paties „Wi-Fi“ tinklo.
- On the projector, navigate to the "Screen Share" or "Miracast/Airplay" option in the main menu.
- On your mobile device, activate the screen mirroring function (e.g., "Smart View" on Android, "Screen Mirroring" on iOS).
- Pasirinkite projektoriaus pavadinimą iš galimų įrenginių sąrašo, kad užmegztumėte ryšį.
5.4 Fokusavimo ir trapecijos koregavimas
- Fokusas: Rotate the focusing wheel near the lens until the projected image is clear and sharp.
- Keystone korekcija: Use the keystone correction wheel to adjust the image shape if it appears trapezoidal (wider at the top or bottom).
6. Operacija
6.1 Pagrindiniai valdikliai
Use the control panel on the projector or the remote control to navigate menus and adjust settings.
- Maitinimo mygtukas: Įjungia/išjungia projektorių.
- Navigacijos mygtukai (rodyklės / Gerai): Meniu naršymui ir pasirinkimui.
- Šaltinio mygtukas: Switches between input sources (HDMI, USB, AV, SD Card, Wi-Fi).
- Meniu mygtukas: Atidaro projektoriaus nustatymų meniu.
6.2 Medijos atkūrimas
Once an input source is selected, the projector will display content. For USB/SD card playback, navigate through the file browser to select your desired media.
6.3 Garso išvestis
- Integruotas garsiakalbis: The projector has a built-in 3W speaker suitable for small viewsrityse.
- Išorinis garsiakalbis: For a better listening experience, connect external speakers or headphones to the 3.5mm audio port.
6.4 Projection Size
The projector supports projection sizes ranging from 40 to 150 inches, offering a large screen experience.
7. Priežiūra
7.1 Valymas
- Projektoriaus išorę valykite minkštu, sausu skudurėliu.
- For the lens, use a lens cleaning cloth and specialized lens cleaning solution. Do not use abrasive materials.
- Regularly clean the ventilation openings to ensure proper airflow and prevent dust buildup.
7.2 LED Bulb Lifespan
The OWLENZ SD60 features an LED bulb with a lifespan of up to 30,000+ hours, significantly longer than traditional projector lamps. No regular bulb replacement is typically required under normal usage conditions.
8. Naudojimo atvejai
The OWLENZ SD60 Mini Projector is versatile and suitable for various applications:
- Namų kinas: Enjoy movies, TV shows, and sports on a large screen.
- Žaidimai: Connect gaming consoles for an immersive gaming experience.
- Švietimo tikslai: Project educational content, videos, and presentations.
- Children's Entertainment: Ideal for playing videos and cartoons for children.
- Mažas Viewimonės sritys: Its compact design and built-in speaker make it perfect for use in smaller rooms or spaces.
9. Problemų sprendimas
| Problema | Galima priežastis | Sprendimas |
|---|---|---|
| Vaizdas nerodomas | Incorrect input source selected; loose cable connection; source device not powered on. | Pasirinkite tinkamą įvesties šaltinį. Patikrinkite visus kabelių prijungimus. Įsitikinkite, kad šaltinio įrenginys įjungtas. |
| Vaizdas neryškus | Fokusas netinkamai sureguliuotas. | Sureguliuokite fokusavimo ratuką, kol vaizdas taps aiškus. |
| Vaizdas yra trapecijos formos | Keystone not adjusted correctly. | Sureguliuokite trapecijos formos koregavimo ratuką. |
| Nėra garso | Per mažas garsumas; netinkamai prijungti išoriniai garsiakalbiai; nepalaikomas garso formatas. | Increase volume. Check external speaker connection or use built-in speaker. Ensure audio format is compatible. |
| Wi-Fi screen sharing not working | Devices not on the same Wi-Fi network; screen mirroring function not activated on mobile device. | Ensure both devices are on the same Wi-Fi. Activate screen mirroring on your mobile device and select the projector. |
10. Specifikacijos
| Funkcija | Detalė |
|---|---|
| Prekės ženklas | OWLENZAS |
| Modelis | SD60 |
| Gaminio matmenys (IxPxH) | 20.8 x 16.5 x 8 cm |
| Prekės svoris | 949 g |
| Techninės įrangos sąsaja | HDMI, USB |
| Ryšio technologija | HDMI, USB, „Wi-Fi“ |
| Suderinami įrenginiai | Išmanieji telefonai, planšetiniai kompiuteriai, nešiojamieji kompiuteriai |
| Ypatingos savybės | Integruotas garsiakalbis, nešiojamas |
| Ekrano technologija | LCD |
| Ryškumas | 1500 liumenų |
| LED Bulb Lifespan | Iki 30,000 XNUMX+ valandų |
| Projekcijos dydis | Nuo 40 iki 150 colių |
| Integruotas garsiakalbio maitinimas | 3W |
| Formos faktorius | Nešiojami |
| Montavimo tipas | Stalviršio laikiklis |
| Vattage | 24 vatų |
| Reikalingos baterijos | Taip (nuotolinio valdymo pultui, nepridedamas) |
11. Produkto vaizdo įrašasview
Peržiūrėkite šį trumpą vaizdo įrašą, kad greitai apžvelgtumėteview of the OWLENZ SD60 Mini Projector's features and capabilities.
Vaizdo įrašas: trumpas aprašymasview highlighting the OWLENZ SD60 projector's display, sound, smart features, other features, portability, and use cases.
12. Garantija ir palaikymas
The OWLENZ SD60 Mini Projector comes with a standard brand warranty. For detailed warranty information, technical support, or service inquiries, please refer to the product detail page on Amazon.in or contact OWLENZ customer service directly.
For further information, visit the product detail page: „Amazon“ produkto puslapis