
Protmex PT3374
Protmex Wireless Weather Station PT3374 User Manual
Model: PT3374 | Brand: Protmex
1. Įvadas
Ačiū, kad pirkoteasing the Protmex PT3374 Wireless Weather Station. This multifunctional device provides accurate indoor and outdoor temperature and humidity readings, barometric pressure, and a weather forecast. It also functions as an alarm clock with a colorful display, enhancing your daily life with essential environmental data. Please read this manual carefully before use to ensure proper operation and to fully utilize all features.
2. Produktas baigtasview
The Protmex PT3374 consists of a main display unit and a wireless outdoor sensor. Familiarize yourself with the components and their functions.
2.1 Pagrindinės įrenginio savybės
- Colorful LCD Display: Shows time, date, indoor/outdoor temperature and humidity, weather forecast, barometric pressure, and moon phase.
- Alarm Clock with Snooze: Set daily alarms with a convenient snooze function.
- Barometer: Displays atmospheric pressure and pressure tendency.
- Weather Forecast: Predicts weather conditions based on barometric pressure changes.
- Comfort Level Indicator: Provides a visual representation of indoor comfort.
- Temperature & Humidity Trend: Shows rising, falling, or steady trends for both indoor and outdoor conditions.
- Ice Alert: Notifies when outdoor temperature approaches freezing.
2.2 belaidis lauko jutiklis
The compact outdoor sensor wirelessly transmits temperature and humidity data to the main unit.
2.3 Komponento identifikavimas

Figure 2.1: Main Unit and Wireless Sensor with Labeled Parts
This image shows the front and back of the main weather station unit and the wireless outdoor sensor, with key components labeled for easy identification. Labels include display areas for weather forecasting, barometric pressure, outdoor and indoor temperature/humidity, time/calendar, and moon phase on the front. The back of the main unit shows buttons (DOWN, UP, ALARM, SET, MEMORY, HPA/INHG, ALERT, SNOOZE/LIGHT), a hook hole, battery compartment, support frame, and power supply socket.

Figure 2.2: Protmex PT3374 Weather Station Overview
A aiškus view of the Protmex PT3374 main display unit and its accompanying wireless outdoor sensor. The main unit features a large, colorful display showing various weather parameters and time, while the compact outdoor sensor is designed for remote placement.
3. Sąranka
3.1 Išpakavimas
Carefully remove all components from the packaging. Ensure you have the main unit, wireless outdoor sensor, and power adapter.
3.2 Akumuliatoriaus įdėjimas
The main unit can be powered by the included AC adapter or by batteries (for backup). The outdoor sensor requires batteries.
- Pagrindinis blokas: Open the battery compartment on the back. Insert 3 x AAA batteries (not included) according to the polarity markings. For continuous backlight, connect the AC power adapter to the power supply socket on the back of the main unit and plug it into a wall outlet.
- Lauko jutiklis: Open the battery compartment. Insert 2 x AA batteries (not included) according to the polarity markings.
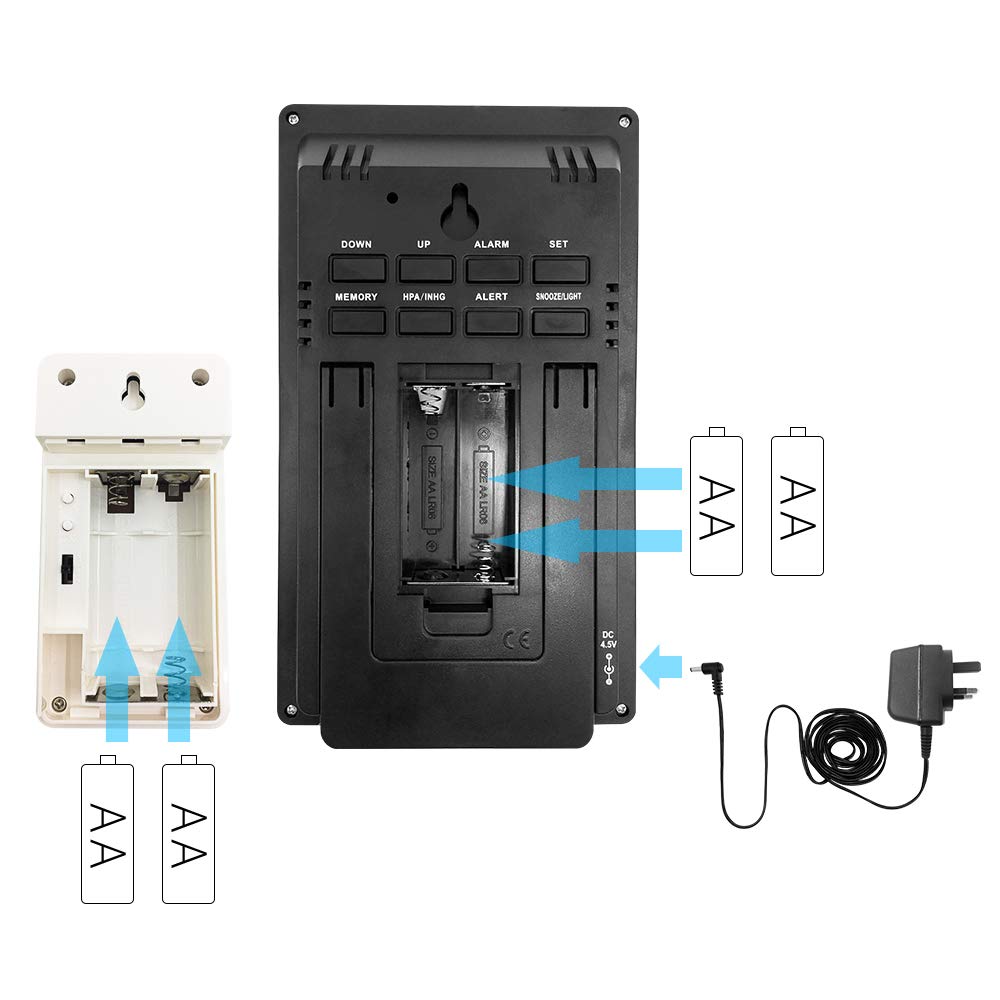
3.1 pav. Akumuliatoriaus įdėjimas
This diagram illustrates the correct insertion of AAA batteries into the main unit and AA batteries into the wireless outdoor sensor, showing the battery compartments and polarity indicators.
3.3 Jutiklių susiejimas
After installing batteries in both units, the main unit will automatically search for the outdoor sensor. Ensure both units are within range. If pairing fails, press and hold the "CHANNEL" button on the main unit to initiate a manual search.
3.4 Pradiniai nustatymai
Upon first power-up or after a reset, you may need to set the time, date, and measurement units.
- Press the "SET" button to enter time setting mode.
- Use the "UP" or "DOWN" buttons to adjust values.
- Press "SET" again to confirm and move to the next setting (e.g., 12/24 hour format, hour, minute, year, month, day, temperature unit (°C/°F), pressure unit (hPa/inHg)).
- Press "SET" repeatedly until all settings are confirmed or the unit exits setting mode automatically.
4. Naudojimo instrukcijos
4.1 Time and Alarm Functions
- Signalo nustatymas: Paspauskite mygtuką „ALARM“, kad view alarm time. Press and hold "ALARM" to enter alarm setting mode. Use "UP" or "DOWN" to adjust, and "ALARM" to confirm.
- Signalizacijos įjungimas / išjungimas: Press "ALARM" repeatedly to toggle the alarm on/off.
- Snaudimo funkcija: When the alarm sounds, press the "SNOOZE/LIGHT" button to activate snooze. The alarm will sound again after approximately 5 minutes.
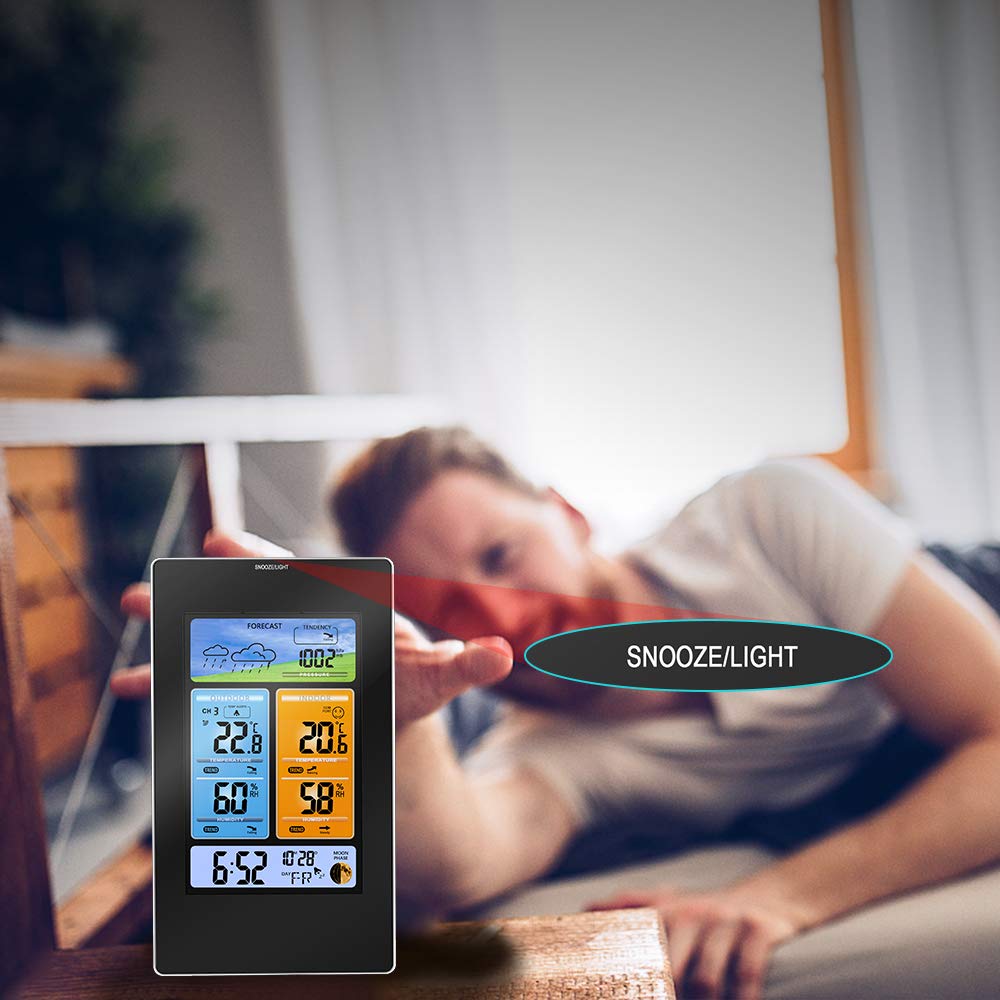
Figure 4.1: Snooze/Light Button Usage
This image demonstrates the use of the "SNOOZE/LIGHT" touch field, typically located at the top of the main unit, for activating the snooze function or temporarily illuminating the display backlight.
4.2 Weather Display and Forecast
The weather station provides a forecast for the next 12-24 hours based on barometric pressure changes.
- Prognozės piktogramos: The display shows icons for Sunny, Partly Cloudy, Cloudy, Rainy, and Snowy.
- Barometrinis slėgis: Displays current atmospheric pressure. Press "HPA/INHG" to switch between hPa and inHg units.
- Pressure Tendency: An arrow indicates if the pressure is rising, falling, or steady.

Figure 4.2: Weather Forecast Icons
This image illustrates the various weather forecast icons displayed on the main unit, including sunny, partly cloudy, cloudy, rainy, and snowy conditions, providing a visual prediction of upcoming weather.
4.3 Temperatūra ir drėgmė
- Indoor/Outdoor Readings: The display shows current indoor and outdoor temperature and humidity.
- Tendencijos rodikliai: Arrows next to temperature and humidity readings indicate if values are rising, falling, or stable.
- Įspėjimas dėl ledo: An ice crystal icon appears when the outdoor temperature drops to a level indicating potential ice formation (typically below 3°C or 37.4°F).

Figure 4.3: Trend Indicators
This image highlights the trend indicators for temperature and humidity on the main display, showing arrows that signify whether the readings are rising, falling, or remaining steady.

Figure 4.4: Ice Alert Feature
An illustration of the ice alert icon appearing on the display when the outdoor temperature reaches a critical level, warning of potential freezing conditions.
4.4 Komforto lygio indikatorius
The comfort level indicator provides a quick visual reference for indoor environmental comfort based on temperature and humidity.

Figure 4.5: Comfort Level Indicator
This image shows the comfort level indicator, represented by various facial expressions, which changes based on the indoor temperature and humidity to indicate whether the environment is comfortable, too dry, or too humid.
4.5 Lauko jutiklio išdėstymas
For accurate outdoor readings, place the wireless sensor in a sheltered location away from direct sunlight and precipitation. Ensure it is within the main unit's transmission range (typically up to 60 meters/200 feet in open air).

Figure 4.6: Optimal Outdoor Sensor Placement
This image illustrates the recommended placement of the main unit indoors and the wireless outdoor sensor in a sheltered outdoor location, ensuring optimal signal transmission and accurate readings.
5. Priežiūra
- Valymas: Nuvalykite pagrindinį įrenginį ir jutiklį minkšta,amp audinys. Nenaudokite abrazyvinių valiklių ar tirpiklių.
- Baterijos keitimas: Kai ekrane pasirodo išsikrovusių baterijų indikatorius, pakeiskite abiejų įrenginių baterijas. Visada keiskite visas baterijas vienu metu.
- Saugykla: Jei įrenginį ilgesnį laiką sandėliuosite, išimkite visas baterijas, kad išvengtumėte jų pratekėjimo.
- Aplinkos sąlygos: Avoid exposing the units to extreme temperatures, direct sunlight, or excessive moisture.
6. Problemų sprendimas
| Problema | Galima priežastis | Sprendimas |
|---|---|---|
| Nėra lauko temperatūros / drėgmės rodmenų. | Jutiklis už diapazono ribų, išsikrovusios jutiklio baterijos, trukdžiai. | Move sensor closer to main unit. Replace sensor batteries. Relocate units away from electronic devices. Press and hold "CHANNEL" button on main unit to re-pair. |
| Neteisingas laikas / data. | Time not set correctly, power interruption. | Manually set time and date (refer to Section 3.4). Ensure AC adapter is connected for continuous power. |
| Ekranas blankus arba tuščias. | Low main unit batteries, AC adapter not connected. | Replace main unit batteries. Connect AC adapter for continuous backlight. |
| Netiksli orų prognozė. | Weather forecast is a prediction, not always 100% accurate. | The forecast is based on barometric pressure trends and may not always match official forecasts. It provides a general indication. |
7. Specifikacijos
| Funkcija | Detalė |
|---|---|
| Modelio numeris | PT3374 (Part No: PPT-WS010) |
| Prekės svoris | 540 g |
| Pakuotės matmenys | 25 x 22.5 x 6 cm |
| Maitinimo tipas (pagrindinis įrenginys) | Battery (3 x AAA, not included), Power Cord (AC Adapter) |
| Maitinimo tipas (lauko jutiklis) | Baterija (2 x AA, nepridedama) |
| Maksimali temperatūros įvertinimas | 60°C |
| Prekės ženklas | Protmex |
8. Garantija ir palaikymas
Protmex products are designed for reliability and performance. For specific warranty details, please refer to the warranty card included with your product or visit the official Protmex website. If you encounter any issues or have questions regarding your PT3374 Weather Station, please contact Protmex customer support for assistance. Contact information can typically be found on the product packaging or the official brand websvetainę.
Norėdami gauti naujausią pagalbos informaciją ir DUK, apsilankykite: www.protmex.com (Pastaba: tai yra vietos rezervavimo ženklas URL nes produkto duomenyse nebuvo pateikta konkreti palaikymo nuoroda.)
Ask a question about this manual
Ask about setup, troubleshooting, compatibility, parts, safety, or missing instructions. Manuals+ will review the question and use this page’s manual context to help answer it.