
Andoer L4 PRO
Andoer L4 Pro Motorized Camera Slider User Manual
Model: L4 PRO
1. Įvadas
Ačiū, kad pirkoteasing the Andoer L4 Pro Motorized Camera Slider. This compact and versatile auto dolly is designed to provide smooth, stable, and dynamic video shots for various applications, including time-lapse, macro, and low-angle filming. Its wireless remote control and adjustable speed settings offer enhanced flexibility for creative videography. This manual provides detailed instructions for setup, operation, and maintenance to ensure optimal performance and longevity of your device.
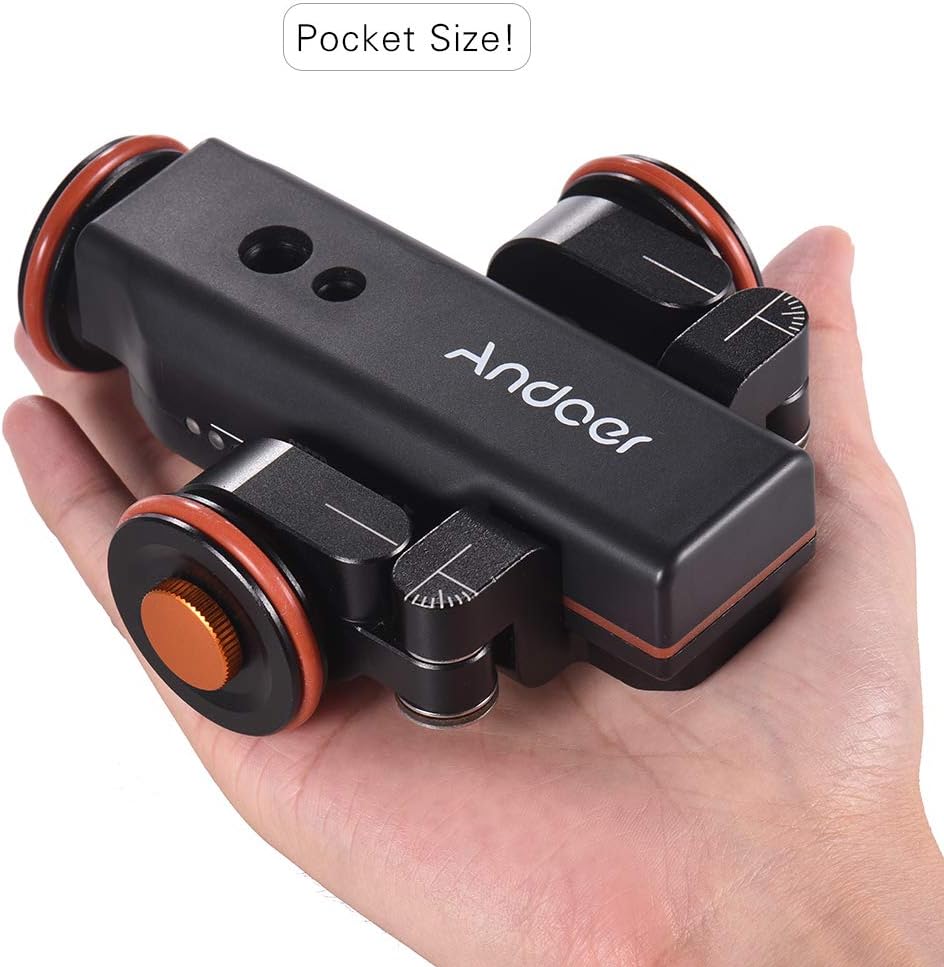
Figure 1.1: The Andoer L4 Pro Motorized Camera Slider, showcasing its compact and portable design, easily fitting into the palm of a hand.
2. Saugos informacija
Please read all safety instructions carefully before using the Andoer L4 Pro. Failure to follow these guidelines may result in damage to the product or personal injury.
- Saugokite prietaisą nuo vandens ar per didelės drėgmės.
- Stenkitės, kad prietaisas nenumestų ar nepatirtų stipraus smūgio.
- Nebandykite ardyti ar modifikuoti įrenginio. Remontą turėtų atlikti tik įgalioti specialistai.
- Naudokite tik nurodytą įkrovimo laidą ir maitinimo adapterį.
- Ensure the device is placed on a flat, stable surface during operation to prevent tipping and damage to attached equipment.
- Neviršykite maksimalios 5 kg (11 svarų) keliamosios galios.
- Laikyti vaikams nepasiekiamoje vietoje.
3. Pakuotės turinys
Patikrinkite, ar pakuotėje yra visi toliau išvardyti daiktai:
- Andoer L4 Pro Motorized Camera Slider (Auto Dolly)
- Belaidis nuotolinio valdymo pultas
- Mini Ball Head Adapter (with 1/4" and 3/8" screws)
- USB įkrovimo laidas
- Hex Key (for wheel adjustment)
- Atsarginis O žiedas
- Vartotojo vadovas

Figure 3.1: All components included in the Andoer L4 Pro package, laid out for inspection.
4. Produktas baigtasview
Familiarize yourself with the main components of the Andoer L4 Pro Motorized Camera Slider.

Figure 4.1: Main components of the Andoer L4 Pro system, showing the motorized dolly, wireless remote, and mini ball head adapter.

4.2 pav. Įvairūs views of the Andoer L4 Pro, highlighting its design and adjustable wheel angles for different movement paths.
4.1 Dolly Components
- Pagrindinis korpusas: Houses the motor, battery, and control electronics.
- Ratai: Three wheels, two of which are adjustable for curved paths.
- Tvirtinimo varžtai: 1/4" and 3/8" screw holes on top for attaching cameras, ball heads, or smartphone holders.
- USB prievadas: Skirta vidinei baterijai įkrauti.
- Maitinimo jungiklis: ON / OFF jungiklis.
- Greičio indikatorius: LED lights indicating the current speed setting.

4.3 pav. Išsamus view of the dolly's top mounting points (1/4" and 3/8") and side controls (USB port, ON/OFF switch).
4.2 Nuotolinio valdymo komponentai
- Paleidimo / pristabdymo mygtukas: Initiates or pauses movement.
- Greičio reguliavimo mygtukai (+/-): Increases or decreases the dolly's speed.
- Direction Change Button: Reverses the dolly's direction.
- Power/Remote Control Indicator Light: Shows remote status and power.

4.4 pav. Baigtaview of the wireless remote control and its functions, including the effective control distance of 6 meters (19.7 feet).
5. Sąranka
5.1 Charging the Dolly
Before first use, fully charge the dolly's internal battery.
- Locate the USB charging port on the side of the dolly.
- Connect the provided USB charging cable to the dolly and a standard USB power adapter (not included) or a computer USB port.
- The charging indicator light will illuminate during charging and turn off when fully charged. A full charge takes approximately 2-3 hours and provides up to 6 hours of operation.

Figure 5.1: Information on the dolly's built-in 1800mAh rechargeable battery, indicating up to 6 hours of battery life and USB charging capability.
5.2 Fotoaparato arba išmaniojo telefono prijungimas
The dolly is compatible with various cameras, camcorders, and smartphones.
- Screw the mini ball head adapter onto the 1/4" or 3/8" mounting screw hole on top of the dolly. Ensure it is securely tightened.
- Attach your camera or smartphone holder (not included) to the ball head adapter.
- Adjust the angle of your camera/smartphone using the ball head. Ensure the setup is balanced and does not exceed the maximum load capacity of 5 kg (11 lbs).
5.3 Adjusting Wheel Angles for Movement Paths
The front two wheels can be adjusted to create straight or curved paths.
- For Straight Line Movement: Ensure all three wheels are aligned straight. Use the hex key to loosen the wheel locking screws, adjust the wheels to be parallel with the main body, and then tighten the screws.
- For Circular Movement: Loosen the locking screws on the front two wheels. Angle them inwards or outwards to achieve the desired curve radius. Ensure both front wheels are set to the same angle for a smooth circle. Tighten the screws firmly.
6. Naudojimo instrukcijos
6.1 Įjungimas / išjungimas
- To power on the dolly, slide the ON/OFF switch to the "ON" position.
- Norėdami išjungti, perjunkite jungiklį į padėtį „IŠJUNGTA“.
6.2 Belaidžio nuotolinio valdymo pulto naudojimas
Nuotolinio valdymo pultas leidžia patogiai valdyti įrenginį iki 6 metrų (19.7 pėdų) atstumu.
- Paleisti / pristabdyti: Paspauskite Leisti / pristabdyti button (▶‖) to start or pause the dolly's movement.
- Greičio reguliavimas: Paspauskite +/- buttons to cycle through the three available speeds: 2.4 cm/s, 2.6 cm/s, and 2.8 cm/s. The LED indicators on the dolly will show the current speed.
- Krypties keitimas: Paspauskite Kryptis button (curved arrow) to reverse the dolly's direction of travel.
6.3 Movement Modes
- Tiesiosios linijos judėjimas: With wheels adjusted for straight travel, the dolly will move in a linear path. This is ideal for tracking shots.
- Apvalus judėjimas: By angling the front wheels, the dolly can perform smooth circular or arc movements. This is useful for orbiting subjects or creating dynamic panoramic shots.

Figure 6.1: Illustration of the dolly's capabilities for both circular and straight-line movements, achieved by adjusting the wheel angles.

Figure 6.2: The Andoer L4 Pro in action, demonstrating its use with both a camera and a smartphone for dynamic video capture.
7. Priežiūra
Proper maintenance ensures the longevity and optimal performance of your Andoer L4 Pro.
- Valymas: Prietaisą valykite minkštu, sausu skudurėliu. Nenaudokite abrazyvinių valiklių ar tirpiklių.
- Saugykla: Store the dolly in a cool, dry place away from direct sunlight and extreme temperatures.
- Akumuliatoriaus priežiūra: If storing for extended periods, charge the battery to approximately 50% every three months to preserve battery health.
- Ratų apžiūra: Periodically check the wheels for debris or wear. Clean them as needed to ensure smooth operation.
8. Problemų sprendimas
If you encounter issues with your Andoer L4 Pro, refer to the following common problems and solutions:
| Problema | Galima priežastis | Sprendimas |
|---|---|---|
| Dolly does not move. |
|
|
| Movement is not smooth or stops intermittently. |
|
|
| Dolly does not follow a straight or perfect circular path. |
|
|
| Nuotolinio valdymo pultas nereaguoja. |
|
|
9. Specifikacijos
| Prekės ženklas | Andoer |
| Modelis | L4 PRO |
| Suderinami įrenginiai | Camera, Mobile Phone |
| Gaminio matmenys (I x P x A) | 12.2 x 10.6 x 3.8 cm (4.8 x 4.2 x 1.5 colio) |
| Prekės svoris | 495 gramų (1.09 svaro) |
| Maks. Keliamoji galia | 5 kg (11 svaro) |
| Baterijos tipas | Įmontuota 1800 mAh įkraunama baterija |
| Maks. Baterijos veikimo laikas | Iki 6 valandų |
| Įkrovimo būdas | Įkraunamas USB |
| Belaidžio valdymo atstumas | Iki 6 metrų (19.7 pėdų) |
| Reguliuojami greičiai | 3 speeds (2.4 cm/s, 2.6 cm/s, 2.8 cm/s) |
| Medžiaga | Aliuminio lydinys |
| UPC | 799410730064 |
10. Garantija ir palaikymas
Andoer products are designed and manufactured to the highest quality standards. For warranty information and technical support, please refer to the warranty card included in your package or visit the official Andoer websvetainėje. Prašome išsaugoti pirkimo įrodymą, jei prireiktų pateikti pretenziją dėl garantijos.
For further assistance, please contact Andoer customer support through their official channels.
Ask a question about this manual
Ask about setup, troubleshooting, compatibility, parts, safety, or missing instructions. Manuals+ will review the question and use this page’s manual context to help answer it.