
KeeYees ESP8266 ESP-12E
KeeYees ESP8266 ESP-12E Development Board User Manual
Model: ESP8266 ESP-12E
Įvadas
The KeeYees ESP8266 ESP-12E Development Board is a versatile WiFi WLAN wireless module designed for Internet of Things (IoT) projects. It integrates GPIO, PWM, IIC, 1-Wire, and ADC capabilities, making it suitable for a wide range of applications. This board is compatible with NodeMCU firmware and Arduino IDE, offering a flexible platform for rapid prototyping and development.
The integrated CP2102-USB interface simplifies programming, eliminating the need to manually press flash and reset buttons for each upload. This manual provides essential information for setting up, operating, and maintaining your development board.
Produkto savybės
- Lengvas programavimas: Features a CP2102-USB interface for straightforward programming without manual button presses.
- Integruotas funkcionalumas: Combines GPIO, PWM, IIC, 1-Wire, and ADC on a single board.
- Smart Networking Support: Supports smart link smart networking for seamless integration.
- WiFi ryšys: Provides fast and affordable WiFi technology for IoT development.
- Lua Technology: Utilizes modern Lua technology, offering an integrated unit with all necessary resources for Arduino and other I/O pin-based projects.
- Rapid Development: Enables quick prototyping and development of IoT applications using its built-in API.

Image: Three KeeYees ESP8266 ESP-12E Development Boards, showcasing their compact design and pin headers.
Sąrankos vadovas
1. Driver Installation (CP2102)
Before connecting your ESP8266 ESP-12E Development Board to your computer, you may need to install the CP2102 USB to UART Bridge VCP Drivers. These drivers enable your computer to recognize the board as a serial port.
- Download the appropriate CP2102 driver for your operating system (Windows, macOS, Linux) from the official Silicon Labs websvetainę.
- Follow the installation instructions provided with the driver package.
- After installation, connect the board to your computer using a Micro USB cable. Verify that a new COM port appears in your device manager (Windows) or system information (macOS/Linux).
2. Arduino IDE sąranka
The ESP8266 ESP-12E can be programmed using the Arduino IDE. Follow these steps to prepare your IDE:
- Download and install the latest version of the Arduino IDE.
- Open the Arduino IDE and go to File > Nuostatos.
- „Papildomų lentų tvarkytuvėje“ URLs' field, add the following URL:
http://arduino.esp8266.com/stable/package_esp8266com_index.json - Eikite į Įrankiai > Lenta > Lentų tvarkyklė.... Ieškokite 'ESP8266' and install the 'esp8266 by ESP8266 Community' package.
- Once installed, go to Įrankiai > Lenta and select 'NodeMCU 1.0 (ESP-12E Module)'.
- Select the correct COM port for your board under Įrankiai > Prievadas.
3. Pinout diagrama
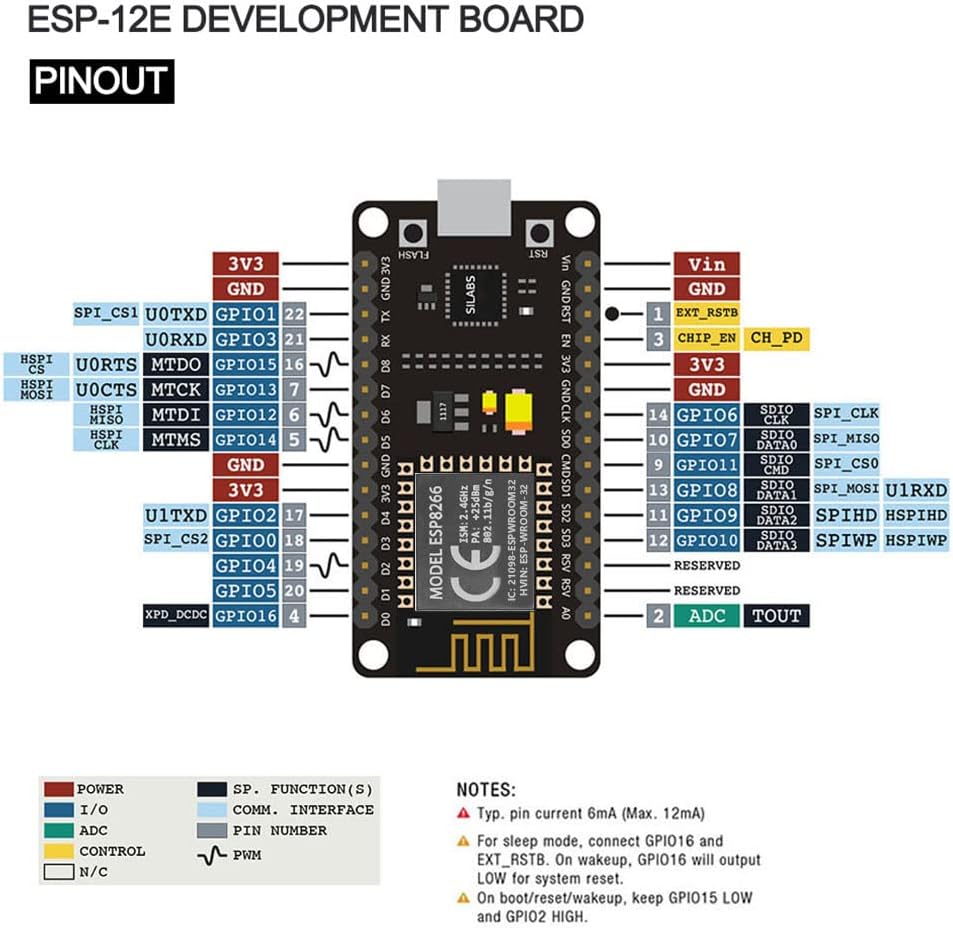
Understanding the pinout is crucial for connecting external components and programming. Refer to the diagram below for the pin assignments of the ESP8266 ESP-12E Development Board.

Image: Detailed pinout diagram for the ESP-12E Development Board, showing GPIO, power, and communication pins.
Note on Digital Pins: The labels D0-D8 on the board correspond to specific GPIO numbers. Always refer to the official NodeMCU ESP-12E pinout documentation for accurate GPIO mapping to avoid confusion, as the silkscreen labels may not directly reflect the underlying GPIO numbers in some programming environments.
Vaizdas: Stambus planas view of the ESP8266 ESP-12E Development Board, highlighting the Micro USB port for power and data, and the ESP8266MOD WiFi module.
Naudojimo instrukcijos
1. Basic Programming
Once the Arduino IDE is set up, you can write and upload your code. The board functions similarly to other Arduino-compatible boards:
- Code placed in the
setup()function runs once at startup. - Code in the
loop()function executes repeatedly aftersetup()užbaigia. - To upload code, click the 'Upload' button in the Arduino IDE. The CP2102 interface will handle the flashing process automatically.
2. WiFi ryšys
The ESP8266 is designed for WiFi applications. You can connect it to your local network and use it to send or receive data, host web servers, or interact with cloud services. Libraries like the ESP8266WiFi library in Arduino IDE simplify network operations.

Image: Conceptual diagram illustrating the ESP8266 ESP-12E acting as a server, connecting to the internet through an access point, and facilitating communication with client devices such as a PC and a mobile phone.
3. GPIO and Peripheral Usage
The board provides various General Purpose Input/Output (GPIO) pins, along with support for Pulse Width Modulation (PWM), Inter-Integrated Circuit (IIC), 1-Wire, and Analog-to-Digital Converter (ADC). These can be used to interface with sensors, actuators, and other electronic components.
Išsamiau pvzamples and code snippets, refer to the NodeMCU documentation and the extensive community resources available online for ESP8266 development.
Video: A brief demonstration of the ESP8266 ESP-12E Development Board connected to a breadboard with multiple LEDs, showcasing its basic functionality and ease of use in a simple circuit.
Video: A rotating view of the ESP8266 Development Board, highlighting its compact size and various components from different angles.
Video: A close-up, rotating view of the ESP8266 ESP-12F NodeMCU Mini D1 Module, demonstrating its physical characteristics and small form factor.
Video: A demonstration of the ESP8266-12F board connected to an LCD screen, displaying data, illustrating its capability to interface with display modules for various projects.
Priežiūra
To ensure the longevity and optimal performance of your KeeYees ESP8266 ESP-12E Development Board, follow these maintenance guidelines:
- Elkitės atsargiai: Venkite lentos numetimo ir per didelio fizinio krūvio.
- Statinė iškrova: Always handle the board in an anti-static environment or take precautions to prevent electrostatic discharge, which can damage electronic components.
- Švara: Keep the board free from dust, dirt, and moisture. Use a soft, dry brush or compressed air for cleaning. Avoid using liquids or harsh chemicals.
- Saugykla: Plokštę laikykite sausoje, vėsioje vietoje, toliau nuo tiesioginių saulės spindulių ir ekstremalių temperatūrų. Jei laikote ilgesnį laiką, naudokite antistatinius maišelius.
- Maitinimas: Ensure you use a stable 5V power supply. Incorrect voltaggali pažeisti plokštę.
Trikčių šalinimas
1. Board Not Recognized / No COM Port
If your computer does not detect the board or a COM port is not available in the Arduino IDE:
- Check CP2102 Driver: Ensure the CP2102 driver is correctly installed. Reinstall it if necessary.
- USB kabelis: Try a different Micro USB cable. Some cables are for charging only and do not support data transfer.
- USB prievadas: Connect the board to a different USB port on your computer.
- Restart IDE/Computer: Close and reopen the Arduino IDE, or restart your computer.
2. Incorrect Digital Pin Behavior
If digital pins are not behaving as expected (e.g., D0-D8 labels not matching GPIO in code):
- Consult Pinout: Always refer to the detailed pinout diagram (provided in the Setup Guide) and official NodeMCU ESP-12E documentation to confirm the actual GPIO numbers corresponding to the D-labels.
- Bandymo kaiščiai: Use simple blink sketches to test individual pins and verify their functionality.
3. Board Stuck in Boot Loop / Upload Errors
If the board continuously reboots or you encounter errors during code upload:
- Correct Board Selection: Ensure 'NodeMCU 1.0 (ESP-12E Module)' is selected under Įrankiai > Lenta Arduino IDE aplinkoje.
- Erase Flash: Sometimes, corrupted firmware can cause issues. Use the 'ESP8266 Sketch Data Upload' tool or a dedicated flash tool to erase the board's flash memory before uploading new code.
- Add Delay: When developing, consider adding a short delay (e.g.,
delay(1000);) at the beginning of yoursetup()function. This can provide a window to upload new code if the board enters a rapid boot loop. - Maitinimas: Ensure your power supply is stable and provides sufficient current, especially when connecting multiple peripherals.
Specifikacijos
| Funkcija | Specifikacija |
|---|---|
| Prekės ženklas | KeeYees |
| Modelio pavadinimas | ESP8266 ESP-12E |
| Prekės modelio numeris | 8541549622 |
| Ryšio technologija | Wi-Fi 802.11b/g/n, UART/GPIO |
| Belaidis tipas | 802.11b |
| Operacinė sistema | Lua |
| Procesoriaus prekės ženklas | Espressif |
| Procesorių skaičius | 1 |
| ttage | 5 voltų |
| RAM | LPDDR3 |
| Prekės svoris | 1.06 uncijos |
| Gaminio matmenys | 1.89 x 1.01 x 0.51 colio |
| Įtraukti komponentai | 3 x Development Board |

Image: Technical drawing illustrating the dimensions of the ESP8266 ESP-12E Development Board in millimeters.
Informacija apie garantiją
For detailed warranty information regarding your KeeYees ESP8266 ESP-12E Development Board, please refer to the manufacturer's official websvetainėje arba produkto pakuotėje. Garantijos sąlygos gali skirtis.
Palaikymas
Should you require further assistance, technical support, or have questions about your KeeYees ESP8266 ESP-12E Development Board, please utilize the following resources:
- KeeYees Official Websvetainė: Visit the official KeeYees website for product documentation, FAQs, and community forums.
- Klientų aptarnavimas: Contact KeeYees customer support directly through their websvetainė, teikianti asmeninę pagalbą.
- Internetinės bendruomenės: Engage with the broader ESP8266 and NodeMCU developer communities for shared knowledge and project ideas.
Ask a question about this manual
Ask about setup, troubleshooting, compatibility, parts, safety, or missing instructions. Manuals+ will review the question and use this page’s manual context to help answer it.