1. Įvadas
Thank you for choosing the Walfront LCD Digital Programmable Weekly Timer Switch. This device is designed for automatic control of various electrical appliances based on user-defined schedules. Please read this manual carefully before installation and operation to ensure proper use and to prevent damage.
2. Saugos informacija
Įspėjimas: Electrical installation should only be performed by qualified personnel. Disconnect power before installation or maintenance to prevent electric shock.
- Įsitikinkite, kad įvesties ttage matches the timer's specifications (24V for this model).
- Do not exceed the maximum load capacity of 16A 250VAC (resistive load).
- Laikykite prietaisą atokiau nuo vandens ir per didelės drėgmės.
- Do not attempt to disassemble or repair the unit yourself. Contact support if issues arise.
3. Produktas baigtasview
The Walfront LCD Digital Programmable Weekly Timer Switch is a high-precision device built with durable, moisture-resistant, and corrosion-protected materials. It features a clear LCD display and supports up to 16 ON/OFF programs daily and weekly.
3.1 Pagrindinės savybės
- High-quality construction for long lifespan.
- Automatic ON/OFF control for various electrical devices.
- Built-in 1.2V/40mA rechargeable battery for memory retention.
- Industrial-grade chip for high precision and strong anti-interference.
- Up to 16 ON and 16 OFF programming settings per day/week.
- LCD display showing real-time, hour, minute, and ON/AUTO/OFF status.
- DIN rail mounting design.
3.2 Komponentai

1 vaizdas: Priekyje view of the Walfront LCD Digital Programmable Weekly Timer Switch. Shows the LCD display and control buttons.

2 vaizdas: Atgal view of the timer switch, illustrating the wiring terminals and basic electrical specifications printed on the unit.
4. Sąranka ir diegimas
This timer is designed for DIN rail mounting. Ensure the DIN rail is securely installed before attaching the timer.
4.1 Sujungimo schema

3 vaizdas: Wiring diagrams showing direct connection (left) and connection with an AC contactor (right). The direct connection illustrates neutral and live wire inputs and load output. The AC contactor diagram shows 220V power input and output to the load device.
Direct Wiring: Connect the neutral and live wires to the designated input terminals (L and N). Connect the load to the output terminals (typically 3 and 4 for normally open, or 3 and 5 for normally closed, as indicated on the device). Refer to the diagram on the device for exact terminal numbering.
Wiring with AC Contactor: For higher loads, connect the timer to control an AC contactor. The timer's output will switch the coil of the contactor, which in turn controls the main power to the load. This setup is shown on the right side of Image 3.
4.2 Pradinis įjungimas ir akumuliatoriaus įkrovimas
Upon first use, connect the timer to power. The internal 1.2V/40mA rechargeable battery will begin charging. If the display is blank or shows incorrect time, allow it to charge for a few minutes. Press the "Reset" button (often labeled with a small 'R' or 'C' and requires a pointed object) to clear all settings and start fresh.
5. Naudojimo instrukcijos
5.1 Dabartinio laiko nustatymas
- Paspauskite "LAIKRODIS" button (often labeled with a clock icon) and hold it.
- Laikant "LAIKRODIS", paspauskite "D+" mygtuką, norėdami nustatyti dabartinę savaitės dieną.
- Laikant "LAIKRODIS", paspauskite "H+" mygtuką, norėdami nustatyti esamą valandą.
- Laikant "LAIKRODIS", paspauskite "M+" mygtuką, norėdami nustatyti dabartinę minutę.
- Atleiskite "LAIKRODIS" mygtuką. Laikas dabar nustatytas.
5.2 Setting 12/24 Hour Mode
By default, the timer operates in 24-hour mode. To switch between 12-hour (AM/PM) and 24-hour modes, press and hold the "LAIKRODIS" button for approximately 5 seconds. The display will show "AM" for 12-hour mode or switch back to 24-hour format.
5.3 Įjungimo/išjungimo tvarkaraščių programavimas
The timer supports up to 16 ON and 16 OFF programs. Each program consists of an ON time and an OFF time.
- Paspauskite „PROGRAM“ mygtuką vieną kartą. Ekrane bus rodoma „1 ON“.
- Paspauskite "D+" to select the day(s) for this ON program (e.g., Mon-Fri, Sat-Sun, or specific days).
- Paspauskite "H+" , kad nustatytumėte norimą ĮJUNGIMO valandą.
- Paspauskite "M+" , kad nustatytumėte norimą įjungimo minutę.
- Paspauskite „PROGRAM“ dar kartą. Ekrane bus rodoma „1 OFF“.
- Repeat steps 2-4 to set the OFF time for the first program.
- Spauskite toliau „PROGRAM“ to cycle through "2 ON", "2 OFF", up to "16 ON", "16 OFF", setting each as needed.
- Nustatę visas norimas programas, paspauskite "LAIKRODIS" button to exit programming mode and return to real-time display.
Pastaba: If you need to cancel a program, press the „PROGRAM“ button to select the program, then press the „MANUAL“ button until "----" appears on the display for that program's time slot.
5.4 Rankinis valdymas (ĮJUNGTA / AUTOMATINIS / IŠJUNGTA)
Paspauskite „MANUAL“ mygtuką, kad perjungtumėte darbo režimus:
- ĮJUNGTA: The output is continuously ON, ignoring all programs.
- AUTOMATINIS: The timer operates according to the programmed ON/OFF schedules.
- IŠJUNGTA: The output is continuously OFF, ignoring all programs.
Įsitikinkite, kad laikmatis įjungtas "AUTO" mode for programmed operation.
5.5 Klavišų užrakto funkcija
To prevent accidental changes to settings, the timer features a key lock function.

4 vaizdas: The timer display showing the key lock symbol, indicating that the buttons are locked.
- To lock the keys: Press and hold the "C/R" (Cancel/Reset) button for approximately 4 seconds until a lock symbol appears on the LCD.
- To unlock the keys: Press and hold the "C/R" button again for approximately 4 seconds until the lock symbol disappears.
6. Specifikacijos
| Parametras | Vertė |
|---|---|
| Įvesties tomastage | AC/DC 24V (This model) |
| Contact Rated Voltage | AC 180V~264V (50/60Hz) |
| Apkrova | 16A 250VAC (Resistive Load) |
| ĮJUNGIMO/IŠJUNGIMO operacijos | 16 ON / 16 OFF (Manual/Auto) |
| Ekranas | LCD |
| Energijos suvartojimas | 4.5VA (Max) |
| Klaida | ≤2 seconds/day (at 25℃) |
| Montavimo būdas | DIN Rail (sold separately) |
| Laiko diapazonas | nuo 1 minutės iki 168 valandų |
| Minimalus intervalas | 1 minutę |
| Darbinė temperatūra | -10 ℃ iki 55 ℃ |
| Darbinė drėgmė | 35-85 % santykinis drėgnis |
| Matmenys (I x P x A) | 86 x 36 x 65 mm |
| Vidinė baterija | 1.2V/40mA rechargeable, >15 days backup |
| Grandinių skaičius | Changeover switch (SPDT) |
| Tarnavimo laikas | Mechanical: 107, Electrical: 105 |
| Svoris | 125g |
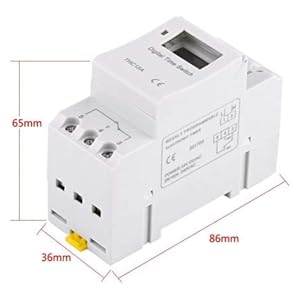
5 vaizdas: Diagram illustrating the dimensions of the timer switch: 86mm length, 36mm width, and 65mm height.
7. Priežiūra
- Keep the timer clean and free from dust. Use a dry, soft cloth for cleaning.
- Nenaudokite abrazyvinių valiklių ar tirpiklių.
- Periodiškai patikrinkite laidų jungtis, kad įsitikintumėte, jog jos yra tvirtos.
- The internal battery is designed for long life and typically does not require replacement. If the timer loses settings frequently after power outages, the battery may need servicing by a qualified technician.
8. Problemų sprendimas
| Problema | Galima priežastis | Sprendimas |
|---|---|---|
| Ekranas tuščias. | No power supply or internal battery discharged. | Check power connections. Allow the timer to charge for a few minutes after connecting to power. |
| Timer does not switch ON/OFF as programmed. | Timer is not in "AUTO" mode, programs are incorrect, or key lock is active. | Press "MANUAL" until "AUTO" is displayed. Review and correct programs. Unlock keys if necessary. |
| Mygtukai nereaguoja. | Klavišų užrakto funkcija aktyvi. | Press and hold "C/R" for 4 seconds to unlock the keys. |
| Laikas netikslus. | Minor drift (within specifications) or internal battery issue. | Reset and re-set the time. If inaccuracy persists or settings are lost frequently, contact support. |
9. Garantija ir palaikymas
Walfront strives to provide high-quality products. If you encounter any issues with your product, please contact us for prompt assistance. We offer return and refund services for product defects.
For support, please refer to the contact information provided with your purchase or visit the Walfront store on Amazon: Walfront Amazon Store.