
Įvadas
This manual provides comprehensive instructions for the installation, operation, and maintenance of your A. O. Smith AO-US-200 2-Stage Under Sink Water Filter System. Please read all instructions carefully before beginning installation or use to ensure proper function and safety. This system is designed to provide clean, filtered drinking water directly from a dedicated faucet.
Svarbi saugos informacija
Always follow basic safety precautions when installing or maintaining this product to reduce the risk of fire, electric shock, or injury to persons. Keep this manual for future reference.
- Prieš montuodami išjunkite pagrindinį vandens tiekimą.
- Do not install the system where it will be exposed to freezing temperatures.
- Įsitikinkite, kad visos jungtys yra tvirtos, kad išvengtumėte nuotėkio.
- Use only genuine A. O. Smith replacement filters.
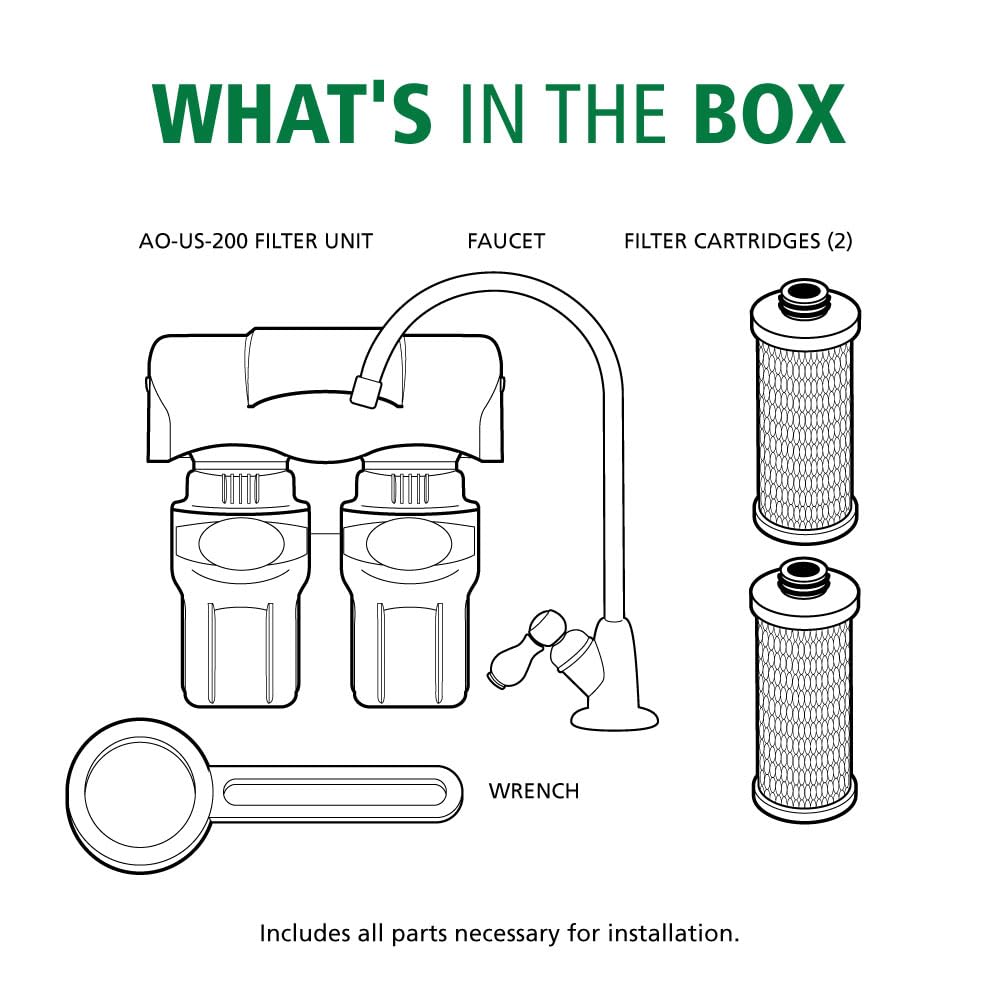
Kas yra dėžutėje
Prieš pradėdami diegti, patikrinkite, ar yra visi komponentai:
- AO-US-200 Filter Unit
- Maišytuvas
- Filter Cartridge Set (2 cartridges)
- Veržliaraktis
- Vamzdis
- 1/4" Brass Tee
- Mounting Screws with Anchors
- Faucet Installation Hardware (spacers, nuts, washers)
Specifikacijos
| Funkcija | Detalė |
|---|---|
| Modelio numeris | AO-US-200 |
| Filtravimas Stages | 2-Stage Claryum Filtration |
| Filtruoti gyvenimą | 6 months / 500 Gallons |
| Teršalų mažinimas | Reduces up to 99% of 78 contaminants including Lead, PFAS, Chlorine, Mercury, Asbestos, Pharmaceuticals, Chloramine |
| Sertifikatai | NSF/ANSI Standards 42, 53, and 401 (WQA Tested & Certified) |
| Srauto greitis | 0.5 galonų per minutę |
| Medžiaga | Anglies blokas |
| Matmenys (apytiksliai) | Aukštis: 9 coliai (22.9 cm), plotis: 8.25 coliai (21 cm), gylis: 4.25 coliai (10.2 cm) |

Sąranka ir diegimas
1. Kontrolinis sąrašas prieš montavimą
- Reikalingi įrankiai: Adjustable wrench, measuring tape, pencil, Phillips head screwdriver, hammer, variable speed drill with 7/32" bit, level.
- Vieta: Select a space under your sink that is at least 12 inches from the bottom of your cabinet and allows for easy access to a cold water supply line.
- Faucet Placement: The dedicated faucet may be mounted on the sink using an existing hole (e.g., for a sprayer nozzle or soap dispenser) or by drilling a new hole no more than 1/2 inch in diameter. Ensure the faucet's spout extends slightly past the edge of the sink. Pastaba: jei reikia gręžti, rekomenduojame kreiptis į patvirtintą arba sertifikuotą specialistą.
2. Connecting to Cold Water Supply
- Išjunkite šalto vandens tiekimą į kriauklę.
- Disconnect the cold water supply line from the shut-off valve.
- Attach the threaded end of the 1/4" brass tee to the cold water shut-off valve.
- Connect the cold water supply line to the top of the brass tee.
- Tighten all connections using an adjustable wrench.
3. Maišytuvo montavimas
- Insert the faucet stem through the chosen hole in your sink.
- From underneath the sink, slide the faucet rubber washer, faucet washer, and faucet spacer onto the faucet stem.
- Secure the faucet with the faucet nut, tightening it with a wrench to ensure it is secure to the sink.
4. Mounting the Filter Unit
- Temporarily position the filter unit under the sink in your chosen location.
- Pieštuku pažymėkite tvirtinimo angas.
- Drill pilot holes at the marked locations. If mounting into drywall, insert the provided drywall anchors.
- Mount the unit to the wall using the provided screws.


5. Vamzdžių sujungimas
- Connect one end of the provided tubing to the open port on the brass tee. Ensure the plastic tube insert and brass nut are correctly installed for a secure, leak-free connection.
- Insert the other end of this tubing completely into the 'IN' port of the filter unit.
- Connect another piece of tubing to the faucet stem. Ensure the chrome nut and plastic collar are correctly installed.
- Insert the other end of this tubing completely into the 'OUT' port of the filter unit.
6. Initial System Flush
- Lėtai įjunkite šalto vandens tiekimą.
- Open the dedicated filtered water faucet and allow water to run for 10 minutes to flush the system. This removes air and carbon fines.
- Patikrinkite visas jungtis, ar nėra nuotėkių. Jei reikia, priveržkite.
Video 1: Official A. O. Smith AO-US-200 Installation Guide. This video provides a visual walkthrough of the installation process for the 2-stage under sink water filter system.
Sistemos valdymas
Once installed and flushed, your A. O. Smith AO-US-200 system is ready for use. Simply open the dedicated filtered water faucet to dispense clean, filtered water. The system filters water at a rate of 0.5 gallons per minute, suitable for families of 1 to 4 people.
Priežiūra: filtro keitimas
For optimal performance, replace your filter cartridges every 6 months or after 500 gallons of use, whichever comes first. The system is designed for easy, tool-free filter replacement.
Filtravimo technologija


Filtro keitimo žingsniai
- Išjunkite šalto vandens tiekimą į sistemą.
- Open the filtered water faucet to relieve pressure and drain any remaining water.
- Twist the old filter cartridges counter-clockwise to remove them from the unit housing.
- Discard the old filters.
- Insert new filter cartridges into the unit housing, aligning the connection points.
- Push the new filters up and twist clockwise until they are securely locked into place.
- Lėtai įjunkite šalto vandens tiekimą.
- Open the filtered water faucet and allow water to run for 10 minutes to flush the new filters.
- Patikrinkite, ar nėra nuotėkių.

Trikčių šalinimas
| Problema | Galima priežastis | Sprendimas |
|---|---|---|
| Nuotėkiai jungtyse | Loose fittings, missing O-rings, improper tubing insertion. | Ensure all nuts are tightened, check for properly seated O-rings, re-insert tubing fully into quick-connect fittings. Using plumber's tape on threaded connections can help. |
| Mažas vandens srautas iš maišytuvo | Clogged filters, kinked tubing, low incoming water pressure. | Replace filters if they are past their service life. Check tubing for kinks. Verify adequate household water pressure. |
| Nemalonus skonis / kvapas | Filters are exhausted, initial carbon fines not fully flushed. | Replace filters. Flush the system for an extended period (e.g., 15-20 minutes) after filter replacement. |
| Filter change indicator not working | Reikia pakeisti bateriją. | Replace the battery in the filter unit's indicator. |
Informacija apie garantiją
A. O. Smith provides a limited warranty for this product. Please refer to the warranty card included with your purchase or visit the official A. O. Smith webIšsamias sąlygas ir nuostatas rasite svetainėje. Išsaugokite pirkimo įrodymą garantiniams reikalavimams.
Pagalba klientams
If you have any questions, require assistance with installation, or need to order replacement parts, please contact A. O. Smith Customer Support:
- Websvetainė: www.aosmith.com
- Telefonas: Refer to your product packaging or the A. O. Smith websvetainė, kurioje rasite naujausius kontaktinius numerius.


