
1. Įvadas
This manual provides detailed instructions for the installation, operation, and maintenance of your ASRock B365 PRO4 ATX Motherboard. Please read this manual thoroughly before proceeding with installation to ensure correct setup and to prevent damage to the components.
The ASRock B365 PRO4 motherboard supports 9th and 8th Generation Intel Core Processors, offering a robust platform for personal computing. It features a Digi Power Design with an 8 Power Phase Design, ensuring stable power delivery to the CPU.
2. Saugos informacija
- Prieš montuodami arba išimdami bet kokius komponentus, visada atjunkite maitinimo šaltinį.
- Dėvėkite antistatinį riešo dirželį, kad išvengtumėte elektrostatinės iškrovos (ESD) žalos jautriems komponentams.
- Pagrindinę plokštę imkite už kraštų, kad neliestumėte jautrių komponentų.
- Užtikrinkite tinkamą ventiliaciją kompiuterio korpuse, kad jis neperkaistų.
- Saugokite pagrindinę plokštę nuo drėgmės ir ekstremalių temperatūrų.
3. Sąranka ir diegimas
3.1 Pakuotės turinys
Patikrinkite, ar pakuotėje yra visi reikalingi daiktai:
- ASRock B365 PRO4 Motherboard
- Greito montavimo vadovas
- Palaikymo CD
- I / O skydas
- 2 x SATA duomenų kabeliai
- 3 x varžtai M.2 lizdams
- 1 x M.2 lizdo atrama

Image: ASRock B365 PRO4 Motherboard and its included accessories, including the quick installation guide, support CD, I/O shield, SATA cables, and M.2 screws/standoff.
3.2 Pagrindinės plokštės išdėstymas
Susipažinkite su pagrindiniais pagrindinės plokštės komponentais ir jungtimis.

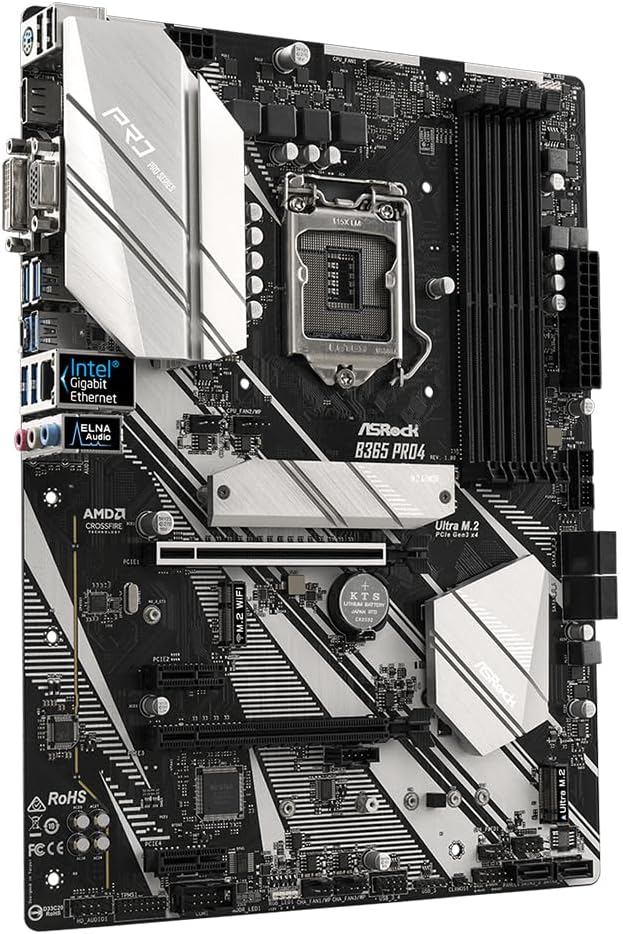
Vaizdas: Iš viršaus į apačią view of the ASRock B365 PRO4 Motherboard, highlighting the CPU socket, RAM slots, PCIe slots, and M.2 slots.

Vaizdas: kampuotas view of the ASRock B365 PRO4 Motherboard, showing the heatsinks and various connectors.
3.3 CPU diegimas (LGA1151)
- Atidarykite procesoriaus lizdo svirtį ir pakelkite apkrovos plokštę.
- Atsargiai sulygiuokite procesorių su lizdu, užtikrindami, kad auksinis trikampis ant procesoriaus sutaptų su trikampiu ant lizdo.
- Švelniai įdėkite procesorių į lizdą, jo nespausdami jėgos.
- Uždarykite krovinio plokštę ir pritvirtinkite ją svirtimi.
3.4 Atminties (RAM) diegimas
The motherboard features 4 DDR4 DIMM slots, supporting dual-channel memory up to 64GB.
- Atidarykite spaustukus abiejuose DIMM lizdo galuose.
- Suderinkite RAM modulio įpjovą su DIMM lizdo rakteliu.
- Insert the RAM module firmly until the clips snap into place.
3.5 Saugojimo įrenginio įrengimas
The motherboard supports 6 SATA3 ports and 2 Ultra M.2 ports.
- SATA diskai: Connect SATA data cables to the SATA ports on the motherboard and to your storage devices (HDDs/SSDs). Connect power cables from your power supply to the devices.
- M.2 SSD diskai: Locate the M.2 slots. Insert the M.2 SSD into the slot at an angle, then gently push it down and secure it with the provided screw and standoff.
3.6 Išplėtimo plokštės (PCIe) diegimas
The motherboard has 2 PCI-Express 3.0 x16 slots and 2 PCI-Express 3.0 x1 slots.
- Select an appropriate PCIe slot for your expansion card (e.g., graphics card).
- Remove the corresponding metal bracket from your PC case.
- Align the card with the slot and press firmly until it is seated correctly.
- Pritvirtinkite kortelę prie kompiuterio korpuso varžtu.
3.7 Connecting Peripherals to the I/O Panel
Galiniame įvesties / išvesties skydelyje yra įvairūs prievadai išoriniams įrenginiams prijungti.
Vaizdas: Stambus planas view of the ASRock B365 PRO4 Motherboard's rear I/O panel, showing ports for PS/2, USB 2.0, USB 3.1 Gen 1, VGA, DVI-D, HDMI, LAN, and audio jacks.
- USB prievadai: Connect USB devices (keyboard, mouse, external drives) to the available USB 2.0 (5 ports) and USB 3.1 Gen 1 (8 ports, including 1 Type-C rear) ports.
- Vaizdo išėjimai: Connect your monitor to the VGA, DVI-D, or HDMI port.
- LAN prievadas: Prijunkite Ethernet kabelį, kad galėtumėte pasiekti tinklą.
- Garso lizdai: Connect speakers, headphones, or microphones to the audio jacks.
- PS/2 prievadas: Connect a PS/2 keyboard or mouse.
4. Naudojimo instrukcijos
4.1 Pirmasis paleidimas ir BIOS sąranka
- After assembling all components, connect the power supply and monitor.
- Įjunkite sistemą. Paspauskite Del or F2 paleidimo metu, kad patektumėte į BIOS / UEFI sąrankos programą.
- Configure boot order, system time, and other necessary settings. Save changes and exit.
- Install your operating system from a bootable USB drive or optical media.
4.2 Tvarkyklės diegimas
After installing the operating system, install the necessary drivers from the provided Support CD or download the latest versions from the ASRock websvetainė. Pagrindiniai veiksniai:
- Lustų rinkinio tvarkyklės
- Garso tvarkyklės (Realtek ALC892)
- LAN Drivers (Intel I219V Gigabit Ethernet)
- Grafikos tvarkyklės (integruotai grafikai arba atskirai GPU)
5. Priežiūra
- Dulkių šalinimas: Regularly clean dust from the motherboard and case fans using compressed air. Ensure the system is powered off and unplugged before cleaning.
- BIOS atnaujinimai: Patikrinkite ASRock website periodically for BIOS updates. Updates can improve system stability and compatibility. Follow the instructions carefully when updating the BIOS.
- Kabelių valdymas: Įsitikinkite, kad laidai yra tvarkingai išdėstyti, kad pagerėtų oro srautas ir būtų išvengta trukdžių.
6. Problemų sprendimas
- Nėra galios:
- Check all power connections, including the 24-pin ATX and 8-pin 12V CPU power connectors.
- Įsitikinkite, kad maitinimo jungiklis yra ĮJUNGTOJE padėtyje.
- Nėra ekrano:
- Verify that the monitor is connected to the correct video output (either integrated graphics or discrete GPU).
- Iš naujo įstatykite grafikos plokštę ir RAM modulius.
- Sistemos nestabilumas / gedimai:
- Patikrinkite, ar RAM moduliai tinkamai įstatyti.
- Ensure CPU cooler is properly installed and making good contact.
- Atnaujinkite tvarkykles ir BIOS į naujausias versijas.
- M.2 SSD neaptiktas:
- Ensure the M.2 SSD is correctly seated and secured.
- Check BIOS settings to ensure M.2 slots are enabled and configured correctly (SATA vs. PCIe mode).
7. Specifikacijos
| Funkcija | Detalė |
|---|---|
| CPU lizdas | LGA 1151 |
| Suderinami procesoriai | 9th/8th Generation Intel Core Processors (up to 95W) |
| Lustų rinkinys | Intel B365 |
| Atmintis | 4 x DDR4 DIMM slots, Dual Channel, Non-ECC, Buffered, Max 64GB (2666/2400/2133 MHz) |
| Išplėtimo lizdai | 2 x PCIe 3.0 x16, 2 x PCIe 3.0 x1 |
| Daugiagrafikos palaikymas | AMD Quad CrossFireX and CrossFire Technology |
| Sandėliavimas | 6 x SATA3 ports (RAID 0, 1, 5, 10), 2 x Ultra M.2 ports (PCIe Gen3 x4 & SATA3) |
| Garsas | Realtek ALC892 7.1 kanalų HD garso įrašas |
| LAN | Intel I219V Gigabit Ethernet |
| USB prievadai | 8 x USB 3.1 Gen1 (1 Type-C rear, 5 rear, 2 via header), 5 x USB 2.0 (2 rear, 3 via header) |
| Vaizdo išvestys | 1 x VGA, 1 x DVI-D, 1 x HDMI |
| Formos faktorius | ATX (12.0 x 9.0 inch / 30.5 x 22.9 cm) |
8. Garantija ir palaikymas
8.1 Informacija apie garantiją
The ASRock B365 PRO4 Motherboard comes with a 1 metų ribota garantija. This warranty covers defects in materials and workmanship under normal use. For specific terms and conditions, please refer to the warranty card included with your product or visit the official ASRock websvetainę.
Note: Damage caused by improper installation, misuse, unauthorized modifications, or natural disasters is not covered under warranty.
8.2 Techninė pagalba
For technical assistance, driver downloads, BIOS updates, or further troubleshooting, please visit the official ASRock support websvetainė:
Taip pat galite susisiekti su „ASRock“ klientų aptarnavimo tarnyba tiesiogiai per jų websvetainė, skirta suasmenintam palaikymui.