
LECTRUS LECT-TAB1011
LECTRUS 10.1-inch Android Tablet User Manual
Model: LECT-TAB1011
1. Įvadas
Thank you for choosing the LECTRUS 10.1-inch Android Tablet. This device is designed to provide a versatile and portable computing experience, featuring Android 9.0 Pie, GMS certification, and robust connectivity options including Wi-Fi and 3G cellular capabilities. This manual will guide you through the setup, operation, and maintenance of your new tablet.
2. Produktas baigtasview
The LECTRUS tablet combines a vibrant 10.1-inch IPS display with powerful performance for everyday tasks, entertainment, and communication. It features a quad-core processor, 2GB RAM, and 32GB internal storage, expandable via microSD. Dual cameras allow for capturing photos and video calls, while dual SIM card slots provide flexible connectivity.

2.1 pav.: priekis view of the LECTRUS 10.1-inch Android Tablet, displaying its home screen with weather and music widgets.
3. Komponentai ir valdikliai
Susipažinkite su savo planšetinio kompiuterio fiziniu išdėstymu:
- Maitinimo mygtukas: Press and hold to power on/off or restart. Press briefly to sleep/wake the screen.
- Volume Buttons (V+, V-): Sureguliuokite garso garsumą.
- USB (OTG) Port: For charging, data transfer, and connecting USB devices (e.g., flash drives, keyboards).
- Ausinių lizdas: Connect 3.5mm headphones or external speakers.
- SIM Card Slots (SIM 1, SIM 2): Insert Nano-SIM cards for cellular data and calls.
- MicroSD kortelės lizdas: Insert a microSD card for expandable storage (up to 128GB).
- Front Camera (2 MP): Vaizdo skambučiams ir asmenukėms.
- Rear Camera (5 MP): Nuotraukų ir vaizdo įrašų darymui.
- Blykstė L.amp: Suteikia apšvietimą galinei kamerai.
- Garsiakalbiai: Integruota garso išvestis.
- Iš naujo nustatyti Pinhole: A small hole for a hard reset in case of system unresponsiveness.
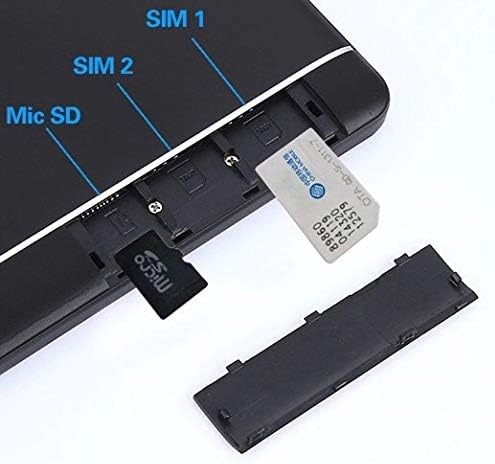
Figure 3.1: Detailed diagram of the LECTRUS tablet's ports, buttons, and camera locations.
4. Sąranka
4.1 Pradinis įkrovimas
Before first use, fully charge your tablet. Connect the included USB cable to the tablet's USB (OTG) port and the other end to a power adapter. The battery indicator on the screen will show charging progress.
4.2 Įjungimas / išjungimas
- Norėdami įjungti: Press and hold the Power button until the LECTRUS logo appears.
- Norėdami išjungti: Paspauskite ir palaikykite maitinimo mygtuką, kol pasirodys meniu. Pasirinkite „Išjungti“ ir patvirtinkite.
- Norėdami paleisti iš naujo: Paspauskite ir palaikykite maitinimo mygtuką, kol pasirodys meniu. Pasirinkite „Paleisti iš naujo“ ir patvirtinkite.
- Miego / pabudimo: Briefly press the Power button to turn the screen off or on without powering down the device.
4.3 SIM kortelės ir „MicroSD“ kortelės įdėjimas
Your tablet supports dual SIM cards for cellular connectivity and a microSD card for expanded storage.
- Locate the removable plastic cover on the side of the tablet.
- Gently pry open the cover to reveal the SIM card slots (SIM 1, SIM 2) and the MicroSD card slot.
- Insert your Nano-SIM cards into the designated SIM slots with the gold contacts facing down, ensuring they click into place.
- Insert your microSD card into its slot until it clicks.
- Tvirtai užsukite plastikinį dangtelį.

4.3 pav. Iš arti view of the SIM card and MicroSD card slots, showing proper insertion.
4.4 Pradinio nustatymo vedlys
Pirmą kartą įjungus planšetinį kompiuterį, bus atliekami pradiniai nustatymai. Vykdykite ekrane pateikiamus nurodymus:
- Pasirinkite savo kalbą.
- Prisijunkite prie „Wi-Fi“ tinklo.
- Prisijunkite naudodami „Google“ paskyrą arba sukurkite naują.
- Nustatykite ekrano užraktą (PIN kodą, šabloną, slaptažodį).
- Review and accept Google services and privacy settings.
5. Naudojimo instrukcijos
5.1 Pagrindinė navigacija
The LECTRUS tablet uses a capacitive touchscreen for interaction:
- Bakstelėkite: Pasirinkite elementą arba atidarykite programą.
- Palieskite ir palaikykite: Access contextual menus or drag items.
- Perbraukimas: Slinkite per puslapius, sąrašus arba perjunkite pagrindinius ekranus.
- Žiupsnelis, norint priartinti: Norėdami priartinti arba atitolinti vaizdus, žemėlapius ar web puslapių.

Figure 5.1: User interacting with the tablet's 10-point capacitive touchscreen for web naršymas.
5.2 Tinklo ryšys
- „Wi-Fi“: Go to Settings > Network & Internet > Wi-Fi. Turn Wi-Fi on, select your network, and enter the password.
- Mobilieji duomenys (3G): Ensure a valid SIM card is inserted. Go to Settings > Network & Internet > Mobile network. Enable Mobile data. You may need to configure APN settings if your carrier requires it.

Figure 5.2: Tablet screen showing wireless and network settings, including Wi-Fi and Bluetooth options.
5.3 Bluetooth poravimas
To connect Bluetooth devices like headphones or speakers:
- Eikite į Nustatymai > Prijungti įrenginiai > „Bluetooth“.
- Įjunkite Bluetooth.
- Įsitikinkite, kad jūsų „Bluetooth“ įrenginys veikia susiejimo režimu.
- Pasirinkite savo įrenginį iš galimų įrenginių sąrašo ir vykdykite visus ekrane pateikiamus nurodymus, kad užbaigtumėte susiejimą.

Figure 5.3: User enjoying audio content on the tablet with wired headphones, demonstrating media playback capabilities.
5.4 Kameros naudojimas
The tablet features a 5 MP rear camera and a 2 MP front camera.
- Pradiniame ekrane arba programėlių skydelyje atidarykite programėlę „Kamera“.
- Norėdami nufotografuoti, palieskite užrakto mygtuką.
- Norėdami perjungti priekinę ir galinę kameras, palieskite kameros perjungimo piktogramą.
- Pasirinkite vaizdo įrašymo režimą, kad įrašytumėte vaizdo įrašus.
Figure 5.4: Tablet being used for a video call or to take a selfie, highlighting the front camera functionality.
5.5 GPS funkcionalumas
The built-in GPS allows for navigation and location-based services.
- Ensure Location services are enabled in Settings > Location.
- Naudokite iš anksto įdiegtas žemėlapių programas arba atsisiųskite mėgstamą navigacijos programėlę iš „Google Play“ parduotuvės.

Figure 5.5: Tablet mounted in a car, displaying a map application for GPS navigation.
5.6 Programėlių valdymas
Atsisiųskite ir tvarkykite programas iš „Google Play“ parduotuvės.
- Įdiegti programas: Open the "Play Store" app, search for your desired app, and tap "Install".
- Pašalinti programas: Go to Settings > Apps & notifications > See all apps. Select the app you wish to uninstall and tap "Uninstall".

Figure 5.6: Tablet home screen displaying a grid of various application icons, including browser, calculator, camera, and email.
6. Priežiūra
6.1 Planšetinio kompiuterio valymas
Planšetinio kompiuterio ekraną ir korpusą valykite minkštu, nepūkuotu audiniu. Įsisenėjusias dėmes šiek tiek nuvalykite.ampNuvalykite šluostę vandeniu arba ekrano valikliu. Venkite stiprių cheminių medžiagų ar abrazyvinių medžiagų.
6.2 Akumuliatoriaus priežiūra
- Venkite ekstremalių temperatūrų, nes jos gali pabloginti akumuliatoriaus veikimo laiką.
- Neleiskite baterijai dažnai visiškai išsikrauti.
- Naudokite originalų įkroviklį arba sertifikuotą suderinamą įkroviklį.
6.3 Programinės įrangos naujiniai
Periodically check for system updates to ensure optimal performance and security. Go to Settings > System > Advanced > System update.
6.4 Saugojimo valdymas
Norėdami atlaisvinti vietos saugykloje:
- Pašalinkite nenaudojamas programas.
- Ištrinkite nereikalingas nuotraukas, vaizdo įrašus ir files.
- Perkelti didelį files to an inserted microSD card.
- Clear cache data for apps in Settings > Apps & notifications.
7. Problemų sprendimas
| Problema | Galimas sprendimas |
|---|---|
| Planšetinis kompiuteris neįsijungia. | Ensure the battery is charged. Connect the charger and wait a few minutes before attempting to power on. If unresponsive, press and hold the power button for 10-15 seconds. |
| „Wi-Fi“ ryšio problemos. | Iš naujo paleiskite planšetinį kompiuterį ir „Wi-Fi“ maršrutizatorių. „Wi-Fi“ nustatymuose pamirškite tinklą ir prijunkite iš naujo. Įsitikinkite, kad esate „Wi-Fi“ signalo diapazone. |
| Programėlės veikia lėtai arba stringa. | Close background applications. Clear the app's cache (Settings > Apps & notifications > [App Name] > Storage & cache > Clear cache). Restart the tablet. Ensure sufficient free storage space. |
| Baterija greitai išsikrauna. | Reduce screen brightness. Disable Wi-Fi, Bluetooth, and GPS when not in use. Close unused apps running in the background. Check battery usage in Settings > Battery to identify power-hungry apps. |
| Nepavyksta aptikti SIM kortelės. | Ensure the SIM card is correctly inserted. Restart the tablet. Try the SIM card in another device to confirm it is functional. |
8. Specifikacijos
| Funkcija | Detalė |
|---|---|
| Modelio pavadinimas | Lectrus |
| Prekės modelio numeris | LECT-TAB1011 |
| Operacinė sistema | Android 9 Pie |
| Ekrano dydis | 10.1 colių |
| Ekrano raiška | 1280x800 |
| Procesorius | 1.3 GHz Quad-core (MediaTek) |
| RAM | 2 GB SDRAM DDR3 |
| Vidinė saugykla | 32 GB |
| Išplečiama saugykla | Up to 128GB via MicroSD (Not Included) |
| Galinis Webkumštelio raiška | 5 MP |
| Priekyje Webkumštelio raiška | 2 MP |
| Belaidis tipas | Bluetooth, 802.11bgn (Wi-Fi), Radio Frequency (3G) |
| Ryšys | Dual SIM Card Slots (3G: WCDMA 850/1900/2100 MHz, 2G: GSM 850/900/1800/1900MHz), GPS, FM |
| Baterijos veikimo laikas (vidutinis) | 5 valandų |
| Prekės svoris | 1.5 svaro |
| Gaminio matmenys | 9.45 x 6.6 x 0.3 colio |
| Spalva | Juoda |
9. Garantija ir palaikymas
LECTRUS products are designed for reliability and performance. For warranty information, please refer to the warranty card included with your product or visit the official LECTRUS website. If you encounter any issues not covered in this manual or require further assistance, please contact LECTRUS customer support through the contact information provided on the product packaging or the official brand websvetainę.
For online support and frequently asked questions, you may also visit the LECTRUS store page on Amazon: LECTRUS Store.
Ask a question about this manual
Ask about setup, troubleshooting, compatibility, parts, safety, or missing instructions. Manuals+ will review the question and use this page’s manual context to help answer it.