
1. Įvadas
The EPEVER Tracer 3215BN is a 30A Maximum Power Point Tracking (MPPT) solar charge controller designed for 12V/24V battery systems. It efficiently converts solar energy to charge various battery types, including Sealed, Gel, and Flooded lead-acid batteries. This controller features an integrated LCD display for system monitoring and configuration, along with advanced protection functions to ensure system reliability.
2. Produkto ypatybės
- Pažangi MPPT technologija: Ensures maximum power point tracking with an efficiency of no less than 99.5%, optimizing solar energy harvesting.
- Didelis konversijos efektyvumas: Pasiekia maksimalų 98 % konversijos efektyvumą.
- Fast Tracking Speed: Ultra-fast tracking and accurate recognition of multiple power points.
- Tvirtas dizainas: Features a common negative design and die-cast aluminum construction for effective heat dissipation.
- Visapusiška apsauga: Includes all-round electronic fault self-test and enhanced electronic protection functions to prevent system damage.
- Ryšio sąsaja: Equipped with an RS-485 communication bus interface and Modbus communication protocol for expanded applications and monitoring via PC or external display units like MT52.
- Software Upgrade Support: Allows for future software enhancements.
- Patogūs naudoti indikatoriai: LED indicators provide clear system status.
- Flexible Load Control: Offers multiple load control modes including manual control, light ON/OFF, light On+Timer, and time control.
- Suderinamumas su baterijomis: Supports Sealed, Gel, Flooded, and User-defined battery types.
- Temperatūros kompensavimas: Includes a battery temperature compensation function.
- Energetikos statistika: Provides real-time energy statistics.
3. Sąranka ir diegimas
Proper installation is crucial for the safe and efficient operation of your EPEVER Tracer 3215BN controller. Follow these steps carefully.
3.1 Komponento identifikavimas

This image illustrates the various components and ports of the Tracer 3215BN controller, including the Heat Sink, RTS Port, Charging LED indicator, Solar Terminal, Battery LED indicator, Button, RS-485 Port, Battery Terminal, and Load Terminal.
3.2 Sujungimo schema
Connect the components in the specified order to prevent damage to the controller and other system components.

This diagram shows the connection sequence: Solar Panel (PV) to the controller, controller to Battery, and controller to Load (e.g., lights, fan, TV, computer via inverter). Ensure correct polarity for all connections.
- Prijunkite akumuliatorių: First, connect the battery to the controller's battery terminals. Ensure correct polarity (+ to + and - to -). The controller requires battery power to operate.
- Prijunkite saulės baterijas: Next, connect the solar panels to the controller's PV terminals. Verify correct polarity.
- Prijunkite apkrovą: Finally, connect your DC loads to the controller's load terminals. If using AC loads, connect them through an inverter, which is then connected to the battery.
Svarbi saugos pastaba: Always disconnect power from solar panels and battery before making or breaking any connections to the controller. Ensure all connections are tight to prevent loose contacts and overheating.
3.3 Ryšio prievadai

This image highlights the RTS (Remote Temperature Sensor) Port and the RS-485 Port, used for external temperature sensing and communication respectively.
- RTS prievadas: Connect the optional Remote Temperature Sensor (RTS) here for accurate battery temperature compensation.
- RS-485 prievadas: Use this port for connecting to a PC, MT52 remote meter, or other monitoring devices via Modbus protocol.
4. Naudojimo instrukcijos
Once installed, the controller will automatically begin charging the battery from the solar panels. The LCD display provides real-time information about the system status.
4.1 LCD ekranas ir mygtukai
The integrated LCD display shows various parameters such as battery voltage, charging current, load status, and error codes. Use the buttons adjacent to the display to navigate through menus and adjust settings.
4.2 Apkrovos valdymo režimai
The controller offers several load control modes:
- Rankinis valdymas: Turn the load ON or OFF manually.
- Šviesos įjungimas/išjungimas: Apkrova ĮJUNGIAMA sutemus ir IŠJUNGIAMA auštant.
- Light On+Timer: Apkrova įsijungia sutemus ir lieka įjungta nustatytą laiką.
- Laiko kontrolė: Load operates during specific programmed times.
4.3 Remote Monitoring and Settings
The Tracer 3215BN supports remote monitoring and parameter adjustment through various accessories.
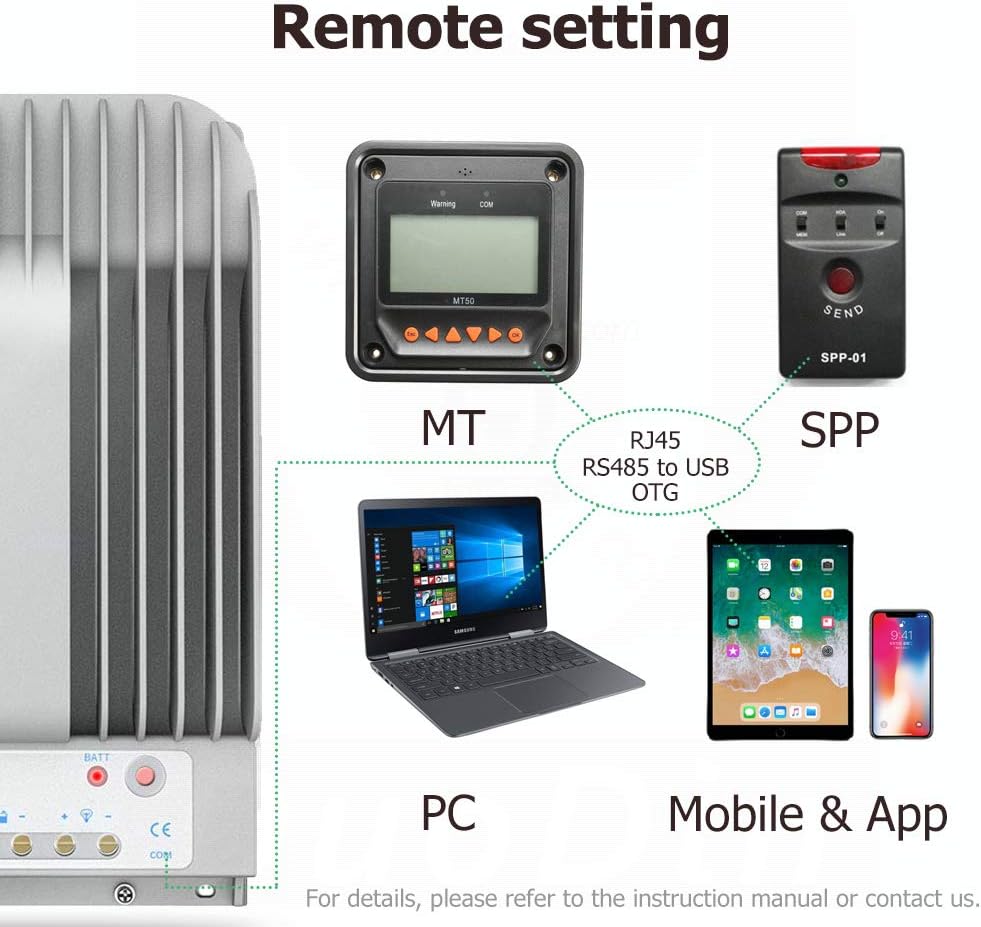
This image illustrates how the controller can be connected to an MT (remote meter), SPP (wireless module), PC, or mobile application for remote monitoring and configuration.
- MT Remote Meter: Connect an EPEVER MT series remote meter (e.g., MT52) to view real-time data and modify parameters from a distance.
- Kompiuterio programinė įranga: Use EPEVER PC software by connecting the controller via an RS-485 to USB adapter for detailed monitoring, data logging, and advanced settings.
- Programėlė mobiliesiems: Connect a compatible wireless module (e.g., Bluetooth or WiFi) to use the EPEVER mobile application for convenient monitoring and control via smartphone or tablet.
5. Priežiūra
Reguliarus saulės įkrovimo valdiklio aptarnavimas užtikrina jo ilgaamžiškumą ir optimalų veikimą.
- Patikrinkite jungtis: Periodically check all wiring connections for tightness and corrosion. Loose connections can cause voltagkritimai ir perkaitimas.
- Valykite valdiklį: Keep the controller clean and free from dust and debris. Ensure the heat sink fins are not obstructed to allow for proper heat dissipation.
- Patikrinkite akumuliatoriaus būseną: Monitoriaus akumuliatoriaus talpatage and health regularly. Ensure the battery type setting in the controller matches your installed battery.
- Aplinkos sąlygos: Įsitikinkite, kad valdiklis yra sumontuotas sausoje, gerai vėdinamoje vietoje, atokiau nuo tiesioginių saulės spindulių ir ekstremalių temperatūrų.
6. Problemų sprendimas
This section addresses common issues you might encounter with your Tracer 3215BN controller.
6.1 Controller Not Powering On
- Patikrinkite akumuliatoriaus jungtį: The controller requires a minimum battery voltage to power on. Ensure the battery is properly connected and has sufficient charge. If the battery is completely discharged, the controller may not power on until an external 12V source or sufficient solar input is provided to raise the battery voltage.
- Patikrinkite poliškumą: Confirm that the battery connections are made with correct polarity.
- Inspect Fuses/Breakers: Check any inline fuses or circuit breakers between the battery and the controller.
6.2 No Charging Indication
- Patikrinkite saulės baterijos prijungimą: Ensure solar panels are correctly connected to the PV terminals with proper polarity.
- Verify Solar Input Voltage: Išmatuokite atviros grandinės tūrįtage of your solar panels to ensure it is within the controller's acceptable range (Max 150V).
- Sunlight Conditions: Ensure there is adequate sunlight reaching the solar panels.
6.3 Load Not Working
- Check Load Connection: Verify that the load is correctly connected to the load terminals.
- Krovinio valdymo režimas: Ensure the load control mode is set appropriately (e.g., manual ON, or correct timer settings).
- Baterijos tūristage: Jei akumuliatoriaus ttage is too low, the controller may disconnect the load to protect the battery.
- Apsauga nuo perkrovos: Check if the load current exceeds the controller's rated load current, triggering overload protection.
7. Specifikacijos
Key technical specifications for the EPEVER Tracer 3215BN MPPT Solar Charge Controller:
| Parametras | Vertė |
|---|---|
| Modelis | Tracer 3215BN |
| Sistemos vardinis ttage | 12V / 24V Auto Work |
| Nominali įkrovimo srovė | 30A |
| Nominali apkrovos srovė | 30A |
| Maks. PV atviros grandinės ttage | 150 V (esant minimaliai darbo aplinkos temperatūrai) 138V (esant 25°C aplinkos temperatūrai) |
| Maks. PV įvesties galia | 390 W (12 V) / 780 W (24 V) |
| MPP ttage Diapazonas | Baterijos tūristage +2V ~ 108V |
| Baterijos tipas | Sealed, Gel, Flooded, User |
| Konversijos efektyvumas | ≤98 % |
| Stebėjimo efektyvumas | ≥ 99.5 % |
| Bendravimas | RS-485 (RJ45 interface) |
| Darbinės temperatūros diapazonas | -35°C iki +55°C |
| Laikymo temperatūros diapazonas | -35°C iki +80°C |
| Matmenys (I x P x A) | 281 mm x 160 mm x 60 mm |

This table provides a comparison of key specifications between the Tracer-AN and Tracer-BN series, highlighting the superior heat dissipation and voltage ranges of the BN series.

This image details the physical dimensions of the Tracer 3215BN controller.
8. Informacija apie garantiją
Warranty terms and conditions for EPEVER products can vary. It is recommended to confirm the specific warranty period and coverage directly with your seller (SolaMr) or the manufacturer (EPEVER) at the time of purchase. Keep your proof of purchase for any warranty claims.
9. Parama
For technical assistance, troubleshooting beyond this manual, or inquiries regarding product functionality, please contact the following:
- Pardavėjo palaikymas: Contact SolaMr for assistance related to your purchase.
- Gamintojo palaikymas: Visit the official EPEVER website for product documentation, FAQs, and contact information for direct manufacturer support.