1. Įvadas ir pabaigaview
The Escort EDM 1111A is a versatile digital multimeter designed for accurate measurement of various electrical parameters. This device is essential for electricians, technicians, and hobbyists for testing circuits, components, and power sources. It features a clear digital display and a rotary dial for selecting different measurement functions.

The Escort EDM 1111A Digital Multimeter with red and black test leads connected, ready for use.
Pagrindinės funkcijos:
- DC ttage (DCV) measurement
- AC ttage (ACV) measurement
- DC Current (DCA) measurement
- AC Current (ACA) measurement
- Atsparumo (Ω) matavimas
- Capacitance (CX) measurement
- Diode and Transistor (hFE) testing
2. Sąranka
2.1 Akumuliatoriaus įdėjimas
The Escort EDM 1111A requires a DC 9V 006P battery for operation. To install or replace the battery:
- Įsitikinkite, kad multimetras yra IŠJUNGTAS.
- Suraskite akumuliatoriaus skyrių įrenginio gale.
- Carefully slide open or unscrew the battery cover.
- Insert a new 9V 006P battery, observing the correct polarity (+/-).
- Saugiai uždėkite akumuliatoriaus dangtelį.

Galinė view of the Escort EDM 1111A Digital Multimeter, showing the battery compartment cover and the product label.
2.2 Bandymo laidų prijungimas
The multimeter comes with two test leads, typically one red (positive) and one black (negative/common). Proper connection is crucial for accurate and safe measurements.
- Daugumai tūriųtage, resistance, and low current measurements, connect the black lead to the 'COM' (Common) jack.
- Connect the red lead to the 'V-Ω-mA' jack for voltage, resistance, and milliampsrovės matavimai.
- Didelės srovės matavimams (iki 10 A) prijunkite raudoną laidą prie „10 A“ lizdo. Always ensure the correct jack is used to prevent damage to the meter or circuit.

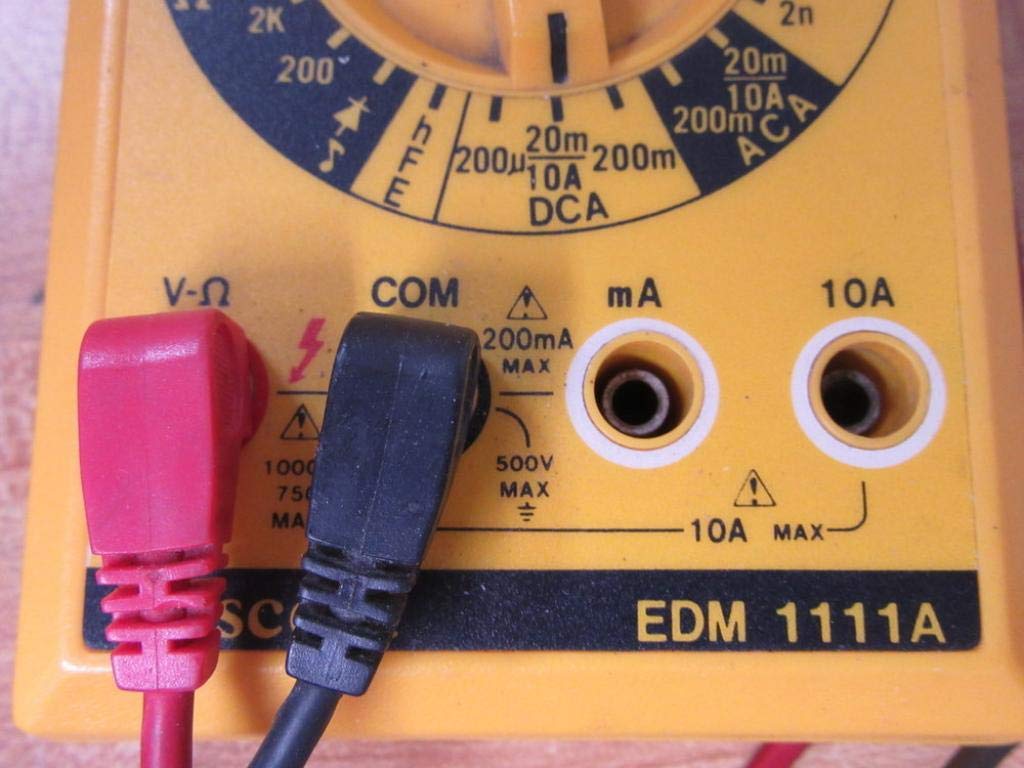
A closer look at the input jacks (V-Ω, COM, mA, 10A) and the lower portion of the rotary dial, indicating current measurement ranges.

The red and black test probes (leads) used with the Escort EDM 1111A Digital Multimeter, featuring pointed tips for electrical contact.
3. Naudojimo instrukcijos
Before taking any measurements, ensure the test leads are correctly connected and the rotary dial is set to the appropriate function and range.

Išsamus view of the rotary selector dial on the Escort EDM 1111A Digital Multimeter, displaying various measurement functions such as DCV, ACV, Ω, DCA, ACA, and CX.
3.1 DC matavimas Voltage (DCV)
- Set the rotary dial to the desired DCV range (e.g., 200m, 2, 20, 200, 1000). Choose a range higher than the expected voltage.
- Connect the red lead to the positive (+) side of the circuit and the black lead to the negative (-) side.
- Perskaitykite ttage reikšmė ekrane.
3.2 AC matavimas, ttage (ACV)
- Set the rotary dial to the desired ACV range (e.g., 200m, 2, 20, 200, 750). Choose a range higher than the expected voltage.
- Prijunkite bandymo laidus prie kintamosios srovės įtampostage source. Polarity does not matter for AC voltage.
- Perskaitykite ttage reikšmė ekrane.
3.3 Varžos (Ω) matavimas
- Prieš matuodami varžą, įsitikinkite, kad grandinė arba komponentas yra atjungtas nuo įtampos.
- Set the rotary dial to the desired Ω range (e.g., 200, 2K, 20K, 200K, 2M, 20M, 200M).
- Prijunkite bandymo laidus prie matuojamo komponento.
- Perskaitykite pasipriešinimo vertę ekrane.
3.4 Measuring DC Current (DCA)
- Įsitikinkite, kad grandinėje nėra įtampos.
- Set the rotary dial to the desired DCA range (e.g., 200µ, 2m, 20m, 200m, 10A).
- Svarbu: For currents up to 200mA, use the 'V-Ω-mA' jack for the red lead. For currents up to 10A, use the '10A' jack.
- Break the circuit and connect the multimeter in series with the load. The current must flow through the multimeter.
- Vėl įjunkite grandinę ir nuskaitykite srovės vertę.
3.5 Measuring AC Current (ACA)
- Įsitikinkite, kad grandinėje nėra įtampos.
- Set the rotary dial to the desired ACA range (e.g., 200µ, 2m, 20m, 200m, 10A).
- Svarbu: For currents up to 200mA, use the 'V-Ω-mA' jack for the red lead. For currents up to 10A, use the '10A' jack.
- Break the circuit and connect the multimeter in series with the load.
- Vėl įjunkite grandinę ir nuskaitykite srovės vertę.
3.6 Measuring Capacitance (CX)
- Prieš bandymą įsitikinkite, kad kondensatorius yra visiškai išsikrovęs.
- Set the rotary dial to the CX range (e.g., 2n, 20n, 200n, 2µ, 20µ).
- Prijunkite bandymo laidus prie kondensatoriaus gnybtų.
- Ekrane perskaitykite talpos vertę.
3.7 Diode and Transistor (hFE) Testing
Refer to the specific markings on the dial for diode and transistor testing functions. Typically, diode test mode allows checking the forward voltage drop of a diode, and hFE mode is used for measuring the DC current gain of transistors.
4. Priežiūra
4.1 Akumuliatoriaus keitimas
Replace the 9V 006P battery when the low battery indicator appears on the display or if the multimeter fails to power on. Follow the instructions in Section 2.1.
4.2 Valymas
Multimetrui valyti naudokite minkštą,amp šluoste. Nenaudokite abrazyvinių valiklių ar tirpiklių, nes jie gali pažeistiasing or display. Ensure the device is turned off and disconnected from any circuits before cleaning.
4.3 Saugykla
When not in use for extended periods, store the multimeter in a cool, dry place, away from direct sunlight and extreme temperatures. Consider removing the battery to prevent leakage, which could damage the internal components.
5. Problemų sprendimas
| Problema | Galima priežastis | Sprendimas |
|---|---|---|
| Nėra ekrano arba ekranas yra pritemdytas | Senka arba išsikrovusi baterija | Replace the 9V 006P battery. |
| Neteisingi rodmenys | Incorrect range selected Poor lead connection Pažeisti bandymo laidai Incorrect input jack used | Pasirinkite tinkamą diapazoną. Ensure leads are firmly connected. Inspect and replace damaged leads. Verify leads are in the correct V-Ω-mA or 10A jack. |
| Rodoma „OL“ (perkrova) | Matavimas viršija pasirinktą diapazoną | Perjunkite į aukštesnį diapazoną. |
| Nėra tęstinumo pyptelėjimo | Continuity function not selected Atvira grandinė | Ensure dial is on continuity/diode test. Check the circuit for breaks. |
6. Specifikacijos
| Parametras | Vertė |
|---|---|
| Modelis | EDM 1111A |
| Gaminio matmenys (I x P x A) | 8 x 4 x 2 colio |
| Prekės svoris | 1.84 svaro |
| Maitinimo šaltinis | DC 9V 006P Battery |
| Matavimo tipas | Multimetras |
| Gamintojas | Palyda |
| Pasiekiama pirmoji data | 21 m. lapkričio 2019 d |
| DC ttage diapazonai | 200mV, 2V, 20V, 200V, 1000V |
| AC ttage diapazonai | 200mV, 2V, 20V, 200V, 750V |
| DC Current Ranges | 200 µA, 2 mA, 20 mA, 200 mA, 10 A |
| Kintamosios srovės diapazonai | 200 µA, 2 mA, 20 mA, 200 mA, 10 A |
| Pasipriešinimo diapazonai | 200Ω, 2KΩ, 20KΩ, 200KΩ, 2MΩ, 20MΩ, 200MΩ |
| Capacitance Ranges | 2nF, 20nF, 200nF, 2µF, 20µF |
7. Informacija apie garantiją
For specific warranty details regarding your Escort EDM 1111A Digital Multimeter, please refer to the documentation provided at the time of purchase or contact the manufacturer directly. Warranty terms typically cover defects in materials and workmanship under normal use.
8. Pagalba klientams
If you encounter any issues or have questions not covered in this manual, please contact Escort customer support. Have your product model number (EDM 1111A) and serial number (if applicable, found on the back label) ready when contacting support for faster assistance.
The product label on the back of the Escort EDM 1111A, indicating 'DIGITAL MULTIMETER DC 9V 006P BATTERY', serial number, and 'MADE IN TAIWAN R.O.C.'.