1. Įvadas ir saugos informacija
Thank you for choosing the ANENG V8 Digital Multimeter. This device is designed for safe and accurate measurement of AC/DC voltage, AC/DC current, resistance, capacitance, frequency, temperature, diode, continuity, and battery testing. Please read this manual thoroughly before use to ensure proper operation and to prevent potential hazards.
1.1 Saugos priemonės
- Prieš naudodami visada įsitikinkite, kad multimetras yra geros darbinės būklės. Patikrinkite, ar bandymo laidai nepažeisti.
- Netaikyti ttage or current that exceeds the maximum rated values for the multimeter.
- Būkite ypač atsargūs dirbdami su ttages above 36V DC or 25V AC RMS, as these can pose a shock hazard.
- Visada atjunkite grandinės maitinimą ir iškraukite visus didelės įtampos krūvius.tagPrieš matuodami varžą, laidumą, diodus ar talpą, atjunkite kondensatorius.
- Ensure the rotary switch is in the correct position for the desired measurement before connecting the test leads to the circuit.
- Nenaudokite multimetro sprogiose dujų, garų ar dulkėtose aplinkose.
- Kad užtikrintumėte tikslius rodmenis, nedelsdami pakeiskite baterijas, kai pasirodys išsikrovusių baterijų indikatorius.
2. Produktas baigtasview
2.1 Pakuotės turinys
The ANENG V8 Digital Multimeter package typically includes the following items:
- ANENG V8 Digital Multimeter
- Bandymo laidai (raudoni ir juodi)
- Temperatūros zondas
- Dėklas nešiojimui
- Vartotojo vadovas

Image: ANENG V8 Digital Multimeter with its standard accessories, including test leads, a temperature probe, and a protective carrying case.
2.2 Valdikliai ir ekranas
The multimeter features an 8000-count LCD backlight display for clear readings in various lighting conditions. Key controls include a rotary switch for function selection and buttons for range, data hold, and other features.

Vaizdas: Išsamus view of the multimeter's front panel, highlighting the LCD screen, the central rotary selector, and various control buttons.
3. Sąranka
3.1 Akumuliatoriaus įdėjimas
The ANENG V8 Digital Multimeter is powered by batteries. To install or replace batteries:
- Įsitikinkite, kad multimetras yra išjungtas, ir atjunkite visus bandymo laidus.
- Suraskite baterijų skyriaus dangtelį įrenginio gale.
- Atsuktuvu atlaisvinkite varžtą (-us), tvirtinantį (-čius) akumuliatoriaus dangtelį.
- Nuimkite dangtelį.
- Insert new batteries, observing the correct polarity (+ and -) as indicated inside the compartment. The device typically uses AA batteries.
- Uždėkite akumuliatoriaus dangtelį ir pritvirtinkite jį varžtu (-ais).
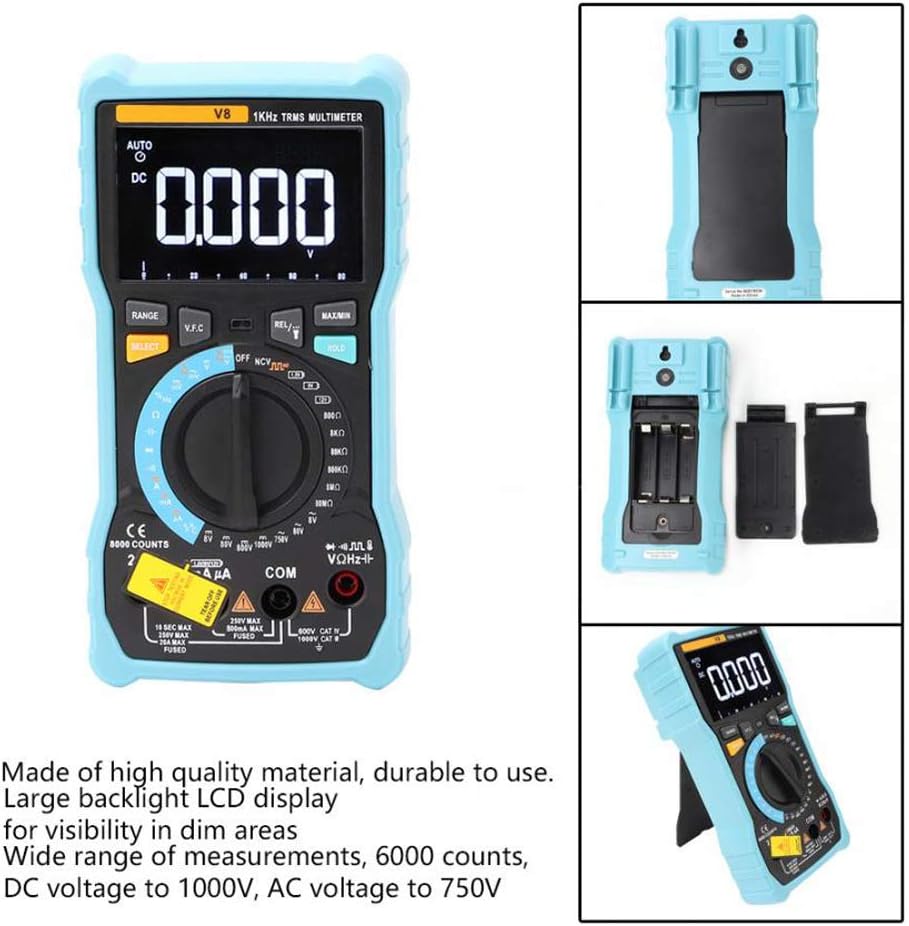
Paveikslėlis: Galinė dalis view of the multimeter with the battery compartment open, illustrating the correct placement for three AA batteries.
4. Naudojimo instrukcijos
Before any measurement, ensure the test leads are correctly inserted into the input jacks and the rotary switch is set to the appropriate function.
4.1 Nuolatinės/kintamosios srovės įtampos matavimastage
- Set the rotary switch to the 'V–' (DC Voltage) arba „V~“ (kintamosios srovės tūriotage) padėtis.
- Connect the red test lead to the 'VΩmA' jack and the black test lead to the 'COM' jack.
- Prijunkite bandymo laidus lygiagrečiai prie grandinės arba komponento, kurį norite išmatuoti.
- Perskaitykite ttage reikšmė ekrane.
4.2 Nuolatinės / kintamosios srovės matavimas
- Set the rotary switch to the 'A–' (DC Current) or 'A~' (AC Current) position. For milliampsrovė (mA) arba mikroampere (µA) measurements, select the corresponding range.
- For current up to 800mA, connect the red test lead to the 'VΩmA' jack. For current up to 20A, connect the red test lead to the '20A' jack. Connect the black test lead to the 'COM' jack.
- Disconnect power to the circuit. Open the circuit where you want to measure current. Connect the multimeter in series with the circuit.
- Įjunkite grandinę ir ekrane nuskaitykite srovės vertę.
4.3 Atsparumo matavimas
- Set the rotary switch to the 'Ω' (Resistance) position.
- Connect the red test lead to the 'VΩmA' jack and the black test lead to the 'COM' jack.
- Ensure the circuit is de-energized and all capacitors are discharged. Connect the test leads across the component to be measured.
- Perskaitykite pasipriešinimo vertę ekrane.
4.4 NCV (bekontaktis tūrinistage) aptikimas
- Set the rotary switch to the 'NCV' position.
- Move the top end of the multimeter near the conductor or outlet.
- The multimeter will emit an audible beep and the NCV indicator light will flash if AC voltagaptinkamas e, rodantis gyvo tūrio buvimątage be fizinio kontakto.
4.5 Temperatūros matavimas
- Set the rotary switch to the '°C/°F' (Temperature) position.
- Connect the temperature probe to the 'VΩmA' and 'COM' jacks, observing polarity if applicable.
- Temperatūros zondo galiuką uždėkite ant objekto, kurio temperatūrą norite matuoti, arba šalia jo.
- Nuskaitykite temperatūros vertę ekrane.
4.6 Kitos funkcijos
- Talpa: Set the rotary switch to the 'F' position. Connect leads across the discharged capacitor.
- Dažnis / darbo ciklas: Set the rotary switch to the 'Hz/%' position. Connect leads to the signal source.
- Diodo testas: Set the rotary switch to the 'Diode' position. Connect leads across the diode.
- Tęstinumo testas: Set the rotary switch to the 'Continuity' position. Connect leads across the circuit. An audible beep indicates continuity.
- Baterijos testas: Set the rotary switch to the 'Battery' position. Connect leads to the battery terminals (1.5V, 9V, or 12V).
- Duomenų sulaikymas: Norėdami užfiksuoti dabartinį rodmenį ekrane, paspauskite mygtuką „HOLD“. Norėdami atleisti, paspauskite dar kartą.
- Foninis apšvietimas / žibintuvėlis: Press the backlight button to turn on/off the display backlight or flashlight.
- Automatinis išjungimas: Multimetras automatiškai išsijungs po tam tikro neveiklumo laikotarpio, kad taupytų baterijų veikimo laiką.
5. Priežiūra
5.1 Valymas
Nuvalykite dėklą su skelbimuamp šluoste ir švelniu plovikliu. Nenaudokite abrazyvinių medžiagų ar tirpiklių. Saugokite įvesties gnybtus nuo purvo ir drėgmės.
5.2 Saugiklio keitimas
Jei srovės matavimo funkcija neveikia, gali tekti pakeisti saugiklį. Tinkamą saugiklio tipą ir vardinę svirtį rasite specifikacijose. Saugiklį turėtų keisti tik kvalifikuoti darbuotojai.
5.3 Saugykla
When not in use for extended periods, remove the batteries to prevent leakage and store the multimeter in a dry, cool place.
6. Problemų sprendimas
- Nėra ekrano: Patikrinkite baterijų įdėjimą ir įkraukite jas. Jei reikia, pakeiskite baterijas.
- Neteisingi skaitymai: Ensure the rotary switch is set to the correct function and range. Check test lead connections. Verify battery charge.
- Srovės matavimas neveikia: Check the fuse. Replace if blown (refer to fuse replacement section).
- NCV neaptinka: Ensure the NCV function is selected and the multimeter is close enough to the AC voltage šaltinis.
7. Specifikacijos
| Parametras | Vertė |
|---|---|
| Ekranas | 8000 Counts LCD with Backlight |
| DC ttage (V) | 8.000V / 80.00V / 800.0V / 1000V |
| DC ttage (mV) | 800mV |
| AC ttage (V) | 8.000V / 80.00V / 750V |
| AC ttage (mV) | 800mV |
| Nuolatinė srovė (A) | 8.000A / 20.00A |
| DC srovė (mA) | 8.000mA / 80.00mA / 800.0mA |
| DC Current (µA) | 800µA / 8000µA |
| Kintama srovė (A) | 8.000A / 20.00A |
| Kintama srovė (mA) | 8.000mA / 80.00mA / 800.0mA |
| AC Current (µA) | 800µA / 8000µA |
| Atsparumas | 800.0Ω / 8.000kΩ / 80.00kΩ / 800.0kΩ / 8.000MΩ / 80.00MΩ |
| Talpa | 9.999 nF / 99.99 nF / 999.9 nF / 9.999 µF / 99.99 µF / 999.9 µF / 9.999 mF / 99.99 mF |
| Dažnis | 9.999 Hz / 99.99 Hz / 999.9 Hz / 9.999 kHz / 99.99 kHz / 999.9 kHz / 9.999 MHz |
| Darbo ciklas | 1 % ~ 99 % |
| Temperatūros diapazonas | -20°C ~ 1000°C (-4°F ~ 1832°F) |
| Akumuliatoriaus testas | 1.5V / 9V / 12V |
| Range | Automatinis / rankinis |
| Atnaujinimo rodiklis | 3 kartus per sekundę |
| Tikras RMS | Taip |
| Duomenų sulaikymas | Taip |
| Foninis apšvietimas / žibintuvėlis | Taip |
| Įspėjimas apie išsikrovusią bateriją | Taip |
| Automatinis išjungimas | Taip |
| Medžiaga | ABS / PVC |
| Maitinimo šaltinis | Maitinamas baterijomis |
8. Garantija ir palaikymas
This product is covered by a standard manufacturer's warranty against defects in materials and workmanship. Please refer to the warranty card included with your purchase for specific terms and conditions. For technical support or service inquiries, please contact your retailer or the manufacturer's customer service department.
9. Oficialūs produktų vaizdo įrašai
Šiuo metu nėra jokių oficialių pardavėjo produktų vaizdo įrašų, kuriuos būtų galima įterpti.