
Streamlight 69414
„Streamlight TLR-8 X“ taktinio ginklo žibinto naudotojo vadovas
Modelis: 69414
Įvadas
The Streamlight 69414 TLR-8 X is a compact and durable tactical weapon light with an integrated red aiming laser, designed for enhanced performance in various environments. It provides 500 lumens of LED brightness and a 5,000 candela peak beam intensity, ensuring superior visibility and precise targeting. This manual provides detailed instructions for the safe and effective use, installation, and maintenance of your TLR-8 X.
Saugos informacija
ĮSPĖJIMAS:
Šiame gaminyje yra cheminių medžiagų, kurios Kalifornijos valstijoje žinomos kaip sukeliančios vėžį ir apsigimimus arba kitokią žalą reprodukcijai.
Always ensure the firearm is unloaded and safe before installing, removing, or performing any maintenance on the TLR-8 X. Keep fingers clear of the muzzle.
The laser is rated Class 3R, 640-660nm with an output of <5mW. Avoid direct eye exposure to the laser beam.
Pakuotės turinys
- TLR-8 X Flashlight with Integrated Red Aiming Laser
- 1x CR123A Battery
- High and Low Switches (pre-installed or included as options)
- Mounting Kit (includes various keys: UNIV-1, UNIV-2, UNIV-3, 1913-1, 1913-2, 1913-3, 1913-4, and any 1913 key)
- Key Box and Tool
- Naudotojo vadovas (šis vadovas)
Sąranka
1. Akumuliatoriaus įdėjimas
The TLR-8 X uses one CR123A battery. To install or replace the battery:
- Įsitikinkite, kad šaunamasis ginklas yra neužtaisytas ir saugus.
- Unscrew the face cap of the light by rotating it counter-clockwise.
- Insert the CR123A battery with the positive (+) end facing towards the light head.
- Screw the face cap back on clockwise until it is finger-tight.

Image: The TLR-8 X with its face cap unscrewed, showing the battery compartment and a CR123A battery ready for insertion.
2. Mounting to Firearm
The TLR-8 X features a robust rail clamp system for secure attachment and detachment without tools. Verify compatibility and fitment with your specific handgun model before purchase and installation.
- Įsitikinkite, kad šaunamasis ginklas yra neužtaisytas ir saugus.
- Select the appropriate key from the mounting kit that matches your firearm's rail type (e.g., UNIV-1 for most Glock models, 1913-1 for Sig Sauer 320 Compact).
- Atlaisvinkite bėgelį clamp screw on the TLR-8 X.
- Align the TLR-8 X with the firearm's accessory rail and slide it into position.
- Priveržkite bėgelį clamp screw until the light is securely fastened to the rail. Do not overtighten.

Image: A Streamlight TLR-8 X shown from the front-right angle, illustrating its compact design and rail clamp system for attachment to a firearm.

Paveikslėlis: Šoninė pusė view of the Streamlight TLR-8 X, highlighting its profile and the integrated laser emitter.
3. Rear Switch Options
The TLR-8 X comes with interchangeable rear paddle switches (high and low options) to suit user preference and firearm ergonomics. The default switches are typically the "high" profile.
- To change switches, ensure the unit is off and detached from the firearm.
- Carefully remove the existing paddle switches.
- Install the desired high or low profile switches by aligning them with the slots and pressing firmly until they click into place.
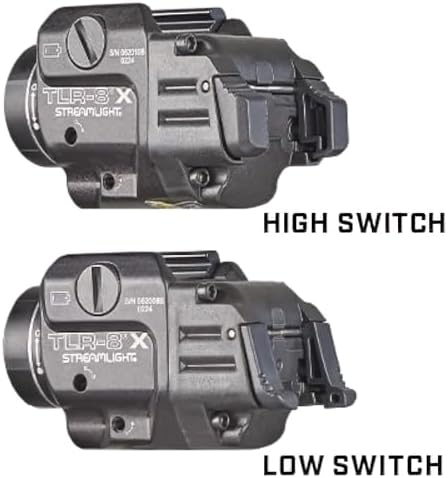
Image: A comparison showing the "High Switch" and "Low Switch" options for the TLR-8 X, illustrating the difference in their paddle profiles.
Naudojimo instrukcijos
1. Įjungimas / išjungimas ir režimo pasirinkimas
The TLR-8 X offers three primary modes: LED Light Only, LED Light & Laser, and Laser Only. Switching between modes is intuitive using the ambidextrous rear paddle switches.
- Momentinis aktyvavimas: Press and hold either paddle switch. Release to turn off.
- Nuolat įjungta: Press and release either paddle switch quickly. Press again to turn off.
- Perjungimo režimai: With the unit on, press and hold one paddle switch, then tap the other paddle switch to cycle through the modes (Light Only → Light & Laser → Laser Only).

Image: The Streamlight TLR-8 X shown with its red aiming laser activated, projecting a visible red dot.
2. Stroboskopinis režimas
The TLR-8 X features a user-enabled strobe mode for tactical situations.
- To activate strobe: From the "Constant On" mode, quickly double-tap either paddle switch.
- To deactivate strobe: Press either paddle switch once.
3. Safe Off Feature
The Safe Off feature prevents unintentional activation, conserving battery life and ensuring readiness. To engage Safe Off, rotate the face cap approximately 1/4 turn counter-clockwise until the light no longer activates. To disengage, rotate clockwise until it is finger-tight.
4. Laser Zeroing (Sighting In)
To ensure accurate aiming, the integrated red laser needs to be zeroed to your firearm. This process typically involves adjusting the laser's point of impact to match your firearm's point of aim.
- Įsitikinkite, kad šaunamasis ginklas yra neužtaisytas ir saugus.
- Mount the TLR-8 X securely to your firearm.
- Using the small hex wrench provided in the mounting kit, locate the windage (horizontal) and elevation (vertical) adjustment screws on the side and bottom of the unit.
- Make small adjustments to the screws. Turning the screw clockwise typically moves the laser in one direction, and counter-clockwise in the opposite. Test adjustments at a safe range.
- Fire a few rounds at a target to determine the point of impact relative to the laser dot. Adjust the laser until the point of impact aligns with the laser dot at your desired zeroing distance.
- Pastaba: Be careful not to strip the adjustment screws. Use a properly sized hex wrench.

Paveikslėlis: Galinis view of the Streamlight TLR-8 X, indicating the location of the windage and elevation adjustment screws for the laser.
Priežiūra
- Valymas: Naudokite minkštą, damp cloth to clean the exterior of the light. For the lens, use a lens cleaning cloth and solution designed for optics. Avoid abrasive materials.
- Baterijos keitimas: Replace the CR123A battery when the light output diminishes or the laser becomes dim. Always use high-quality batteries.
- O formos žiedai: Periodically inspect the O-rings for wear and tear. Lubricate with silicone grease if necessary to maintain water resistance.
- Saugykla: When storing the TLR-8 X for extended periods, remove the battery to prevent leakage and damage. Engage the Safe Off feature.
Trikčių šalinimas
| Problema | Galima priežastis | Sprendimas |
|---|---|---|
| Šviesa / lazeris neįsijungia. | Dead or improperly installed battery; Safe Off engaged. | Replace battery, ensuring correct polarity. Disengage Safe Off by tightening the face cap. |
| Šviesa blanki arba mirga. | Low battery; loose face cap. | Replace battery. Ensure face cap is finger-tight. |
| Laser cannot be zeroed or moves after firing. | Loose mounting; stripped adjustment screws; defective unit. | Ensure unit is securely mounted. Use proper tools for adjustment. If issues persist, contact Streamlight customer service. |
| Režimų perjungimo sunkumai. | Neteisinga mygtukų seka. | Review "Operating Instructions" for correct mode switching procedure. |
Specifikacijos
- Modelis: 69414
- Šviesos išvestis: 500 liumenų
- Didžiausias spindulio intensyvumas: 5000 kandelų
- Spindulio atstumas: 141 metrai
- Runtime (Light Only): 1.5 valandos
- Lazerio tipas: Red Aiming Laser (Class 3R, 640-660nm, <5mW output)
- Maitinimo šaltinis: 1x CR123A Battery (included)
- Medžiaga: Anodized Machined Aluminum
- Atsparumas vandeniui: IPX4 (atsparus vandeniui)
- Matmenys: 2.58 "D x 1.18" P x 1.5" A
- Svoris: 2.56 uncijos (0.16 svaro)
- Spalva: Juoda
- Montavimas: Bėgis Clamp System (compatible with UNIV-1, UNIV-2, UNIV-3, 1913-1, 1913-2, 1913-3, 1913-4, and any 1913 key)
Garantija ir palaikymas
The Streamlight TLR-8 X is backed by a Ribota viso gyvenimo garantija. For warranty claims, technical support, or service, please contact Streamlight customer service directly. Refer to the official Streamlight websvetainėje, kurioje rasite naujausią kontaktinę informaciją ir garantijos sąlygas.
Papildomų išteklių ir pagalbos taip pat galite rasti adresu „Streamlight“ parduotuvė „Amazon“ platformoje.
Susiję dokumentai - 69414
 |
„Streamlight TLR-7/TLR-8“ serijos prie ginklo tvirtinamo taktinio žibintuvėlio naudojimo instrukcijos Išsamios „Streamlight TLR-7“ ir „TLR-8“ serijos prie ginklų tvirtinamų taktinių žibintuvėlių naudojimo instrukcijos, apimančios saugą, montavimą, naudojimą, priežiūrą ir garantiją. |
 |
„Streamlight TLR-7/TLR-8“ serijos taktinio ginklo žibinto naudojimo instrukcija Išsamios naudojimo instrukcijos, saugos įspėjimai, įrengimo, priežiūros ir garantijos informacija, skirti „Streamlight TLR-7“ ir „TLR-8“ serijos taktiniams ginklų žibintams. |
 |
Streamlight TLR-9 & TLR-10 Series: Operating Instructions and Safety Guide This document provides comprehensive operating instructions, safety guidelines, and maintenance information for the Streamlight TLR-9 and TLR-10 series weapon-mounted tactical flashlights. |
 |
„Streamlight TLR-1/TLR-2“ serijos ginklų žibintuvėlio naudojimo instrukcija ir instrukcijos Išsamios „Streamlight TLR-1“ ir „TLR-2“ serijos prie ginklų tvirtinamų žibintų naudojimo instrukcijos, saugos įspėjimai, įrengimo ir priežiūros vadovas. Įtraukta informacija apie lazerio nulio nustatymą, baterijų keitimą ir garantiją. |
 |
„Streamlight TLR-1“ ir „TLR-2“ serijos ginklų žibintuvėlių naudojimo instrukcijos ir vadovas Išsamios naudojimo instrukcijos, saugos gairės, įrengimo, tvirtinimo ir priežiūros informacija, skirta „Streamlight TLR-1“ ir „TLR-2“ serijos taktiniams prie ginklų montuojamiems žibintams. |
 |
„Streamlight TLR RM 1 / TLR RM 2“ serijos prie ginklo tvirtinamo taktinio žibintuvėlio naudojimo instrukcijos Išsamios „Streamlight TLR RM 1“ ir „TLR RM 2“ serijos taktinių žibintuvėlių naudojimo instrukcijos ir saugos gairės. Apima įrengimo, baterijų keitimo, jungiklių funkcijų, priežiūros, garantijos ir aptarnavimo informaciją. |
Ask a question about this manual
Ask about setup, troubleshooting, compatibility, parts, safety, or missing instructions. Manuals+ will review the question and use this page’s manual context to help answer it.