
Įvadas
The Streamlight TLR-9 Flex is a low-profile, rail-mounted tactical light designed for full-frame weapons. It features a powerful LED, ambidextrous rear switches, and a durable aluminum construction. This manual provides essential information for the safe and effective use of your TLR-9 Flex.

Vaizdas: Priekinis kampas view of the Streamlight TLR-9 Flex Tactical Light, showcasindėl kompaktiško dizaino ir integruoto tvirtinimo prie bėgelio.
Sąranka
1. Akumuliatoriaus įdėjimas
- Ensure the light is in the "Safe off" position by unscrewing the bezel until you feel it stop. This prevents accidental activation and conserves battery life.
- Insert two CR123A lithium batteries into the battery compartment, observing the correct polarity as indicated inside the light.
- Securely screw the bezel back into place.
Pastaba: Only use CR123A lithium batteries. Always dispose of used batteries responsibly.
2. Rail Mounting
The TLR-9 Flex features a rail clamp designed for rapid attachment and detachment from full-frame weapons. A key kit is included to ensure proper fitment on various rail types.
- Select the appropriate key from the included kit that matches your weapon's rail system.
- Atlaisvinkite bėgelį clamp prisukite TLR-9 Flex.
- Align the light with the rail and slide it into position. Ensure the selected key engages with the rail slot.
- Priveržkite bėgelį clamp screw firmly to secure the light. Do not overtighten.

Image: The Streamlight TLR-9 Flex Tactical Light securely mounted on the rail of a firearm, demonstrating its low-profile integracija.
3. Switch Installation (High/Low Options)
The TLR-9 Flex comes with interchangeable high and low ambidextrous rear switches to customize the ergonomic feel based on your shooting style.
- Identify the currently installed switch type (High or Low).
- To change, carefully remove the existing switch by following the instructions provided in the detailed diagram (if available) or by gently prying it off.
- Align the desired High or Low switch with the contact points and press firmly until it clicks into place.

Image: The High Switch component, offering a more pronounced activation surface.
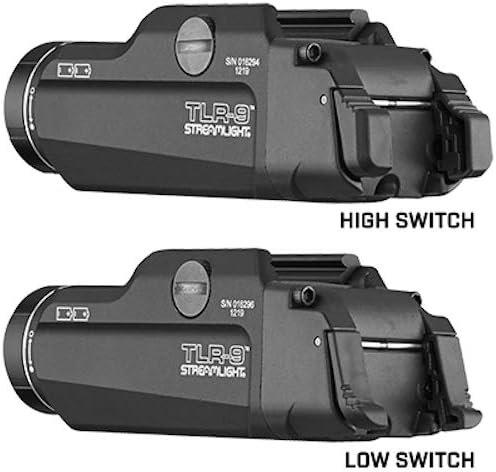
Image: The Low Switch component, providing a more recessed activation surface.

Image: The TLR-9 Flex with the High Switch installed, showing its extended profile.

Image: The TLR-9 Flex with the Low Switch installed, showing its more compact profile.
Naudojimo instrukcijos
1. Pagrindinė operacija
The TLR-9 Flex features ambidextrous rear switches for momentary or constant-on operation.
- Momentary On: Press and hold either rear switch. The light will remain on as long as the switch is held. Release to turn off.
- Nuolat įjungta: Press and quickly release either rear switch. The light will remain on until the switch is pressed and released again.
2. Strobe Function
The TLR-9 Flex includes a user-enabled strobe function.
- To activate the strobe, rapidly press either rear switch twice (double-tap).
- To deactivate the strobe and return to constant-on mode, press and release either switch once.
The white LED produces 1,000 lumens with 10,000 candela, providing a 200-meter beam distance. Runtime is approximately 1.5 hours in constant-on mode and 3 hours in strobe mode.
Priežiūra
1. Baterijos keitimas
When the light output diminishes, it is time to replace the batteries. Follow the battery installation steps outlined in the Setup section.
2. Valymas
Regular cleaning will help maintain the performance and longevity of your TLR-9 Flex.
- Šviestuvo išorę nuvalykite minkšta,amp audinys.
- Clean the lens with a lens cleaning cloth or cotton swab to remove dirt and smudges. Avoid abrasive materials.
- Ensure the O-rings are free of debris and lightly lubricated to maintain water resistance.
3. Sandėliavimas
When storing the TLR-9 Flex for extended periods, remove the batteries to prevent potential leakage and damage to the device.
Trikčių šalinimas
- Šviesa neįsijungia: Check battery polarity. Ensure batteries are fresh. Confirm the bezel is fully tightened (out of "Safe off" mode).
- Silpna šviesa: Replace batteries with fresh ones. Clean the lens.
- Pertraukiamas veikimas: Užtikrinti bėgių clamp is securely tightened. Check battery contacts for corrosion.
If issues persist, contact Streamlight customer support.
Specifikacijos
| Funkcija | Detalė |
|---|---|
| Modelio numeris | 69464 |
| Šviesos srautas (baltas LED) | 1000 liumenų |
| Kandela | 10,000 |
| Sijos atstumas | 200 metrų |
| Runtime (Constant On) | 1.5 valandos |
| Vykdymo laikas (Blyksniai) | 3 valandos |
| Maitinimo šaltinis | 2 x CR123A ličio baterijos (pridedamos) |
| Medžiaga | 6000 serijos apdirbtas orlaivių aliuminis |
| Baigti | Juodai anoduotas |
| Matmenys (I x P x A) | 3.87 colio x 1.18 colio x 1.27 colio (9.82 cm x 2.98 cm x 3.22 cm) |
| Prekės svoris | 4.3 uncijos (121.9 gramų) |
| Atsparumo vandeniui lygis | Atsparus vandeniui |
| Įtraukti komponentai | Light, Key Kit, High Switch (Mounted), Low Switch, Batteries |

Image: A diagram illustrating the key dimensions and performance specifications of the Streamlight TLR-9 Flex Tactical Light.
Informacija apie garantiją
„Streamlight TLR-9 Flex“ yra padengtas Ribota viso gyvenimo garantija. For specific terms and conditions, please refer to the official Streamlight warranty documentation or their websvetainę.
Palaikymas
For technical assistance, replacement parts, or warranty claims, please contact Streamlight customer service directly. Visit the official Streamlight websvetainėje, kurioje rasite kontaktinę informaciją ir papildomus išteklius.