
Įvadas
This manual provides essential information for the safe and efficient operation of your Overmax MULTIPIC 3.5 Projector. Please read it thoroughly before use and retain it for future reference.
Saugos informacija
ĮSPĖJIMAS: kad sumažintumėte gaisro ar elektros smūgio pavojų, nelaikykite šio prietaiso nuo lietaus ar drėgmės.
- Do not block any ventilation openings. Ensure adequate space around the projector for proper airflow.
- Nemontuokite šalia jokių šilumos šaltinių, pvz., radiatorių, šilumokaičių, viryklių ar kitų įrenginių (įskaitant ampkeltuvai), kurie gamina šilumą.
- Saugokite, kad maitinimo laidas nebūtų užeinamas ar užspaudžiamas, ypač prie kištukų, patogių talpyklų ir vietų, kur jie išeina iš prietaiso.
- Naudokite tik gamintojo nurodytus priedus/priedus.
- Atjunkite šį prietaisą iš elektros tinklo žaibuojant arba kai jis nenaudojamas ilgą laiką.
- Visus techninės priežiūros darbus patikėkite kvalifikuotam techninės priežiūros personalui. Techninė priežiūra reikalinga, kai aparatas buvo kaip nors pažeistas, pvz., pažeistas maitinimo laidas arba kištukas, į aparatą išsiliejo skystis ar įkrito daiktai, aparatas buvo paveiktas lietaus ar drėgmės, neveikia normaliai. , arba buvo numestas.
- Nežiūrėkite tiesiai į projektoriaus objektyvą, kai lamp yra įjungtas.
Pakuotės turinys
Patikrinkite, ar pakuotėje yra visi reikalingi daiktai:
- Overmax MULTIPIC 3.5 Projector
- Nuotolinio valdymo pultas
- Maitinimo kabelis
- HDMI kabelis
- AV kabelis (RCA)
- Vartotojo vadovas (šis dokumentas)
Produktas baigtasview
Familiarize yourself with the projector's components and connection ports.

1 paveikslas: Overmax MULTIPIC 3.5 Projector and Remote Control. This image displays the projector from the front-right angle, showing the lens, the Overmax logo, ventilation grilles, and the included remote control.

2 paveikslas: Top Panel Controls. This image highlights the manual focus and keystone correction dials, along with the directional pad and function buttons on the top surface of the projector.

3 paveikslas: Rear Connection Panel. This view shows the AV input, two HDMI ports (HDMI1, HDMI2), and a USB port for connecting various devices.

4 paveikslas: Side VGA Port. This image displays the VGA (D-sub) input port located on the side of the projector, used for connecting older computers or monitors.
Sąranka
1. Pradinis paskirstymas
Place the projector on a stable, flat surface or mount it on a tripod or ceiling. Ensure the projector is positioned at an appropriate distance from the projection surface to achieve the desired screen size.
2. Maitinimo prijungimas
- Prijunkite maitinimo laidą prie projektoriaus maitinimo įvesties.
- Kitą maitinimo laido galą prijunkite prie tinkamo elektros lizdo.
- Paspauskite maitinimo mygtuką ant projektoriaus arba nuotolinio valdymo pulto, kad įjungtumėte įrenginį.
3. Išorinių įrenginių prijungimas
The MULTIPIC 3.5 supports various input sources:
- HDMI: Use an HDMI cable to connect devices like laptops, Blu-ray players, or gaming consoles to the HDMI1 or HDMI2 ports.
- USB: Įkiškite USB atmintinę į USB prievadą, kad galėtumėte leisti mediją files tiesiogiai.
- VGA: Connect older computers using a VGA cable to the D-sub port.
- APIE: Use the included AV cable to connect devices with composite video and stereo audio outputs.
4. „Wi-Fi“ ryšys
To access online features like YouTube or screen mirroring, connect the projector to a Wi-Fi network.
- Navigate to the projector's settings menu.
- Select "Network" or "Wi-Fi settings".
- Iš sąrašo pasirinkite norimą „Wi-Fi“ tinklą.
- Jei būsite paraginti, įveskite tinklo slaptažodį.

5 paveikslas: Projector Wi-Fi Connectivity. This image illustrates the projector's ability to connect wirelessly to a Wi-Fi router for internet access and streaming.
5. Screen Mirroring (Miracast / AirPlay)
The projector supports wireless display from compatible smartphones, tablets, and computers.
- Ensure both the projector and your mobile device are connected to the same Wi-Fi network.
- On the projector, select the Miracast or AirPlay input source.
- On your mobile device, activate the screen mirroring function (e.g., "Smart View" on Android, "Screen Mirroring" on iOS).
- Pasirinkite projektorių iš galimų įrenginių sąrašo.
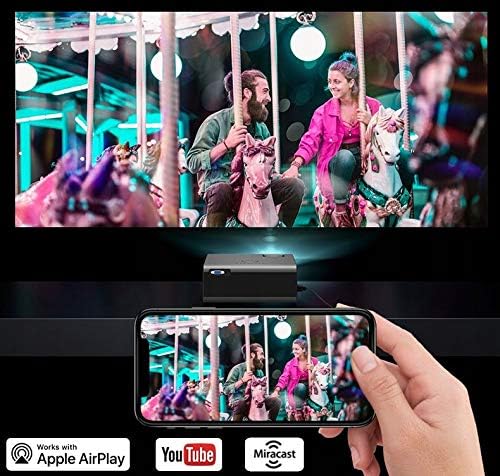
6 paveikslas: Wireless Screen Mirroring. This image demonstrates a smartphone wirelessly casting its display to the projector, utilizing Miracast or AirPlay functionality.
Naudojimo instrukcijos
1. Pagrindiniai valdikliai
The projector can be controlled using the on-device buttons or the included remote control.
- Maitinimo mygtukas: Įjungia arba išjungia projektorių.
- Šaltinio mygtukas: Cycles through input sources (HDMI1, HDMI2, USB, VGA, AV, Miracast/AirPlay).
- Naršymo mygtukai (aukštyn / žemyn / kairėn / dešinėn / gerai): Naudojamas naršyti meniu ir patvirtinti pasirinkimus.
- Meniu mygtukas: Pasiekia pagrindinį nustatymų meniu.
- Back/Exit Button: Grąžina į ankstesnį ekraną arba išeina iš dabartinio meniu.
2. Vaizdo koregavimas
- Fokusas: Rotate the focus ring on the projector lens (refer to Figure 2) until the image appears sharp and clear.
- Keystone korekcija: Adjust the keystone dial (refer to Figure 2) to correct trapezoidal distortion if the projector is not perfectly perpendicular to the screen.
- Kraštinių santykis: In the settings menu, you can change the aspect ratio between 16:9 and 4:3 to match your content. The image can also be rotated 180 degrees for ceiling mounting.

7 paveikslas: Display Resolution Example. This image illustrates the native 1280x720 resolution capability of the projector, providing clear visuals.
3. Garso nustatymai
The built-in speaker can be adjusted for different audio profiles:
- Access the audio settings in the main menu.
- Select from three preset modes: Music, Voice, or Movie.
- An advanced equalizer is available for fine-tuning audio parameters.
- For external audio, connect speakers or headphones to the audio output port.
4. Integruotų programų naudojimas
The projector comes with pre-installed applications like YouTube and KoalaTV.
- Įsitikinkite, kad projektorius prijungtas prie „Wi-Fi“ tinklo.
- From the main interface, select the desired application icon.
- Use the remote control to navigate and select content within the application.
Priežiūra
1. Lamp Gyvenimas
Projektorius lamp is designed for extended operation, with an estimated lifespan of up to 50,000 hours. No regular lamp replacement is typically required under normal usage conditions.

8 paveikslas: Internal Optical System. This diagram illustrates the sophisticated optical components and light path within the projector, contributing to its image quality and lamp ilgaamžiškumas.
2. Valymas
- Objektyvas: Švelniai nuvalykite projektoriaus objektyvą minkštu, nepūkuotu audiniu, specialiai skirtu optiniams paviršiams. Nenaudokite abrazyvinių valiklių.
- Išorė: Clean the projector's exterior with a soft, dry cloth. For stubborn marks, a slightly damp galima naudoti šluostę, po to – sausą šluostę.
- Vėdinimo angos: Periodically check and clean the ventilation grilles to prevent dust buildup, which can affect performance and lifespan. Use a soft brush or compressed air.
Trikčių šalinimas
| Problema | Galima priežastis | Sprendimas |
|---|---|---|
| Vaizdas nerodomas | Power not connected; Incorrect input source; Cable not properly connected. | Check power cable; Select correct input source (HDMI, USB, VGA, AV); Ensure all cables are securely connected. |
| Vaizdas neryškus | Nenustatytas fokusavimas; projektorius per arti/per toli nuo ekrano. | Adjust the focus ring on the lens; Reposition the projector for optimal distance. |
| Vaizdas yra trapecijos formos | Keystone nepataisytas. | Sureguliuokite trapecijos korekcijos ratuką. |
| Nėra garso | Per mažas garsumas; Nutildytas garsas; Pasirinkta neteisinga garso išvestis; Išorinio įrenginio garso problema. | Increase volume; Unmute; Check audio settings; Verify audio output on connected device. |
| „Wi-Fi“ ryšys nestabilus | Weak signal; Incorrect password; Router issue. | Ensure projector is within Wi-Fi range; Re-enter password; Restart router and projector. |
| Nuotolinio valdymo pultas neveikia | Batteries depleted; Obstruction between remote and projector; Remote sensor blocked. | Replace batteries; Remove obstructions; Ensure remote is pointed at the projector's IR sensor. |
Specifikacijos
| Funkcija | Detalė |
|---|---|
| Modelis | MULTIPIC 3.5 |
| Prekės ženklas | Overmax |
| Ekrano technologija | LED |
| Gimtoji raiška | 1280 x 720 (HD) |
| Palaikoma rezoliucija | Iki 1920 x 1080 (Full HD) raiška |
| Ryškumas | 2200 liumenų |
| Kontrasto santykis | 1500:1 |
| Maksimalus vaizdo dydis | 150 colių |
| Lamp Gyvenimas | Iki 50,000 valandų |
| Ryšys | 2x HDMI, 1x USB, 1x VGA (D-sub), 1x AV, Wi-Fi, Bluetooth, IR |
| Ypatingos savybės | Built-in Wi-Fi, YouTube, Miracast, AirPlay, Keystone Correction, Advanced Equalizer |
| Palaikomi medijos formatai | MPEG4, DIVX, XVID, AVI, WMA, MP3, JPEG, BMP, PNG, MOV |
| Krašto santykis | 16:9, 4:3 |
| Matmenys (I x P x A) | 21.5 x 18.5 x 8.7 cm |
| Svoris | 1.5 kg |
| Montavimo tipas | Tripod, Ceiling Mount |
Garantija ir palaikymas
For warranty information and technical support, please refer to the official Overmax websvetainėje arba susisiekite tiesiogiai su jų klientų aptarnavimo tarnyba. Išsaugokite pirkimo kvitą kaip pirkimo įrodymą.
Dėl papildomos pagalbos apsilankykite Overmax official websvetainę.