
1. Įvadas
This manual provides detailed instructions for the installation, operation, and maintenance of your ASRock B550M Steel Legend motherboard. Designed for daily users and mainstream enthusiasts, this motherboard offers robust performance and a comprehensive feature set for AMD AM4 Ryzen processors.
Key features include support for 3rd Gen AMD AM4 Ryzen and future AMD Ryzen processors, a 10 Power Phase Design with Dr. MOS, DDR4 4733+ (OC) memory support, and multiple PCIe slots including PCIe 4.0 x16. It also features a flexible integrated I/O shield, USB 3.2 Gen2 Type-A+C (10Gbps), Dragon 2.5Gb LAN, and premium audio packages.

Figure 1.1: ASRock B550M Steel Legend Motherboard Overview
2. Sąranka ir diegimas
Prieš pradėdami diegimą, įsitikinkite, kad jūsų sistema yra išjungta ir atjungta nuo maitinimo šaltinio. Imkite pagrindinę plokštę už kraštų, kad išvengtumėte statinės iškrovos.
2.1 Komponento identifikavimas
Susipažinkite su įvairiais pagrindinės plokštės komponentais ir jungtimis.
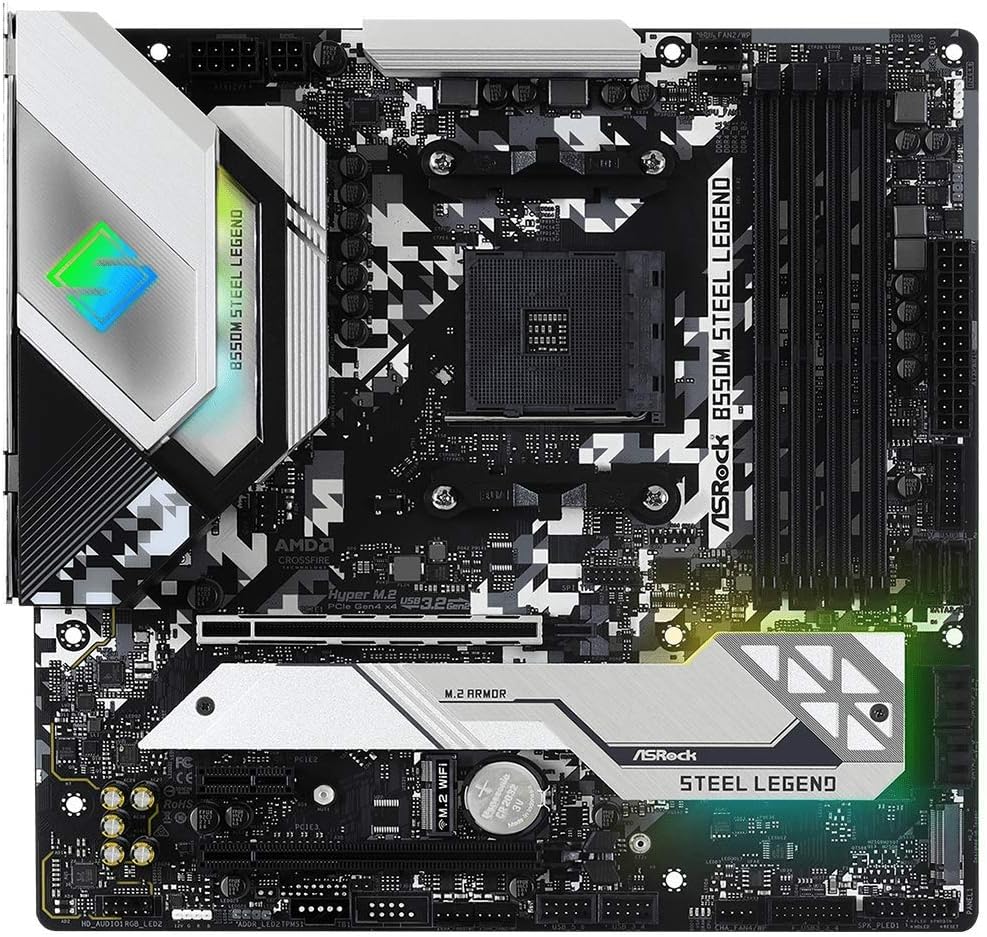
Figure 2.1: Motherboard Layout

Figure 2.2: Key Features - CPU, Memory, and M.2 Sockets

Figure 2.3: Key Features - I/O and Connectivity

Figure 2.4: Key Features - Power Delivery and Cooling
2.2 Procesoriaus diegimas
This motherboard supports AMD AM4 socket processors. Carefully align the CPU with the socket, ensuring the golden triangle on the CPU matches the triangle on the socket. Lower the retention arm to secure the CPU.
2.3 Atminties (RAM) diegimas
Insert DDR4 memory modules into the DIMM slots. Ensure the notches on the modules align with the slots. Press down firmly on both ends until the clips lock into place. This motherboard supports DDR4 4733+ (OC) memory.
2.4 Saugojimo įrenginio įrengimas
Install M.2 SSDs into the Hyper M.2 sockets (PCIe Gen4x4) and SATA drives into the available SATA 3 ports. Secure M.2 drives with the provided screw.
2.5 Išplėtimo plokštės diegimas
Install graphics cards into the PCIe 4.0 x16 slot and other expansion cards into the PCIe 3.0 x16 or PCIe 3.0 x1 slots. Ensure cards are seated firmly and secured with a screw to the chassis.
2.6 Maitinimo jungtys
Connect the 24-pin ATX power connector and the 8+4 pin Hi-Density power connector from your power supply to the motherboard.
2.7 Priekinio skydelio ir periferinių įrenginių jungtys
Connect front panel headers (power button, reset button, USB, audio) according to the motherboard manual. Connect peripherals such as USB devices, display cables (HDMI, DisplayPort), and network cables to the rear I/O panel.
2.8 Pradinis paleidimas ir BIOS konfigūracija
After all components are installed and connected, power on your system. Access the BIOS/UEFI setup utility by pressing the designated key (usually DEL or F2) during startup. Configure boot order, system time, and other necessary settings. Ensure the latest BIOS version is installed for optimal compatibility with AMD Ryzen 5000/4000/3000 Series processors.
Video 2.1: Product Demonstration Video. This video provides a visual overview of the motherboard and its components, which can assist with initial setup and identification.
3. Naudojimo instrukcijos
3.1 BIOS/UEFI Interface
The UEFI (Unified Extensible Firmware Interface) provides a graphical interface for system configuration. Navigate using a mouse or keyboard. Key sections include:
- Pagrindinis: System information, date, and time.
- OC koregavimas: CPU ir atminties perkrovimo nustatymai.
- Išplėstinė: Configuration for CPU, storage, chipset, and onboard devices.
- Įrankis: BIOS update utility (Instant Flash), Polychrome RGB.
- Įkrovimas: Boot device priority and boot options.
- Saugumas: Slaptažodžio nustatymai.
- Išeiti: Save and exit, discard changes.
3.2 Tvarkyklės diegimas
After installing your operating system (Windows 10 is supported), install the necessary drivers for the chipset, LAN, audio, and other onboard devices. These can typically be found on the ASRock support websvetainė, skirta jūsų konkrečiam pagrindinės plokštės modeliui.
3.3 ASRock Software Utilities
ASRock provides various software utilities to enhance your experience, including:
- ASRock App Shop: For downloading and updating drivers and utilities.
- ASRock Polychrome SYNC: For controlling the motherboard's RGB lighting and synchronizing with compatible components.
- Nahimic Audio: Geresnei garso patirčiai.
4. Priežiūra
4.1 BIOS naujinimai
Reguliariai tikrinkite ASRock website for BIOS updates. BIOS updates can improve system stability, add support for new CPUs, and fix bugs. Follow the instructions provided by ASRock carefully when performing a BIOS update to avoid system damage.
4.2 Vairuotojų atnaujinimai
Keep your system drivers updated to ensure optimal performance and compatibility. Use the ASRock App Shop or visit the ASRock support webSvetainė, kurioje galima atsisiųsti naujausius tvarkykles.
4.3 Fizinis valymas
Periodically clean your computer's interior to prevent dust buildup, which can lead to overheating and reduced performance. Use compressed air to remove dust from fans, heatsinks, and motherboard components. Ensure the system is powered off and unplugged before cleaning.
5. Problemų sprendimas
5.1 Nėra maitinimo / Neįkraunama
- Verify all power cables (24-pin ATX, 8+4 pin CPU) are securely connected to the motherboard and power supply.
- Įsitikinkite, kad maitinimo jungiklis yra ĮJUNGTOJE padėtyje.
- Patikrinkite priekinio skydelio maitinimo mygtuko jungtis.
- Patikrinkite maitinimo šaltinį naudodami kitą sistemą arba maitinimo šaltinio testerį.
5.2 Nėra ekrano išvesties
- Ensure the monitor is connected to the correct graphics output (either integrated graphics on APU or dedicated graphics card).
- Iš naujo įstatykite grafikos plokštę ir atminties modulius.
- If using a dedicated graphics card, ensure it is properly powered.
- Pabandykite paleisti sistemą tik su viena RAM atmintimi.
5.3 Neaptiktas komponentas
- Saugykla: Check SATA data and power cables. For M.2 drives, ensure they are properly seated and secured. Verify settings in BIOS/UEFI.
- RAM: Reseat modules. Ensure they are in the correct slots for dual-channel operation (refer to motherboard manual for specific slot configuration).
- Išoriniai įrenginiai: Try different USB ports. Ensure drivers are installed.
5.4 Sistemos nestabilumas / gedimai
- Įsitikinkite, kad visos tvarkyklės yra atnaujintos.
- Check CPU and GPU temperatures to rule out overheating.
- Paleiskite atminties diagnostikos įrankius, kad patikrintumėte, ar nėra sugedusios RAM.
- Jei padidinate spartinimą, grįžkite į numatytuosius nustatymus, kad patikrintumėte stabilumą.
6. Specifikacijos
Below are the detailed specifications for the ASRock B550M Steel Legend Motherboard:
| Funkcija | Detalė |
|---|---|
| Prekės ženklas | ASRock |
| Modelio pavadinimas | B550M STEEL LEGEND |
| CPU lizdas | Lizdas AM4 |
| Suderinami procesoriai | AMD Ryzen 5000/4000/3000 serija |
| Lustų rinkinio tipas | AMD B550 |
| RAM atminties technologija | DDR4 |
| Atminties laikrodžio greitis | 2400 MHz (Supports up to 4733+ OC) |
| Galimi atminties lizdai | 4 (dviejų kanalų) |
| Ram Memory Maximum Size | 128 GB |
| Grafikos plokštės sąsaja | PCI Express (1x PCIe 4.0 x16, 1x PCIe 3.0 x16, 1x PCIe 3.0 x1) |
| Total PCIe Ports | 4 |
| Grafikos išvesties parinktys | HDMI, „DisplayPort“ |
| Iš viso SATA prievadų | 6 (SATA 3) |
| M.2 Lizdai | 2 (Hyper M.2 Sockets, PCIe Gen4x4) |
| USB 2.0 prievadai | 2 (Internal headers) |
| Iš viso USB prievadų | 12 (Includes USB 3.2 Gen2 Type-A+C 10Gbps) |
| Ethernet prievadų skaičius | 1 (Dragon 2.5Gb LAN) |
| Garso kodekas | Realtek ALC1220/ALC1200 Audio Codec, Nahimic Audio |
| Pagrindinės maitinimo jungties tipas | 24-Pin ATX |
| CPU maitinimo jungtis | 8+4 Pin Hi-Density |
| Platforma | Windows 10 |
| Prekės matmenys P x P x A | 11.5 colio ilgio x 2.8 colių pločio x 12 colio aukščio |
| Prekės svoris | 1 kg |

Figure 6.1: Detailed CPU Support List
7. Garantija ir palaikymas
7.1 Gaminio garantija
The ASRock B550M Steel Legend motherboard comes with a 3 metų garantija from the date of purchase. This warranty covers defects in materials and workmanship under normal use. For specific terms and conditions, please refer to the warranty card included with your product or visit the official ASRock websvetainę.
7.2 Techninė pagalba
For technical assistance, driver downloads, BIOS updates, or further troubleshooting, please visit the official ASRock support website. You can typically find FAQs, knowledge bases, and contact information for customer service there.
ASRock oficialus Websvetainė: www.asrock.com