
1. Įvadas
The AVMATRIX VS0601 is a compact, multi-format video switcher designed for professional video production. It features a robust metal housing and supports 6 channels of SDI and HDMI inputs, offering versatile video switching, audio mixing, and various transition effects. The unit is engineered for compatibility with diverse equipment, providing flexibility for live events and broadcast applications.
Pagrindinės funkcijos:
- 6 channel inputs: 4xSDI and 2xHDMI inputs
- 2xSDI & 1xHDMI PGM outputs, 1xSDI AUX output, 1xSDI & 1xHDMI multiview išėjimai
- T-Bar/ AUTO/ CUT transitions and MIX/ FADE/ WIPE effects
- Picture-in-Picture (PiP) mode with adjustable size and position
- Audio mixer: 3.5mm stereo/ RCA audio & SDI/ HDMI embedded audio
- GPIO sąsaja, skirta tiesioginių skaičiavimų sistemai
- FTB (Fade to Black) function for emergency situations
2. Sąranka
2.1 Išpakavimas ir patikrinimas
Carefully unpack the VS0601 switcher and inspect it for any signs of damage. Ensure all components listed in the packaging are present.
2.2 Maitinimo prijungimas
- Connect the provided DC 12V power adapter to the 'DC 12V' input port on the rear panel of the VS0601.
- Įkiškite maitinimo adapterį į tinkamą elektros lizdą.
- Ensure the 'OFF/ON' switch on the rear panel is in the 'OFF' position before connecting power.
2.3 Vaizdo įvesties jungtys
The VS0601 supports both SDI and HDMI video inputs. The device auto-detects the input signal format.
- SDI įėjimai: Connect up to four SDI sources (cameras, media players, etc.) to the 'SDI IN' ports (1-4) using BNC cables.
- HDMI įėjimai: Connect up to two HDMI sources to the 'HDMI IN' ports (5-6) using HDMI cables.
2.4 Vaizdo išvesties jungtys
The switcher provides multiple program (PGM) and multiview išėjimai.
- PGM Outputs: Connect your main display or recording device to the 'PGM OUT' SDI (x2) or HDMI (x1) ports.
- AUX išvestis: Use the 'AUX' SDI output for an additional program feed.
- Keliview Išėjimai: Connect a monitor to the 'MULTIVIEW OUT' SDI or HDMI ports to view all input sources simultaneously.
2.5 Garso jungtys
- Garso įvestis: Connect external audio sources to the 3.5mm stereo audio input or the RCA (L/R) audio input ports.
- Garso išvestis: Connect monitoring headphones or speakers to the 3.5mm stereo audio output or the RCA (L/R) audio output ports.
2.6 Kitos jungtys
- TALLY: Connect a tally system to the DB-15 GPIO interface for live production cues.
- LAN: Use the RJ45 LAN port for network control and time synchronization.

Figure 2.1: Rear panel connections of the AVMATRIX VS0601. This image displays the various input and output ports including SDI IN, HDMI IN, PGM OUT, MULTIVIEW OUT, AUX, Audio IN/OUT, TALLY, LAN, and DC 12V power input.
3. Naudojimo instrukcijos
3.1 Įjungimas / išjungimas
- To power on, switch the 'OFF/ON' toggle on the rear panel to the 'ON' position.
- To power off, switch the 'OFF/ON' toggle to the 'OFF' position.
3.2 Priekinio skydelio valdikliaiview
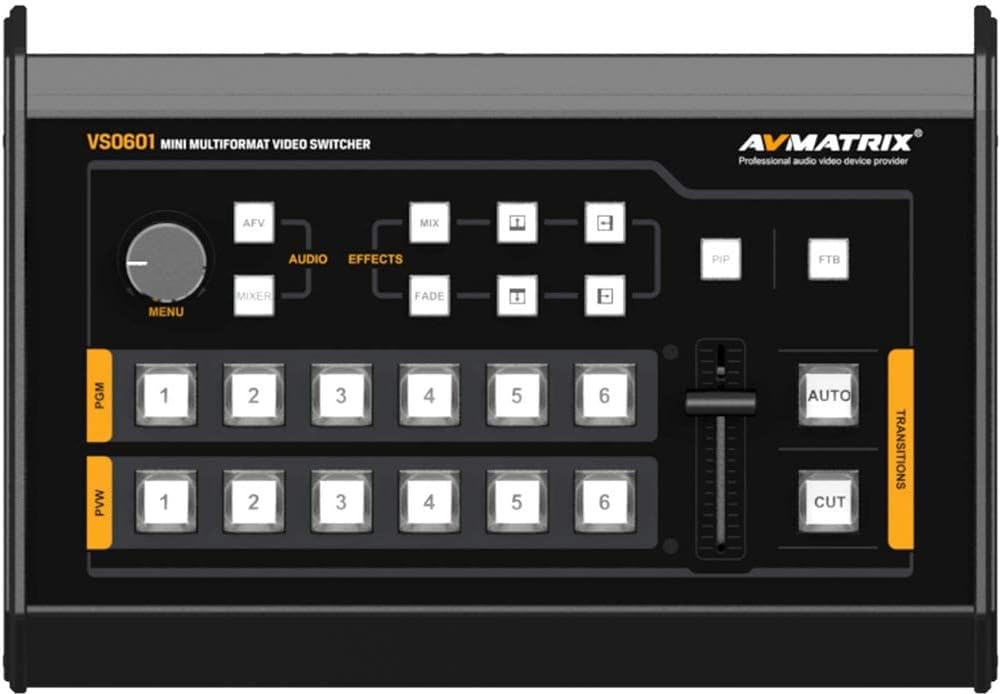
Figure 3.1: Front control panel of the AVMATRIX VS0601. This image highlights the PGM and PVW input selection buttons, T-Bar fader, AUTO/CUT transition buttons, MENU knob, and effect selection buttons (MIX, FADE, WIPE, PiP, FTB).
3.3 Input Selection (PGM & PVW)
The front panel features two rows of numbered buttons (1-6) for Program (PGM) and Preview (PVW) selection.
- PGM (Program): The top row of buttons selects the input currently live on the main output.
- PVW (Preview): The bottom row of buttons selects the input to be prepared for the next transition. This input will be visible on the multiview išvestis.
3.4 Perėjimai
The VS0601 offers various transition methods and effects.
- Pjaustyti: Press the 'CUT' button for an instant, hard cut between the PVW and PGM sources.
- AUTOMATINIS: Press the 'AUTO' button to execute a smooth transition (e.g., fade, wipe) between PVW and PGM sources at a preset speed.
- T-baras: Manually control the transition speed and direction by moving the T-Bar fader. Pushing the T-Bar up or down will transition between the PVW and PGM sources.
- Effects (MIX, FADE, WIPE): Select the desired transition effect (MIX, FADE, WIPE) using the dedicated buttons above the T-Bar. The selected effect will be applied when using the AUTO button or T-Bar.
3.5 Picture-in-Picture (PiP) Mode
Activate PiP mode by pressing the 'PiP' button. Use the 'MENU' knob and associated buttons to adjust the size and position of the PiP window. The PiP source is typically the PVW input, overlaid on the PGM input.
3.6 Garso maišymas
The audio mixer allows control over embedded SDI/HDMI audio and external analog audio inputs.
- Use the 'AUDIO' buttons and 'MENU' knob to navigate and adjust audio levels for each input.
- The 3.5mm stereo and RCA inputs can be mixed with embedded audio from video sources.
3.7 FTB (Fade to Black)
Press the 'FTB' button to instantly fade the program output to black. Press it again to return to the previous program source.
4. Priežiūra
4.1 Valymas
To maintain optimal performance and appearance, regularly clean the exterior of the VS0601.
- Use a soft, dry cloth to wipe down the unit.
- Įsisenėjusioms dėmėms lengvai nuvalykiteamplt šluostę nuvalykite vandeniu arba švelniu, neabrazyviniu valikliu.
- Venkite naudoti stiprias chemines medžiagas, tirpiklius ar abrazyvines medžiagas, nes jos gali pažeisti apdailą.
- Ensure no liquids enter the device through vents or ports.
4.2 Aplinkos sąlygos
Operate the VS0601 within the specified environmental ranges to prevent damage and ensure longevity.
- Darbinė temperatūra: -20 iki 60°C (nuo -4 iki 140°F)
- Laikymo temperatūra: -30 iki 70°C (nuo -22 iki 158°F)
- Darbinė drėgmė: 20 % ~ 70 % RH (nekondensuojantis)
Avoid exposing the unit to extreme temperatures, direct sunlight, excessive dust, or high humidity.
4.3 Power Supply Care
Always use the original power adapter provided with the unit. Do not use damaged cables or adapters. Disconnect power during electrical storms or when the unit is not in use for extended periods.
5. Problemų sprendimas
This section addresses common issues you might encounter with the AVMATRIX VS0601. If problems persist, contact customer support.
5.1 Nėra vaizdo išvesties
- Patikrinkite galią: Ensure the unit is powered on and the power adapter is securely connected.
- Verify Input Sources: Confirm that all video input sources are active and sending a signal.
- Patikrinkite kabelius: Ensure all SDI and HDMI cables are securely connected to both the switcher and the display/recording device. Try swapping cables if possible.
- Įvesties pasirinkimas: Verify that the correct input is selected on the PGM row of buttons.
- Išvesties formatas: Check if the output format of the VS0601 is compatible with your display/recording device. The PGM output can be scaled.
5.2 Nėra garso išvesties
- Check Audio Connections: Ensure external audio cables are properly connected to the audio input/output ports.
- Garso lygiai: Verify that audio levels are not muted or set too low in the audio mixer settings.
- Įdėtasis garsas: If using embedded audio, confirm the source device is sending audio with the video signal.
5.3 Device Freezes or Unexpected Power Loss
- Maitinimas: Ensure the power adapter is providing stable 12V, 2A power. An unstable power source can cause interruptions.
- Vėdinimas: Check that the unit has adequate ventilation and is not overheating. Ensure vents are not blocked.
- Firmware: Check the AVMATRIX website for any available firmware updates that may address stability issues.
- Atstatyti: Power cycle the device by turning it off, waiting 10 seconds, and then turning it back on.
5.4 Keliview Not Displaying All Inputs
- Keliview Išvesties jungtis: Ensure the monitor is correctly connected to the 'MULTIVIEW OUT' port.
- Įvesties signalai: Confirm that all connected input sources are active and sending valid video signals.
6. Specifikacijos
| Funkcija | Specifikacija |
|---|---|
| Vaizdo įrašų įėjimai | 4x 3G/HD/SD-SDI, 2x HDMI |
| SDI vaizdo sparta | Automatinis aptikimas, SD/HD/3G-SDI |
| SDI atitiktis | SMPTE 259M/ SMPTE 292M/ SMPTE 424M |
| PGM išėjimai | 2x 3G/HD/SD-SDI; 1x HDMI Type A |
| PGM išvesties formatas | 1080p 60/50/30/25/24; 1080i 50/60 |
| Keliview Išvestis | 1x 3G-SDI; 1x HDMI Type A |
| Keliview Išvesties formatas | 1080p 60 m |
| Garso įvestis | 1x 3.5mm Stereo audio; 1x RCA (L/R) |
| Garso išvestis | 1x 3.5mm Stereo audio; 1x RCA (L/R) |
| GPIO | Tally, DB-15x1 |
| LAN | RJ45, Synchronize local time |
| Darbinė temperatūra | -20 iki 60°C |
| Laikymo temperatūra | -30 iki 70°C |
| Veikimas Drėgmė | 20% ~ 70% RH |
| Energijos suvartojimas | ≤ 14.5W |
| Maitinimo šaltinis | DC 12V, 2A |
| Matmenys | 6.78 colio x 2.17 colio x 9.81 colio (17.22 x 5.51 x 24.92 cm) |
| Svoris | 2.2 svarai (1 kg) |
7. Informacija apie garantiją
Specific warranty terms and conditions for the AVMATRIX VS0601 may vary by region and reseller. Please refer to the warranty card included with your product or contact your point of purchase for detailed information regarding warranty coverage, duration, and service procedures. Keep your proof of purchase for warranty claims.
8. Parama
For technical assistance, troubleshooting beyond this manual, or service inquiries, please contact AVMATRIX customer support or your authorized reseller. You may also visit the official AVMATRIX website for additional resources, FAQs, and firmware updates.
Internetiniai ištekliai:
- AVMATRIX Official Websvetainė: www.avmatrix.net (Atkreipkite dėmesį: tai yra vietos rezervavimo ženklas URL, patikrinkite tikrąjį oficialų website for AVMATRIX)