Įvadas
Thank you for choosing the LifePlus Commercial Ice Maker Machine. This manual provides essential information for the safe and efficient operation, installation, and maintenance of your ice maker. Please read it thoroughly before first use and keep it for future reference.
Svarbi pastaba:
- Before first use, clean the ice machine and keep it in an upright position for 24 hours.
- Allow 30 minutes for the compressor to pre-cool after selecting the ice size for the first time.
- This ice maker is not a refrigerator. If you produce a large quantity of ice cubes and do not use them immediately, transfer them to an ice pack and store them in a refrigerator.
- This ice maker requires a drain. Ensure you have a suitable drainage solution (e.g., a floor drain or a water tank) to collect melted ice water.
- If embedding the ice maker in a cabinet, leave at least 5 inches of space around the unit for proper heat dissipation.
Saugos instrukcijos
Norėdami užtikrinti saugų darbą ir išvengti sužalojimų ar žalos, laikykitės šių saugos nurodymų:
- Ledo gaminimo aparatą visada statykite ant stabilaus, lygaus paviršiaus.
- Neužblokuokite prietaiso ventiliacijos angų.
- Įsitikinkite, kad maitinimo laidas nėra pažeistas arba suspaustas.
- Nenaudokite prietaiso šlapiomis rankomis.
- Veikiant ledo gaminimo aparatui, laikykite vaikus atokiau nuo jo.
- Ledo gamybai naudokite tik geriamąjį vandenį.
- Prieš valydami ar atlikdami bet kokią techninę priežiūrą, atjunkite prietaisą nuo elektros tinklo.
- Nebandykite patys taisyti ar modifikuoti prietaiso. Kreipkitės į kvalifikuotus techninės priežiūros darbuotojus.
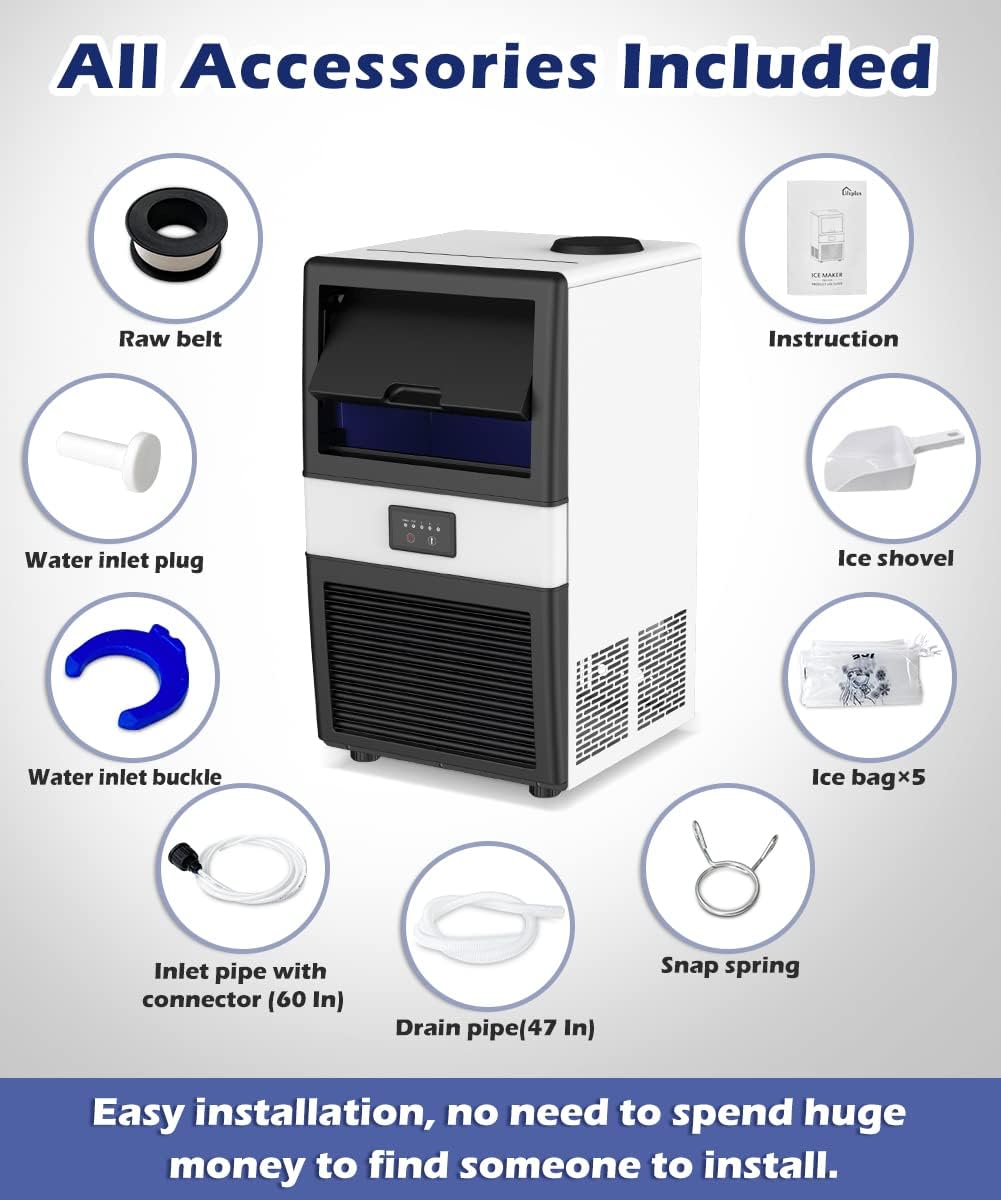
Pakuotės turinys
Your LifePlus Commercial Ice Maker Machine package includes the following items:
- LifePlus Commercial Ice Maker Machine
- Ledo samtelis
- Water Supply Hose with Faucet Connector
- Išleidimo žarna
- Raw Belt
- Vandens įleidimo kamštis
- Water Inlet Buckle
- Snap Spring
- Instrukcijų vadovas (šis dokumentas)
Specifikacijos
| Funkcija | Specifikacija |
|---|---|
| Prekės ženklas | LifePlus |
| Modelio pavadinimas | Ice Maker Machine Under Counter Produce 70LBS (DBJ-32A) |
| Gaminio matmenys | 13.78 "D x 14.09" P x 24.8" A |
| Ledo dėžės talpa | 10 LBS (0.22 Cubic Feet) |
| Ice Production (24 Hrs) | 70 Lt |
| Ledo gamyba (per ciklą) | 32 vnt |
| Ciklo laikas | 11-20 minučių |
| Vattage | 280 vatų |
| ttage | 110 voltų |
| Šaldymo agentas | R134a |
| Medžiaga | Metalas |
| Prekės svoris | 50.3 svaro |

Sąranka ir diegimas
Proper setup is crucial for the optimal performance of your ice maker. Follow these steps carefully:
1. Išpakavimas ir įdėjimas
- Pašalinkite visas pakavimo medžiagas.
- Place the ice maker on a firm, level surface.
- Ensure there is at least 5 inches of clearance around the unit for proper ventilation.
- Allow the unit to stand upright for 24 hours before plugging it in.
2. Vandens pajungimas
Your ice maker supports two water inlet modes: bucket water supply or direct tap water supply. Both methods require a drain hose connection.
Išleidimo žarnos prijungimas
Regardless of the water inlet method chosen, the drain hose must be connected to manage melted ice water. The ice maker uses gravity drainage, so ensure the drain hose is positioned below the drain outlet of the machine and leads to a suitable container or floor drain.

Option A: Bucket Water Supply
- Open the top cover of the ice maker.
- Locate the blue valve inside the water tank. Ensure the handle of the blue valve is perpendicular to the black door (this sets it to bucket water intake mode).
- Place a water bucket (e.g., a 5-gallon water jug) onto the designated area on top of the ice maker.

Option B: Tap Water Supply
- Open the top cover of the ice maker.
- Locate the blue valve inside the water tank. Ensure the handle of the blue valve is parallel to the black door (this sets it to tap water intake mode).
- Connect the provided water supply hose to the 'Water Inlet' port at the back of the machine. Secure it with the blue buckle.
- Connect the other end of the water supply hose to your tap water source. Use sealing tape to ensure a tight, leak-free connection.

Video: How to Install and Remove the Inlet Water Hose
Video 1: This video demonstrates the correct procedure for installing and removing the water inlet hose for the LifePlus ice maker.
3. Maitinimo prijungimas
- After connecting the water supply and drain, plug the ice maker into a grounded electrical outlet.
- Ensure the ice maker has been standing upright for at least 24 hours before plugging it in for the first time.
Naudojimo instrukcijos
The LifePlus ice maker features an intuitive LED control panel for easy operation.

1. Initial Power On and Water Intake
- Paspauskite maitinimo mygtuką (red circle) įjungti įrenginį.
- The indicator lights will briefly illuminate.
- The red 'Water' light will go on, and the green thickness light will twinkle as the machine begins to take in water.
- Wait for the water intake to complete and the red 'Water' light to turn off.
2. Ledo kubelio storio reguliavimas
You can select from three ice cube thickness settings: Small (S), Medium (M), or Large (L).
- Press the arrow button (rodyklė aukštyn) to cycle through the thickness options. The corresponding light (S, M, or L) will illuminate.
- The machine will start pre-cooling for 3-30 minutes after a thickness is selected.


3. Ledo gaminimo procesas
- Once pre-cooling is complete, the ice maker will automatically begin producing ice.
- Each cycle produces 32 clear ice cubes within 11-20 minutes.
- The 'Ice Full' indicator light will illuminate when the ice bin is full, and the machine will automatically stop ice production.

4. Harvesting Ice Cubes
- When ice cubes fall into the bin, they may stick together, especially if a thicker setting is used.
- Use the provided ice shovel to separate the ice cubes. This also allows the ice bin to hold more ice.

Video: LifePlus Commercial Ice Maker Operation
Video 2: This video demonstrates the overall operation of the LifePlus Commercial Ice Maker, including water connection, power-on sequence, ice thickness adjustment, and ice harvesting.
Priežiūra
Regular cleaning and maintenance will prolong the life of your ice maker and ensure hygienic ice production.
1. Automatic Self-Cleaning Function
- In the off state, press and hold the arrow button (rodyklė aukštyn) 5 sekundes.
- The machine will initiate a self-cleaning cycle, circulating water to clean internal components.
- After cleaning, pull out the sewage outlet plug at the back of the machine to empty the dirty water.

2. Bendras valymas
- Atjunkite ledo gaminimo aparatą nuo elektros lizdo.
- Remove the ice bin and clean it with mild soap and warm water. Rinse thoroughly.
- Wipe down the interior and exterior surfaces of the machine with a soft cloth and mild detergent.
- Ensure all parts are completely dry before reassembling and operating the machine.
Trikčių šalinimas
If you encounter issues with your LifePlus ice maker, refer to the table below for common problems and solutions.
| Problema | Galima priežastis | Sprendimas |
|---|---|---|
| Ledo gaminimo aparatas negamina ledo | No water supply; Water valve incorrect; Power issue; Compressor not pre-cooled. | Check water connection/bucket; Ensure water inlet valve is set correctly; Verify power connection; Allow 30 minutes for pre-cooling after first use or ice size change. |
| 'Water' indicator light is on | Vandens krantastage. | Refill water bucket or check tap water supply. |
| 'Ice Full' indicator light is on | Ledo dėžė pilna. | Pašalinkite ledą iš šiukšliadėžės. |
| Ledo kubeliai suklijuoti kartu | Ice thickness setting too high; Ice not separated after falling. | Use the ice shovel to separate cubes; Consider a thinner ice setting (S or M). |
| Vandens nutekėjimas | Loose connections; Improper drain setup. | Check all hose connections for tightness; Ensure drain hose is correctly positioned for gravity drainage. |
Garantija ir palaikymas
For warranty information, technical support, or any questions not covered in this manual, please contact LifePlus customer service. Refer to your purchase documentation for specific warranty terms and contact details.
You can also visit the official LifePlus store on Amazon for more information: LifePlus Store