Įvadas
This manual provides detailed instructions for the ZEXMTE 6-in-1 USB C Hub with M.2 SATA SSD Enclosure. This versatile docking station expands the connectivity of your USB-C enabled devices, offering multiple ports for data transfer, video output, network connection, power delivery, and integrated M.2 SATA SSD storage.
Produkto savybės
The ZEXMTE 6-in-1 USB C Hub integrates the following functionalities:
- M.2 SATA NGFF SSD Enclosure: Supports B-Key and B+M Key SATA-based M.2 SSDs (2230, 2242, 2260, 2280 sizes) with USB 3.1 Gen 1 (5Gbps) speeds.
- HDMI išvestis: Supports up to 4K resolution at 30Hz for external displays.
- USB-C maitinimo tiekimas (PD): Up to 100W for charging your host device.
- 3 USB 3.0 prievadai: SuperSpeed 5Gbps data transfer for peripherals like thumb drives, keyboards, mice, and external hard drives.
- „Gigabit Ethernet“: Provides stable and fast 10/100/1000Mbps wired network connection.

1 pav. Baigtaview of the ZEXMTE 6-in-1 USB C Hub, highlighting its HDMI, USB 3.0, USB-C PD, Ethernet, and M.2 SSD Enclosure features.
Specifikacijos
| Funkcija | Specifikacija |
|---|---|
| Gaminio matmenys | 5.91 x 3.15 x 0.39 colio |
| Prekės svoris | 3.98 uncijos |
| Techninės įrangos sąsaja | Ethernet, HDMI, USB, USB Type C |
| Iš viso USB prievadų | 6 (3 x USB 3.0, 1 x USB-C PD, 1 x USB-C Host, 1 x M.2 SATA) |
| HDMI raiška | Iki 4K@30Hz |
| USB 3.0 duomenų perdavimo greitis | Iki 5Gbps |
| Ethernet greitis | 10/100/1000 Mbps |
| USB-C PD įvestis | Iki 100W |
| M.2 SSD Compatibility | SATA-based NGFF M.2 SSD (B-Key / B+M Key) only. Sizes: 2230, 2242, 2260, 2280. |
Sąrankos vadovas
1. M.2 SATA SSD Installation
The hub features an integrated M.2 SATA SSD enclosure. Follow these steps to install your compatible M.2 SATA SSD:
- Check SSD Compatibility: Ensure your M.2 SSD is SATA-based (B-Key or B+M Key). NVMe (M-Key) SSDs are ne supported. Refer to Figure 2 for visual guidance.
- Atidarykite korpusą: Gently press the back cover of the hub and slide it back to open the M.2 enclosure.
- Įdėkite SSD diską: Align the M.2 SATA SSD with the slot inside the enclosure and insert it firmly.
- Saugus SSD diskas: Align the circular notch on the SSD with the fastener and press the fastener down to secure the SSD in place.
- Uždaryti priedą: Align the three slots on the cover with the hub and press down to close the enclosure securely.

Figure 2: M.2 SSD compatibility. Only SATA-based (B-Key or B+M Key) M.2 SSDs are supported. NVMe (M-Key) SSDs are not compatible.
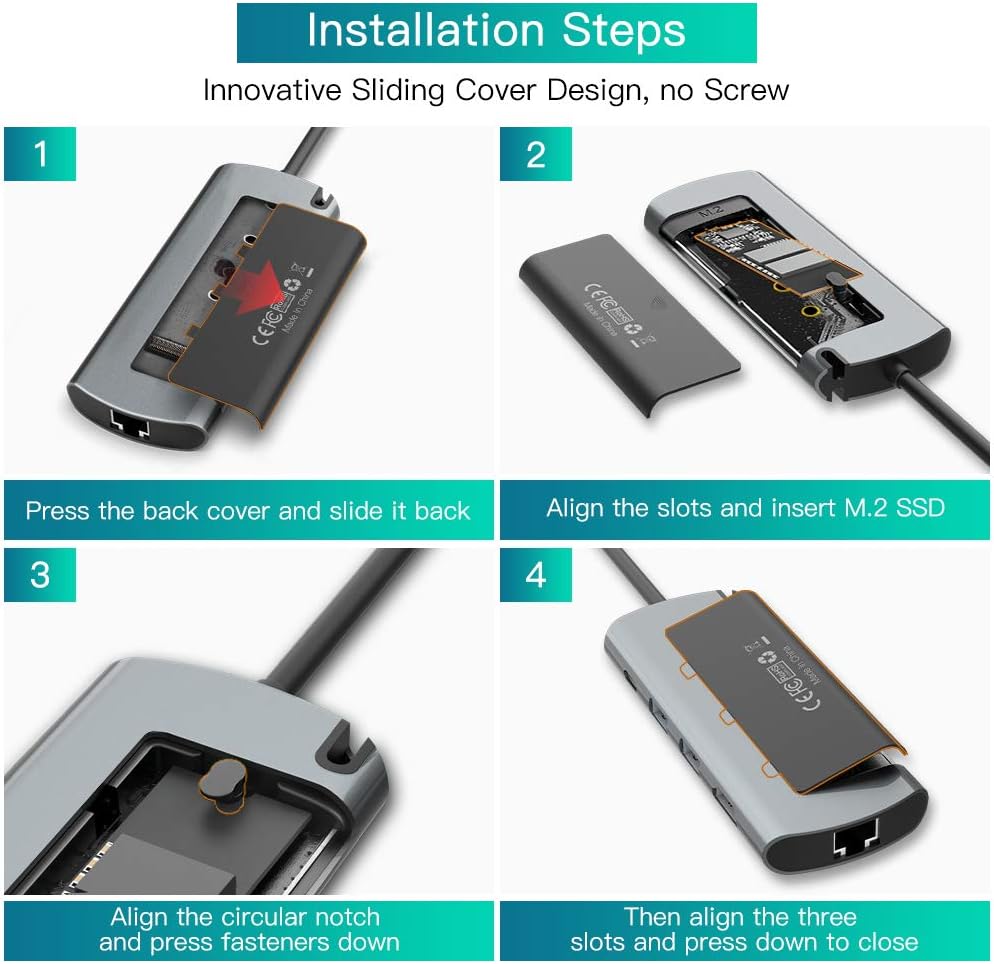
Figure 3: Step-by-step guide for installing an M.2 SATA SSD into the enclosure. Ensure proper alignment and secure fastening.
2. Connecting the Hub to Your Device
Connect the integrated USB-C cable of the ZEXMTE hub to a USB-C port on your host device (e.g., laptop, tablet, smartphone). The hub is plug-and-play and typically requires no additional drivers.
Naudojimo instrukcijos
1. USB 3.0 prievadų naudojimas
The hub provides three USB 3.0 ports for connecting various USB peripherals. These ports support data transfer speeds up to 5Gbps.
- Connect USB devices such as external hard drives, USB flash drives, keyboards, mice, or printers to any of the three USB 3.0 ports.
- Ensure your device drivers are up-to-date for optimal performance.

Figure 4: Illustration of USB 3.0 ports supporting SuperSpeed data transfer for various peripherals.
2. HDMI vaizdo išvestis
Connect an HDMI cable from the hub's HDMI port to an external display (monitor, TV, projector) to extend or mirror your device's screen.
- Supports resolutions up to 4K (3840x2160) at 30Hz.
- Ensure your host device's USB-C port supports DisplayPort Alternate Mode (Alt Mode) for video output.
- Adjust display settings on your host device as needed (e.g., extend, duplicate, resolution).

Figure 5: Connecting the hub to a 4K display via HDMI for clear video output.
3. Gigabito eterneto ryšys
For a stable and high-speed internet connection, use the Gigabit Ethernet port.
- Connect an Ethernet cable from your router or modem to the hub's RJ45 port.
- The hub supports 10/100/1000Mbps network speeds.
- Your host device should automatically detect the wired connection.

Figure 6: The Gigabit Ethernet port provides a fast and stable wired network connection.
4. USB-C Power Delivery (PD)
The USB-C PD port allows you to charge your host device while using the hub.
- Connect your original USB-C power adapter to the hub's USB-C PD port.
- The hub supports up to 100W power input, delivering power to your host device and connected peripherals.
Trikčių šalinimas
- Nėra vaizdo išvesties per HDMI:
- Įsitikinkite, kad jūsų pagrindinio įrenginio USB-C prievadas palaiko „DisplayPort Alternate Mode“.
- Išbandykite kitą HDMI kabelį arba monitorių.
- Check display settings on your host device.
- Ensure the hub is receiving sufficient power, especially if multiple devices are connected.
- M.2 SSD Not Recognized or Disconnecting:
- Verify that your M.2 SSD is SATA-based (B-Key or B+M Key), not NVMe (M-Key).
- Ensure the SSD is correctly installed and secured within the enclosure (refer to Setup Guide).
- Check if the SSD is properly formatted for your operating system.
- Ensure the hub is connected directly to your host device's USB-C port.
- If using a high-power SSD, ensure the hub is connected to a power source via the PD port.
- USB įrenginiai neveikia:
- Pabandykite prijungti USB įrenginį tiesiai prie pagrindinio įrenginio, kad įsitikintumėte, jog jis veikia.
- Įsitikinkite, kad šakotuvas yra tvirtai prijungtas prie pagrindinio įrenginio.
- If multiple high-power USB devices are connected, ensure the hub is receiving power via the PD port.
- Perkaitimas:
- It is normal for the hub to generate some heat during operation, especially when the M.2 SSD is actively reading/writing large files or when multiple ports are in use.
- If the hub becomes excessively hot, disconnect it and allow it to cool down. Reduce the number of connected high-power devices or ensure adequate ventilation.
- Ethernet ryšio problemos:
- Patikrinkite Ethernet kabelio jungtį tiek su šakotuvu, tiek su maršrutizatoriumi / modemu.
- Verify that your network settings on the host device are configured correctly.
- Išbandykite kitą Ethernet kabelį.
Priežiūra
- Stebulę palaikykite švarią, nuvalydami ją minkšta, sausa šluoste.
- Saugokite šakotį nuo ekstremalių temperatūrų, drėgmės ar tiesioginių saulės spindulių.
- Do not attempt to disassemble or repair the hub yourself, as this will void the warranty.
- Store the hub in a safe place when not in use to prevent damage.
Garantija ir palaikymas
ZEXMTE products are designed for reliability and performance. For warranty information or technical support, please refer to the product packaging or contact ZEXMTE customer service through their official channels. Keep your purchase receipt for warranty claims.