
Įvadas
This manual provides detailed instructions for the setup, operation, and maintenance of your groov e Atlas Radio Alarm Clock with Wireless Charger. Please read this manual thoroughly before using the device to ensure proper function and to maximize your user experience. Keep this manual for future reference.
Pakuotės turinys
Patikrinkite, ar pakuotėje yra visi reikalingi daiktai:
- groov e Atlas Radio Alarm Clock
- Maitinimo adapteris
- Vartotojo vadovas
Produkto savybės
- Belaidis įkrovimas (5 W): Conveniently charge compatible smartphones by placing them on the top surface.
- FM radijas: Įsijunkite mėgstamiausias FM stotis.
- Skystųjų kristalų ekranas: Clear digital time display.
- Maitinimas iš tinklo: Reliable power supply for continuous operation.
- USB įkrovimo stotis: Additional USB port for charging other devices.
- Dvigubas aliarmas: Nustatykite du nepriklausomus žadintuvus skirtingam žadinimo laikui.
- Ekrano reguliatorius: Sureguliuokite LED ekrano ryškumą.
Sąranka
- Prijunkite maitinimą: Insert the power adapter into the 'DC IN' port on the back of the alarm clock, then plug the adapter into a wall outlet. The display will light up.
- Nustatyti laiką:
- Press and hold the 'TIME SET' button located on the back of the unit.
- Use the 'TUN-' or 'TUN+' buttons on the top panel to adjust the hour.
- Press 'TIME SET' again to confirm the hour and move to minutes.
- Use 'TUN-' or 'TUN+' to adjust the minutes.
- Press 'TIME SET' once more to confirm and exit time setting.
- To switch between 12-hour and 24-hour format, press the '12/24H' button on the back.

Vaizdas: Galinis view of the groov e Atlas alarm clock, highlighting the DC IN power input and the USB charging port. The '12/24H TIME SET' and 'SLEEP' buttons are also visible.
Naudojimo instrukcijos
Setting Alarms (ALM1 / ALM2)
- Press the 'ALM1' or 'ALM2' button to select the alarm you wish to set. The alarm icon will flash on the display.
- Use the 'TUN-' or 'TUN+' buttons to adjust the alarm hour.
- Press the 'ALM1' or 'ALM2' button again to confirm the hour and move to minutes.
- Use 'TUN-' or 'TUN+' to adjust the alarm minutes.
- Press the 'ALM1' or 'ALM2' button a third time to confirm the alarm time. The alarm icon will remain lit, indicating the alarm is active.
- To deactivate an alarm, press the corresponding 'ALM1' or 'ALM2' button until the alarm icon disappears from the display.
FM radijo veikimas
- Įjungti/išjungti: Press the 'ON/OFF' button to turn the radio on or off.
- Automatinis nuskaitymas: Paspauskite mygtuką „SCAN“, kad automatiškai nuskaitytumėte ir išsaugotumėte galimas FM stotis.
- Rankinis derinimas: Use the 'TUN-' or 'TUN+' buttons to manually adjust the frequency. Press and hold for faster tuning.
- Iš anksto nustatytos stotys: Use 'MEM-' or 'MEM+' to cycle through saved preset stations.
- Reguliuoti garsumą: Use the 'VOL-' or 'VOL+' buttons to control the radio volume.
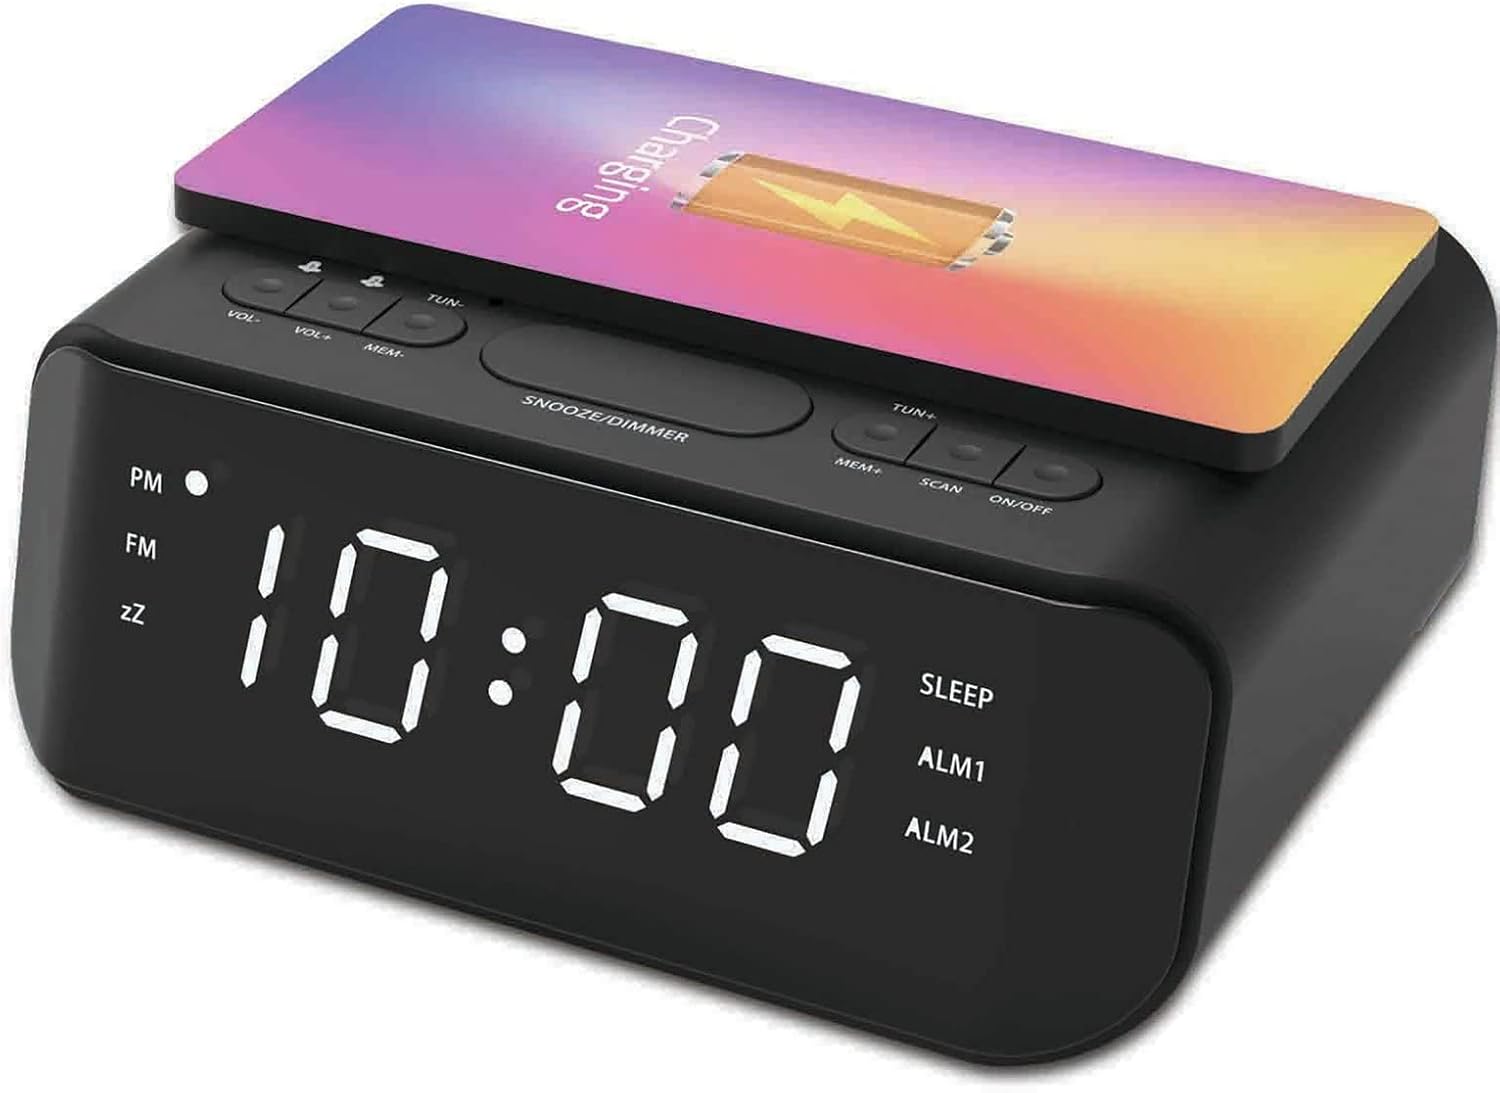
Vaizdas: Viršus view of the groov e Atlas alarm clock, illustrating the layout of the control buttons for volume, tuning, memory, scan, and power.
Belaidis įkrovimas
- Ensure your smartphone is compatible with 5W Qi wireless charging.
- Place your compatible smartphone centrally on the wireless charging pad located on the top surface of the alarm clock.
- The phone's display should indicate that charging has begun. If not, adjust the phone's position.

Image: A smartphone placed on the groov e Atlas alarm clock's top surface, showing the charging indicator on the phone's screen, confirming wireless charging is active.
USB įkrovimas
- Connect a USB charging cable (not included) to the USB port on the back of the alarm clock.
- Prijunkite kitą kabelio galą prie savo prietaiso.
- Jūsų įrenginys pradės krauti.
Ekrano reguliatorius
Press the 'SNOOZE/DIMMER' button to cycle through different brightness levels for the LED display. This allows you to adjust the display to your preferred visibility, especially in dark environments.
Priežiūra
- Valymas: Use a soft, dry cloth to clean the surface of the alarm clock. Do not use liquid cleaners or abrasive materials.
- Saugykla: Jei prietaisas nenaudojamas ilgą laiką, atjunkite jį nuo elektros tinklo ir laikykite jį vėsioje, sausoje vietoje.
- Sauga: Do not expose the device to water, high humidity, or extreme temperatures. Avoid dropping or subjecting the device to strong impacts.
Trikčių šalinimas
| Problema | Galima priežastis | Sprendimas |
|---|---|---|
| Įrenginys neįsijungia. | Neprijungtas maitinimo adapteris arba sugedęs lizdas. | Įsitikinkite, kad maitinimo adapteris yra tvirtai prijungtas prie įrenginio ir veikiančio sieninio lizdo. Išbandykite kitą lizdą. |
| Belaidis įkrovimas neveikia. | Phone not Qi-compatible or not positioned correctly. | Verify your phone supports Qi wireless charging. Reposition the phone centrally on the charging pad. Remove any thick phone cases. |
| Signalizacija neskamba. | Žadintuvas neįjungtas arba garsumas per mažas. | Check if the alarm icon is lit on the display. Increase the alarm volume using the 'VOL+' button. |
| Radijo priėmimas prastas. | Silpnas signalas arba antenos padėtis. | Extend and adjust the position of the FM antenna wire on the back of the unit for better reception. |
Specifikacijos
- Modelio numeris: GVWC06BK
- Prekinis ženklas: groov e
- Spalva: Juoda
- Ekrano tipas: Skaitmeninis LED
- Maitinimo šaltinis: Mains Powered (AC Adapter included)
- Belaidis įkrovimo išėjimas: 5W
- USB įkrovimo išvestis: 5V/1A
- Signalizacijos funkcijos: Dual Alarm, Snooze
- Radijas: FM
- Medžiaga: Akrilnitrilo butadieno stirenas (ABS)
- Forma: Stačiakampis
- Montavimo tipas: Stalo laikiklis
- Judėjimo tipas: Kvarcas
- Baterijos: Not included (requires 1 battery for backup, type not specified in data)
Garantija ir palaikymas
Your groov e Atlas Radio Alarm Clock GVWC06BK comes with a standard manufacturer's warranty. Please refer to the warranty card included in your package for specific terms and conditions, including the warranty period and coverage details.
For technical support, troubleshooting assistance, or warranty claims, please contact groov e customer service through their official websvetainėje arba kontaktinę informaciją, pateiktą jūsų garantijos kortelėje.
Prašome išsaugoti pirkimo įrodymą, jei kiltų su garantija susijusių klausimų.