
Sorand AC 230V Floor Heating Thermostat
Sorand AC 230V Digital Programmable Floor Heating Thermostat User Manual
Model: AC 230V Floor Heating Thermostat
Įvadas
This manual provides comprehensive instructions for the installation, operation, and maintenance of your Sorand AC 230V Digital Programmable Floor Heating Thermostat. Please read this manual carefully before installation and use to ensure proper function and safety.
The thermostat is designed for electronic floor heating systems and other electrical heating elements. It features a large LCD with backlight, programmable temperature settings, and internal/external temperature sensing capabilities.
Saugos informacija
- Montavimą turi atlikti kvalifikuotas elektrikas.
- Prieš montuodami arba atlikdami techninę priežiūrą įsitikinkite, kad maitinimas yra atjungtas.
- Saugokite termostatą nuo vandens ar per didelės drėgmės.
- Veikti nurodyto tūrio ribosetage ir srovės ribos.
Pakuotės turinys
Patikrinkite, ar pakuotėje yra visi reikalingi daiktai:
- 1 x Sorand AC 230V Digital Programmable Floor Heating Thermostat
- 1 x External Temperature Sensor Cable (approx. 3 meters)
- 2 x montavimo varžtai
- 1 x Naudotojo vadovas (šis dokumentas)

Image: Contents of the Sorand thermostat package, showing the main unit, external sensor cable, mounting screws, and the instruction manual.
Sąranka ir diegimas
Svarbu: Installation should only be carried out by a qualified electrician. Ensure the main power supply is turned off before commencing any wiring work.
Laidų schema
Refer to the wiring diagram on the back of the thermostat unit for correct connections. The terminals are typically labeled as follows:
- L1, N1: Power input (AC 230V)
- LOAD (1, 2): Connection to the heating element
- NTC (5, 6): Connection for the external floor temperature sensor

Vaizdas: Galinis view of the Sorand thermostat, displaying the wiring terminals and a simplified diagram for electrical connections.
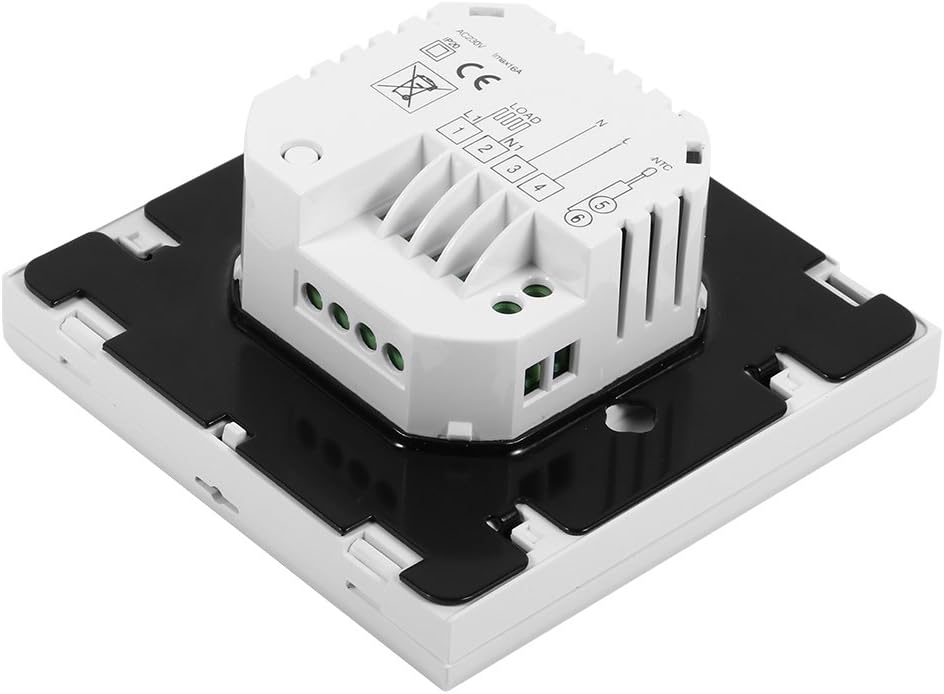
Vaizdas: Šoninė view of the Sorand thermostat, illustrating the internal components and ports for wiring connections.
Montavimas
- Prepare a standard electrical wall box (86x86mm recommended).
- Connect the power supply, heating load, and external sensor wires according to the wiring diagram.
- Carefully push the wired thermostat into the wall box.
- Pritvirtinkite termostatą prie sieninės dėžutės naudodami pateiktus varžtus.
- Attach the front panel of the thermostat.
Naudojimo instrukcijos
The thermostat features a large LCD and touch-sensitive buttons for easy operation.
Mygtukų funkcijos
- ⏻ (Galia): Įjungia / išjungia termostatą.
- ↻ (Mode/Cycle): Switches between manual mode and programmable mode.
- ⏱ (Clock/Time): Sets the time and enters programming mode.
- ▲ (Up Arrow): Increases temperature setting or adjusts values.
- ▼ (Down Arrow): Decreases temperature setting or adjusts values.

Vaizdas: priekis view of the Sorand thermostat, highlighting the LCD screen and the five touch-sensitive control buttons below it.
Laiko ir dienos nustatymas
- Paspauskite ir palaikykite ⏱ mygtuką 3 sekundes, kad įjungtumėte laiko nustatymo režimą.
- Naudokite ▲ ir ▼ mygtukais nustatykite valandas, tada paspauskite ⏱ , kad patvirtintumėte ir pereitumėte prie minučių, tada – prie savaitės dienos.
- Paspauskite ⏱ again to exit, or wait for 10 seconds for automatic exit.
Rankinio režimo veikimas
In manual mode, the thermostat maintains a constant temperature set by the user.
- Paspauskite ↻ button to switch to manual mode (indicated by a hand icon or similar on the display).
- Naudokite ▲ ir ▼ mygtukus norimai temperatūrai nustatyti.
- The thermostat will now maintain this temperature.
Programmable Mode Operation (6 Periods)
The thermostat allows for 6 programmable periods per day, enabling different temperature settings at different times.
- Paspauskite ↻ button to switch to programmable mode (indicated by a clock icon or similar).
- Paspauskite ir palaikykite ⏱ button for 3 seconds to enter programming mode.
- The display will show the first period (e.g., "Period 1"). Use ▲ ir ▼ to set the start time and desired temperature for this period.
- Paspauskite ⏱ to move to the next period and repeat the process for all 6 periods.
- After setting all periods, press ⏱ again or wait for automatic exit to save settings.
Termostatas automatiškai laikysis užprogramuoto grafiko.
Sensor Selection (Internal/External)
The thermostat can use its internal sensor or the external floor sensor. The selection method is typically found in advanced settings or by a specific button combination. Refer to the on-screen indicators for the active sensor.
Priežiūra
- Nuvalykite termostato ekraną irasinminkštu, sausu skudurėliu. Nenaudokite abrazyvinių valiklių ar tirpiklių.
- Ensure the thermostat is free from dust and debris to maintain optimal performance.
- No user-serviceable parts inside. Do not attempt to open or repair the unit.
Trikčių šalinimas
| Problema | Galima priežastis | Sprendimas |
|---|---|---|
| Termostatas neįsijungia. | Nėra maitinimo šaltinio; neteisingas laidų išvedžiojimas. | Check circuit breaker. Verify wiring connections (consult a qualified electrician). |
| Šildymas neįsijungia/neišsijungia. | Incorrect temperature setting; thermostat in OFF mode; wiring issue. | Adjust set temperature. Ensure thermostat is ON. Check heating element wiring. |
| Netikslus temperatūros rodmuo. | Sensor malfunction; incorrect sensor selected. | Verify sensor connection. Check if internal or external sensor is active. |
| Ekranas tuščias arba mirga. | Power fluctuation; internal fault. | Reset power to the thermostat. If issue persists, contact support. |
Specifikacijos
| Funkcija | Detalė |
|---|---|
| Prekės ženklas | Sorand |
| Modelis | AC 230V Floor Heating Thermostat |
| Darbo ttage | AC 230V, 50/60Hz |
| Apkrovos srovė | 12/16A (Electric Heating) |
| Tikslumas | ±0.5 ℃ |
| Set-point Temperature Range | 5 ℃ - 35 ℃ |
| Ribinis temperatūros diapazonas | 5 ℃ - 99 ℃ |
| Energijos suvartojimas | <0.3W |
| Temperatūros jutiklis | NTC (Internal and External) |
| Surface Size | Apytiksliai 86 x 86 x 40 mm (3.4 x 3.4 x 1.6 colio) |
| External Sensor Cable Length | Maždaug 3 metrų (9.8 pėdų) |
| Medžiaga | PC+ABS |
| Ekrano tipas | Skaitmeninis LCD su foniniu apšvietimu |
| Kontrolės metodas | Jutiklinės dalies valdymas |
Garantija ir palaikymas
This product is covered by the manufacturer's standard warranty. Please refer to the product packaging or your point of purchase for specific warranty terms and conditions.
Dėl techninės pagalbos, trikčių šalinimo ar garantinių pretenzijų kreipkitės tiesiogiai į pardavėją arba gamintoją. Išsaugokite pirkimo kvitą kaip pirkimo įrodymą.
Ask a question about this manual
Ask about setup, troubleshooting, compatibility, parts, safety, or missing instructions. Manuals+ will review the question and use this page’s manual context to help answer it.